Quantcast
Channel: R-bloggers » Search Results » anova
Viewing all 174 articles
Browse latest View live

Interpreting regression coefficient in R

$
0
0

(This article was first published on biologyforfun » R, and kindly contributed to R-bloggers)

Linear models are a very simple statistical techniques and is often (if not always) a useful start for more complex analysis. It is however not so straightforward to understand what the regression coefficient means even in the most simple case when there are no interactions in the model. If we are not only fishing for stars (ie only interested if a coefficient is different for 0 or not) we can get much more information (to my mind) from these regression coefficient than from another widely used technique which is ANOVA. Comparing the respective benefit and drawbacks of both approaches is beyond the scope of this post. Here I would like to explain what each regression coefficient means in a linear model and how we can improve their interpretability following part of the discussion in Schielzeth (2010) Methods in Ecology and Evolution paper.

Let’s make an hypothetical example that will follow us through the post, say that we collected 10 grams of soils at 100 sampling sites, where half of the site were fertilized with Nitrogen and the other half was kept as control. We also used recorded measure of mean spring temperature and annual precipitation from neighboring meteorological stations. We are interested to know how temperature and precipitation affect the biomass of soil micro-organisms, and to look at the effect of nitrogen addition. To keep things simple we do not expect any interaction here.

# let's simulate the data the explanatory variables: temperature (x1),
# precipitation (x2) and the treatment (1=Control, 2= N addition)
set.seed(1)
x1 <- rnorm(100, 10, 2)
x2 <- rnorm(100, 100, 10)
x3 <- gl(n = 2, k = 50)
modmat <- model.matrix(~x1 + x2 + x3, data = data.frame(x1, x2, x3))
# vector of fixed effect
betas <- c(10, 2, 0.2, 3)
# generate data
y <- rnorm(n = 100, mean = modmat %*% betas, sd = 1)
# first model
m <- lm(y ~ x1 + x2 + x3)
summary(m)
## 
## Call:
## lm(formula = y ~ x1 + x2 + x3)
## 
## Residuals:
##     Min      1Q  Median      3Q     Max 
## -2.8805 -0.4948  0.0359  0.7103  2.6669 
## 
## Coefficients:
##             Estimate Std. Error t value Pr(>|t|)    
## (Intercept)  10.4757     1.2522    8.37  4.8e-13 ***
## x1            2.0102     0.0586   34.33  < 2e-16 ***
## x2            0.1938     0.0111   17.52  < 2e-16 ***
## x32           3.1359     0.2109   14.87  < 2e-16 ***
## ---
## Signif. codes:  0 '***' 0.001 '**' 0.01 '*' 0.05 '.' 0.1 ' ' 1
## 
## Residual standard error: 1.05 on 96 degrees of freedom
## Multiple R-squared:  0.949,  Adjusted R-squared:  0.947 
## F-statistic:  596 on 3 and 96 DF,  p-value: <2e-16

Let’s go through each coefficient: the intercept is the fitted biomass value when temperature and precipitation are both equal to 0 for the Control units. In this context it is relatively meaningless since a site with a precipitation of 0mm is unlikely to occur, we cannot therefore draw further interpretation from this coefficient. Then x1 means that if we hold x2 (precipitation) constant an increase in 1° of temperature lead to an increase of 2mg of soil biomass, this is irrespective of whether we are in the control or nutrient added unit. Similarly x2 means that if we hold x1 (temperature) constant a 1mm increase in precipitation lead to an increase of 0.19mg of soil biomass. Finally x32 is the difference between the control and the nutrient added group when all the other variables are held constant, so if we are at a temperature of 10° and a precipitation of 100mm, adding nutrient to the soil lead to changes from 10+2x10+0.19x100= 49mg to 52mg of soil biomass. Now let’s make a figure of the effect of temperature on soil biomass

plot(y ~ x1, col = rep(c("red", "blue"), each = 50), pch = 16, xlab = "Temperature [°C]", 
    ylab = "Soil biomass [mg]")
abline(a = coef(m)[1], b = coef(m)[2], lty = 2, lwd = 2, col = "red")
Coeff1

What happened there? It seems as if our model is completely underestimating the y values … Well what we have been drawing is the estimated effect of temperature on soil biomass for the control group and for a precipitation of 0mm, this is not so interesting, instead we might be more interested to look at the effect for average precipitation values:

plot(y ~ x1, col = rep(c("red", "blue"), each = 50), pch = 16, xlab = "Temperature [°C]", 
    ylab = "Soil biomass [mg]")
abline(a = coef(m)[1] + coef(m)[3] * mean(x2), b = coef(m)[2], lty = 2, lwd = 2, 
    col = "red")
abline(a = coef(m)[1] + coef(m)[4] + coef(m)[3] * mean(x2), b = coef(m)[2], 
    lty = 2, lwd = 2, col = "blue")
# averaging effect of the factor variable
abline(a = coef(m)[1] + mean(c(0, coef(m)[4])) + coef(m)[3] * mean(x2), b = coef(m)[2], 
    lty = 1, lwd = 2)
legend("topleft", legend = c("Control", "N addition"), col = c("red", "blue"), 
    pch = 16)
Coeff2

Now this look better, the black line is the effect of temperature on soil biomass averaging out the effect of the treatment, it might be of interest if we are only interested in looking at temperature effects.

In this model the intercept did not make much sense, a way to remedy this is to center the explanatory variables, ie removing the mean value from the variables.

# now center the continuous variable to change interpretation of the
# intercept
data_center <- data.frame(x1 = x1 - mean(x1), x2 = x2 - mean(x2), x3 = x3)
modmat <- model.matrix(~x1 + x2 + x3, data = data.frame(x1 = x1, x2 = x2, x3 = x3))
data_center$y_center <- rnorm(n = 100, mean = modmat %*% betas, sd = 1)

# second model
m_center <- lm(y_center ~ x1 + x2 + x3, data_center)
summary(m_center)
## 
## Call:
## lm(formula = y_center ~ x1 + x2 + x3, data = data_center)
## 
## Residuals:
##     Min      1Q  Median      3Q     Max 
## -2.4700 -0.5525 -0.0287  0.6701  1.7920 
## 
## Coefficients:
##             Estimate Std. Error t value Pr(>|t|)    
## (Intercept)  50.4627     0.1423   354.6   <2e-16 ***
## x1            1.9724     0.0561    35.2   <2e-16 ***
## x2            0.1946     0.0106    18.4   <2e-16 ***
## x32           2.8976     0.2020    14.3   <2e-16 ***
## ---
## Signif. codes:  0 '***' 0.001 '**' 0.01 '*' 0.05 '.' 0.1 ' ' 1
## 
## Residual standard error: 1 on 96 degrees of freedom
## Multiple R-squared:  0.951,  Adjusted R-squared:  0.949 
## F-statistic:  620 on 3 and 96 DF,  p-value: <2e-16

Now through this centering we know that under average temperature and precipitation conditions the soil biomass in the control plot is equal to 50.25mg, in the nitrogen enriched plot we have 53mg of soil biomass. The slopes are not changing we are just shifting where the intercept lie making it directly interpretable. Let’s do a plot

plot(y_center ~ x2, data_center, col = rep(c("red", "blue"), each = 50), pch = 16, 
    xlab = "Precipitation [mm]", ylab = "Biomass [mg]")
abline(a = coef(m_center)[1], b = coef(m_center)[3], lty = 2, lwd = 2, col = "red")
abline(a = coef(m_center)[1] + coef(m_center)[4], b = coef(m_center)[3], lty = 2, 
    lwd = 2, col = "blue")
# averaging effect of the factor variable
abline(a = coef(m_center)[1] + mean(c(0, coef(m_center)[4])), b = coef(m_center)[3], 
    lty = 1, lwd = 2)
legend("bottomright", legend = c("Control", "N addition"), col = c("red", "blue"), 
    pch = 16)
Coeff3

We might also be interested in knowing which from the temperature or the precipitation as the biggest impact on the soil biomass, from the raw slopes we cannot get this information as variables with low standard deviation will tend to have bigger regression coefficient and variables with high standard deviation will have low regression coefficient. One solution is to derive standardized slopes that are in unit of standard deviation and therefore directly comparable in terms of their strength between continuous variables:

# now if we want to find out which of the two continuous variables as the
# most importance on y we can compute the standardized slopes from the
# unstandardized ones:
std_slope <- function(model, variable) {
    return(coef(model)[variable] * (sd(m$model[[variable]])/sd(m$model[[1]])))
}

std_slope(m, "x1")
##     x1 
## 0.7912
std_slope(m, "x2")
##     x2 
## 0.4067

From this we can conclude that temperature as a bigger impact on soil biomass than precipitation. If we wanted to compare the continuous variables with the binary variable we could standardize our variables by dividing by two times their standard deviation following Gelman (2008) Statistics in medecine.

Here we saw in a simple linear context how to derive quite a lot of information from our estimated regression coefficient, this understanding can then be apply to more complex models like GLM or GLMM. These models are offering us much more information than just the binary significant/non-significant categorization. Happy coding.


Filed under: R and Stat Tagged: LM, R

To leave a comment for the author, please follow the link and comment on his blog: biologyforfun » R.

R-bloggers.com offers daily e-mail updates about R news and tutorials on topics such as: visualization (ggplot2, Boxplots, maps, animation), programming (RStudio, Sweave, LaTeX, SQL, Eclipse, git, hadoop, Web Scraping) statistics (regression, PCA, time series, trading) and more...

A weird and unintended consequence of Barr et al’s Keep It Maximal paper

$
0
0

(This article was first published on Shravan Vasishth's Slog (Statistics blog), and kindly contributed to R-bloggers)
Barr et al's well-intentioned paper is starting to lead to some seriously weird behavior in psycholinguistics! As a reviewer, I'm seeing submissions where people take the following approach:

1. Try to fit a "maximal" linear mixed model.  If you get a convergence failure (this happens a lot since we routinely run low power studies!), move to step 2.

[Aside:
By the way, the word maximal is ambiguous here, because you can have a "maximal" model with no correlation parameters estimated, or have one with correlations estimated. For a 2x2 design, the difference would look like:

correlations estimated: (1+factor1+factor2+interaction|subject) etc.

no correlations estimated: (factor1+factor2+interaction || subject) etc.

Both options can be considered maximal.]

2. Fit a repeated measures ANOVA. This means that you average over items to get F1 scores in the by-subject ANOVA. But this is cheating and amounts to p-value hacking. This effectively changes the between items variance to 0 because we aggregated over items for each subject in each condition. That is the whole reason why linear mixed models are so important; we can take both between item and between subject variance into account simultaneously. People mistakenly think that the linear mixed model and rmANOVA are exactly identical. If your experiment design calls for crossed varying intercepts and varying slopes (and it always does in psycholinguistics), an rmANOVA is not identical to the LMM, for the reason I give above. In the old days we used to compute minF.  In 2014, I mean, 2015, it makes no sense to do that if you have a tool like lmer.

As always, I'm happy to get comments on this.

To leave a comment for the author, please follow the link and comment on his blog: Shravan Vasishth's Slog (Statistics blog).

R-bloggers.com offers daily e-mail updates about R news and tutorials on topics such as: visualization (ggplot2, Boxplots, maps, animation), programming (RStudio, Sweave, LaTeX, SQL, Eclipse, git, hadoop, Web Scraping) statistics (regression, PCA, time series, trading) and more...

Top 77 R posts for 2014 (+R jobs)

$
0
0

(   if(like) { Please(share, this_post); print(“Thanks!”) }   )

The site R-bloggers.com is now 5 years old. It strives to be an (unofficial) online journal of the R statistical programming environment, written by bloggers who agreed to contribute their R articles to the site, to be read by the R community.

In this post I wish to celebrate R-bloggers’ 5th birth-month by sharing with you:

  1. Links to the top 77 most read R posts of 2014
  2. Statistics on “how well” R-bloggers did this year
  3. A list of top open R jobs for the beginning of 2015

1. Top 77 R posts for 2014

Enjoy:

  1. Using apply, sapply, lapply in R
  2. Basics of Histograms
  3. Box-plot with R – Tutorial
  4. Adding a legend to a plot
  5. Read Excel files from R
  6. In-depth introduction to machine learning in 15 hours of expert videos
  7. Select operations on R data frames
  8. Setting graph margins in R using the par() function and lots of cow milk
  9. R Function of the Day: tapply
  10. Prediction model for the FIFA World Cup 2014
  11. ANOVA and Tukey’s test on R
  12. Model Validation: Interpreting Residual Plots
  13. ggplot2: Cheatsheet for Visualizing Distributions
  14. How to plot a graph in R
  15. Using R: barplot with ggplot2
  16. Color Palettes in R
  17. A million ways to connect R and Excel
  18. Merging Multiple Data Files into One Data Frame
  19. How to become a data scientist in 8 easy steps: the infographic
  20. ROC curves and classification
  21. A Brief Tour of the Trees and Forests
  22. Polynomial regression techniques
  23. To attach() or not attach(): that is the question
  24. R skills attract the highest salaries
  25. The R apply function – a tutorial with examples
  26. Melt
  27. Two sample Student’s t-test #1
  28. High Resolution Figures in R
  29. Datasets to Practice Your Data Mining
  30. Exploratory Data Analysis: 2 Ways of Plotting Empirical Cumulative Distribution Functions in R
  31. Basic Introduction to ggplot2
  32. Using R: Two plots of principal component analysis
  33. Reorder factor levels
  34. Fitting a Model by Maximum Likelihood
  35. Pivot tables in R
  36. How do I Create the Identity Matrix in R?
  37. A practical introduction to garch modeling
  38. Download and Install R in Ubuntu
  39. Paired Student’s t-test
  40. dplyr: A gamechanger for data manipulation in R
  41. Computing and visualizing PCA in R
  42. Plotting Time Series data using ggplot2
  43. Automatically Save Your Plots to a Folder
  44. Environments in R
  45. Hands-on dplyr tutorial for faster data manipulation in R
  46. Multiple Y-axis in a R plot
  47. Make R speak SQL with sqldf
  48. MySQL and R
  49. paste, paste0, and sprintf
  50. Creating surface plots
  51. R: Using RColorBrewer to colour your figures in R
  52. Five ways to handle Big Data in R
  53. Free books on statistical learning
  54. Export R Results Tables to Excel – Please don’t kick me out of your club
  55. Linear mixed models in R
  56. Running R on an iPhone/iPad with RStudio
  57. When to Use Stacked Barcharts?
  58. Date Formats in R
  59. Making matrices with zeros and ones
  60. Converting a list to a data frame
  61. A Fast Intro to PLYR for R
  62. Using R: common errors in table import
  63. Text Mining the Complete Works of William Shakespeare
  64. Mastering Matrices
  65. Summarising data using box and whisker plots
  66. R : NA vs. NULL
  67. Scatterplot Matrices
  68. Getting Started with Mixed Effect Models in R
  69. The Fourier Transform, explained in one sentence
  70. Import/Export data to and from xlsx files
  71. An R “meta” book
  72. R Function of the Day: table
  73. Facebook teaches you exploratory data analysis with R
  74. Simple Linear Regression
  75. Regular expressions in R vs RStudio
  76. Fitting distributions with R
  77. Drawing heatmaps in R

2. Statistics – how well did R-bloggers do this year?

There are several matrices one can consider when evaluating the success of a website.  I’ll present a few of them here and will begin by talking about the visitors to the site.

This year, the site was visited by 2.7 million users, in 7 million sessions with 11.6 million pageviews. People have surfed the site from over 230 countries, with the greatest number of visitors coming from the United States (38%) and then followed by the United Kingdom (6.7%), Germany (5.5%), India( 5.1%), Canada (4%), France (2.9%), and other countries. 62% of the site’s visits came from returning users. R-bloggers has between 15,000 to 20,000 RSS/e-mail subscribers.

The site is aggregating posts from 569 bloggers, and there are over a hundred more which I will add in the next couple of months.

I had to upgrade the site’s server and software several times this year to manage the increase in load, and I believe that the site is now more stable than ever.

I gave an interview about R-bloggers in at useR!2014 which you might be interested in:

I am very happy to see that R-bloggers continues to succeed in offering a real service to the global R users community – thank you all for your generosity, professionalism, kindness, and love.

3. Top 10 R jobs from 2014

This year I started a new site for sharing R users to share and fine new jobs called: www.R-users.com.

If you are an employer who is looking to hire people from the R community, please visit this link to post a new R job (it’s free, and registration takes less than 10 seconds).

If you are a job seekers, please follow the links below to learn more and apply for your job of interest (or visit previous R jobs posts).

Below are the top 10 open jobs (you can see new jobs at R-users.com)

  1. Senior programmer / business analyst for customized solutions (1,497 views)
  2. MatrixBI Data scientist (1,308 views)
  3. Data genius, modeller, creative analyst (1,222 views)
  4. Data Scientist for developing the algorithmic core of Supersonic (1,154 views)
  5. Content Developer-R (1,054 views)
  6. Looking for a partner to code an algorithm which will trade pairs in R (834 views)
  7. Statistician for a six-month project contract in Milano, Italy. (773 views)
  8. R programmer for spatial data – Germany (738 views)
  9. Team leader Data Analysis of wind turbine data(701 views)
  10. Sr. PRedictive Modeler (688 views)

R_single_01

Multiple Comparisons with BayesFactor, Part 1

$
0
0

(This article was first published on BayesFactor: Software for Bayesian inference, and kindly contributed to R-bloggers)

On of the most frequently asked questions about the BayesFactor package is how to do multiple comparisons; that is, given that some effect exists across factor levels or means, how can we test whether two specific effects are unequal. In the next two posts, I'll explain how this can be done in two cases: in Part 1, I'll cover tests for equality, and in Part 2 I'll cover tests for specific order-restrictions.

Before we start, I will note that these methods are only meant to be used for pre-planned comparisons. They should not be used for post hoc comparisons.

An Example

Suppose we are interested in the basis for feelings of moral disgust. One prominent theory, from the embodied cognition point of view, holds that feelings of moral disgust are extensions of more basic feelings of disgust: disgust for physical things, such as rotting meat, excrement, etc (Schnall et al, 2008; but see also Johnson et al., 2014 and Landy & Goodwin, in press). Under this theory, moral disgust is not only metaphorically related to physical disgust, but may share physiological responses with physical disgust.

Suppose we wish to experimentally test this theory, which predicts that feelings of physical disgust can be “transferred” to possible objects of moral disgust. We ask 150 participants to fill out a questionnaire that measures the harshness of their judgments of undocumented migrants. Participants are randomly assigned to one of three conditions, differing by the odor present in the room: a pleasant scent associated with cleanliness (lemon), a disgusting scent (sulfur), and a control condition in which no unusual odor is present. The dependent variable is the score on the questionnaire, which ranges from 0 to 50 with higher scores representing harsher moral judgment.

Hypothetical data, simulated for the sake of example, can be read into R using the url() function:
# Read in the data from the learnbayes.org
disgust_data = read.table(url('http://www.learnbayes.org/disgust_example.txt'),header=TRUE)

A boxplot and means/standard errors reveal that the effects appear to be in the predicted direction:


(note that the axes are different in the two plots, so that the standard errors can be seen)

And we can perform a classical ANOVA on these data:
# ANOVA
summary(aov(score ~ condition, data = disgust_data))
##              Df Sum Sq Mean Sq F value Pr(>F)  
## condition 2 263 131.4 2.91 0.058 .
## Residuals 147 6635 45.1
## ---
## Signif. codes: 0 '***' 0.001 '**' 0.01 '*' 0.05 '.' 0.1 ' ' 1

The classical test of the null hypothesis that all means are equal just fails to reach significance at (alpha=0.05).

A Bayes factor analysis

We can easily perform a Bayes factor test of the null hypothesis using the BayesFactor package. This assumes that the prior settings are acceptable; because this post is about multiple comparisons, we will not explore prior settings here. See ?anovaBF for more information.

The anovaBF is a convenience function to perform Bayes factor ANOVA-like analyses. The code for the Bayes factor analysis is almost identical to the code for the classical test:
library(BayesFactor)
bf1 = anovaBF(score ~ condition, data = disgust_data)
bf1
## Bayes factor analysis
## --------------
## [1] condition : 0.7738 ±0.01%
##
## Against denominator:
## Intercept only
## ---
## Bayes factor type: BFlinearModel, JZS
The Bayes factor in favor of a condition effect is about 0.774, or 1/0.774 = 1.3 in favor of the null (the “Intercept only” model). This is not strong evidence for either the null or the alternative, which given the moderate p value is perhaps not surprising. It should be noted here that even if the p value had just crept in under 0.05, the Bayes factor would not be appreciably different, which shows the inherent arbitrariness of significance testing.

Many possible hypotheses?

This analysis is not the end of the story, however. The hypothesis tested above — that all means are different, but with no further specificity — was not really the hypothesis of interest. The hypothesis of interest was more specific. We might consider an entire spectrum of hypotheses, listed in increasing order of constraint:
  • (most constrained) The null hypothesis (control = lemon = sulfur)
  • (somewhat constrained) Unexpected scents cause the same effect, regardless of type (lemon = sulfur ≠ control; this might occur, for instance, both “clean” and “disgusting” scents prime the same underlying concepts)
  • (somewhat constrained) Only disgusting scents have an effect (control = lemon ≠ sulfur)
  • (somewhat constrained) Only pleasant scents have an effect (control = sulfur ≠ lemon)
  • (unconstrained) All scents have unique effects (control ≠ sulfur ≠ lemon)
The above are all equality constraints. We can also specify order constraints, such as lemon < control < sulfur. The unconstrained model tested above (control ≠ sulfur ≠ lemon) does not give full credit to this ordering prediction. In the next section, I will show how to test equality constraints. In Part 2 of this post, I will show how to test order constraints.

Testing equality constraints

To test equality constraints, we must first consider what an equality constraint means. Claiming that an equality constraint holds is the same as saying that your predictions for data would not change if the two conditions are supposed to be the same had exactly the same label. If want to to impose the constraint that lemon = sulfur ≠ control, we merely have to give lemon and sulfur the same label.

In practice, this means making a new column in the data frame with the required change:
# Copy the condition column that we will change
# We use 'as.character' to avoid using the same factor levels
disgust_data$lemon.eq.sulfur = as.character(disgust_data$condition)
# Change all 'lemon' to 'lemon/sulfur'
disgust_data$lemon.eq.sulfur[ disgust_data$condition == "lemon" ] = 'lemon/sulfur'
# Change all 'sulfur' to 'lemon/sulfur'
disgust_data$lemon.eq.sulfur[ disgust_data$condition == "sulfur" ] = 'lemon/sulfur'
# finally, make the column a factor
disgust_data$lemon.eq.sulfur = factor(disgust_data$lemon.eq.sulfur)
We now have a data column, called lemon.eq.sulfur, that labels the data so that lemon and sulfur have the same labels. We can use this in Bayes factor test:
bf2 = anovaBF(score ~ lemon.eq.sulfur, data = disgust_data)
bf2
## Bayes factor analysis
## --------------
## [1] lemon.eq.sulfur : 0.1921 ±0%
##
## Against denominator:
## Intercept only
## ---
## Bayes factor type: BFlinearModel, JZS
The null hypothesis is now preferred by a factor of 1/0.192 = 5.2, which is expected given that lemon and sulfur were the least similar pair of three means. The null hypothesis accounts for the data better than this constraint.

One of the conveniences of using Bayes factors is if we have two hypotheses that are both tested against the same third hypothesis, we can test the two hypotheses against one another. The BayesFactor package makes this easy; any two BayesFactor objects compared against the same denominator — in this case, the intercept-only null hypothesis — can be combined together:
bf_both_tests = c(bf1, bf2)
bf_both_tests
## Bayes factor analysis
## --------------
## [1] condition : 0.7738 ±0.01%
## [2] lemon.eq.sulfur : 0.1921 ±0%
##
## Against denominator:
## Intercept only
## ---
## Bayes factor type: BFlinearModel, JZS

We could, for instance, put all equality-constraint tests into the same object, and then compare them like so:
bf_both_tests[1] / bf_both_tests[2]
## Bayes factor analysis
## --------------
## [1] condition : 4.029 ±0.01%
##
## Against denominator:
## score ~ lemon.eq.sulfur
## ---
## Bayes factor type: BFlinearModel, JZS
The fully unconstrained hypothesis, represented by condition, is preferred to the lemon = sulfur ≠ control hypothesis by a factor of about 4.

In the next post, we will use the posterior() function to draw from the posterior of the unconstrained model, which will allow us to test ordering constraints.

To leave a comment for the author, please follow the link and comment on his blog: BayesFactor: Software for Bayesian inference.

R-bloggers.com offers daily e-mail updates about R news and tutorials on topics such as: visualization (ggplot2, Boxplots, maps, animation), programming (RStudio, Sweave, LaTeX, SQL, Eclipse, git, hadoop, Web Scraping) statistics (regression, PCA, time series, trading) and more...

An Introduction to Change Points (packages: ecp and BreakoutDetection)

$
0
0

(This article was first published on QuantStrat TradeR » R, and kindly contributed to R-bloggers)

A forewarning, this post is me going out on a limb, to say the least. In fact, it’s a post/project requested from me by Brian Peterson, and it follows a new paper that he’s written on how to thoroughly replicate research papers. While I’ve replicated results from papers before (with FAA and EAA, for instance), this is a first for me in terms of what I’ll be doing here.

In essence, it is a thorough investigation into the paper “Leveraging Cloud Data to Mitigate User Experience from ‘Breaking Bad’”, and follows the process from the aforementioned paper. So, here we go.

*********************

Twitter Breakout Detection Package
Leveraging Cloud Data to Mitigate User Experience From ‘Breaking Bad’

Summary of Paper

Introduction: in a paper detailing the foundation of the breakout detection package (arXiv ID 1411.7955v1), James, Kejariwal, and Matteson demonstrate an algorithm that detects breakouts in twitter’s production-level cloud data. The paper begins by laying the mathematical foundation and motivation for energy statistics, the permutation test, and the E-divisive with medians algorithm, which create a fast way of detecting a shift in median between two nonparametric distributions that is robust to the presence of anomalies. Next, the paper demonstrates a trial run through some of twitter’s production cloud data, and compares the non-parametric E-divisive with medians to an algorithm called PELT. For the third topic, the paper discusses potential applications, one of which is quantitative trading/computational finance. Lastly, the paper states its conclusion, which is the addition of the E-divisive with medians algorithm to the existing literature of change point detection methodologies.

The quantitative and computational methodologies for the paper use a modified variant of energy statistics more resilient against anomalies through the use of robust statistics (viz. median). The idea of energy statistics is to compare the distances of means of two random variables contained within a larger time series. The hypothesis test to determine if this difference is statistically significant is called the permutation test, which permutes data from the two time series a finite number of times to make the process of comparing permuted time series computationally tractable. However, the presence of anomalies, such as in twitter’s production cloud data, would limit the effectiveness of using this process when using simple means. To that end, the paper proposes using the median, and due to the additional computational time resulting from the weaker distribution assumptions to extend the generality of the procedure, the paper devises the E-divisive with medians algorithms, one of which works off of distances between observations, and one works with the medians of the observations themselves (as far as I understand). To summarize, the E-divisive with medians algorithms exist as a way of creating a computationally tractable procedure for determining whether or not a new chunk of time series data is considerably different from the previous through the use of advanced distance statistics robust to anomalies such as those present in twitter’s cloud data.

To compare the performance of the E-divisive with medians algorithms, the paper compares the algorithms to an existing algorithm called PELT (which stands for Pruned Extract Linear Time) in various quantitative metrics, such as “Time To Detect”, meaning the exact moment of the breakout to when the algorithms report it (if at all), along with precision, recall, and the F-measure, defined as the product of precision and recall over their respective sum. Comparing PELT to the E-divisive with medians algorithm showed that the E-divisive algorithm outperformed the PELT algorithm in the majority of data sets. Even when anomalies were either smoothed by taking the rolling median of their neighbors, or by removing them altogether, the E-divisive algorithm still outperformed PELT. Of the variants of the EDM algorithm (EDM head, EDM tail, and EDM-exact), the EDM-tail variant (i.e. the one using the most recent observations) was also quickest to execute. However, due to fewer assumptions about the nature of the underlying generating distributions, the various E-divisive algorithms take longer to execute than the PELT algorithm, with its stronger assumptions, but worse general performance. To summarize, the EDM algorithms outperform PELT in the presence of anomalies, and generally speaking, the EDM-tail variant seems to work best when considering computational running time as well.

The next section dealt with the history and applications of change-point/breakout detection algorithms, in fields such as finance, medical applications, and signal processing. As finance is of a particular interest, the paper acknowledges the ARCH and various flavors of GARCH models, along with the work of James and Matteson in devising a trading strategy based on change-point detection. Applications in genomics to detect cancer exist as well. In any case, the paper cites many sources showing the extension and applications of change-point/breakout detection algorithms, of which finance is one area, especially through work done by Matteson. This will be covered further in the literature review.

To conclude, the paper proposes a new algorithm called the E-divisive with medians, complete with a new statistical permutation test using advanced distance statistics to determine whether or not a time series has had a change in its median. This method makes fewer assumptions about the nature of the underlying distribution than a competitive algorithm, and is robust in the face of anomalies, such as those found in twitter’s production cloud data. This algorithm outperforms a competing algorithm which possessed stronger assumptions about the underlying distribution, detecting a breakout sooner in a time series, even if it took longer to run. The applications of such work range from finance to medical devices, and further beyond. As change-point detection is a technique around which trading strategies can be constructed, it has particular relevance to trading applications.

Statement of Hypothesis

Breakouts can occur in data which does not conform to any known regular distribution, thus rendering techniques that assume a certain distribution less effective. Using the E-divisive with medians algorithm, the paper attempts to predict the presence of breakouts using time series with innovations from no regular distribution as inputs, and if effective, will outperform an existing algorithm that possesses stronger assumptions about distributions. To validate or refute a more general form of this hypothesis, which is the ability of the algorithm to detect breakouts in a timely fashion, this summary test it on the cumulative squared returns of the S&P 500, and compare the analysis created by the breakpoints to the analysis performed by Dr. Robert J. Frey of Keplerian Finance, a former managing director at Renaissance Technologies.

Literature Review

Motivation

A good portion of the practical/applied motivation of this paper stems from the explosion of growth in mobile internet applications, A/B testing, and other web-specific reasons to detect breakouts. For instance, longer loading time on a mobile web page necessarily results in lower revenues. To give another example, machines in the cloud regularly fail.

However, the more salient literature regarding the topic is the literature dealing with the foundations of the mathematical ideas behind the paper.

Key References

Paper 1:

David S. Matteson and Nicholas A. James. A nonparametric approach for multiple change point analysis of multivariate data. Journal of the American Statistical Association, 109(505):334–345, 2013.

Thesis of work: this paper is the original paper for the e-divisive and e-agglomerative algorithms, which are offline, nonparametric methods of detecting change points in time series. Unlike Paper 3, this paper lays out the mathematical assumptions, lemmas, and proofs for a formal and mathematical presentation of the algorithms. Also, it documents performance against the PELT algorithm, presented in Paper 6 and technically documented in Paper 5. This performance compares favorably. The source paper being replicated builds on the exact mathematics presented in this paper, and the subject of this report uses the ecp R package that is the actual implementation/replication of this work to form a comparison for its own innovations.

Paper 2:

M. L. Rizzo and G. J. Sz´ekely. DISCO analysis: A nonparametric extension of analysis of variance. The Annals of Applied Statistics, 4(2):1034–1055, 2010

Thesis of work: this paper generalizes the ANOVA using distance statistics. This technique aims to find differences among distributions outside their sample means. Through the use of distance statistics, the techniques aim to more generally answer queries about the nature of distributions (EG identical means, but different distributions as a result of different factors). Its applicability to the source paper is that it forms the basis of the ideas for the paper’s divergence measure, as detailed in its second section.

Paper 3:

Nicholas A. James and David S. Matteson. ecp: An R package for nonparametric multiple change point analysis of multivariate data. Technical report, Cornell University, 2013.

Thesis of work: the paper introduces the ecp package which contains the e-agglomerative and e-divisive algorithms for detecting change points in time series in the R statistical programming language (in use on at least one elite trading desk). The e-divisive method recursively partitions a time series and uses a permutation test to determine change points, but it is computationally intensive. The e-agglomerative algorithm allows for inputs from the user for initial time-series segmentation and is a computationally faster algorithm. Unlike most academic papers, this paper also includes examples of data and code in order to facilitate the use of these algorithms. Furthermore, the paper includes applications to real data, such as the companies found in the Dow Jones Industrial Index, further proving the effectiveness of these methods. This paper is important to the topic in question as the E-divisive algorithm created by James and Matteson form the base changepoint detection process for which the paper builds its own innovations for, and visually compares against; furthermore, the source paper restates many of the techniques found in this paper.

Paper 4:

Owen Vallis, Jordan Hochenbaum, and Arun Kejariwal. A novel technique for long-term anomaly detection in the cloud. In 6th USENIX Workshop on Hot Topics in Cloud Computing (HotCloud 14), June 2014.

Thesis of work: the paper proposes the use of piecewise median and median absolute deviation statistics to detect anomalies in time series. The technique builds upon the ESD (Extreme Studentized Deviate) technique and uses piecewise medians to approximate a long-term trend, before extracting seasonality effects from periods shorter than two weeks. The piecewise median method of anomaly detection has a greater F-measure of detecting anomalies than does the standard STL (seasonality trend loess decomposition) or quantile regression techniques. Furthermore, piecewise median executes more than three times faster. The relevance of this paper to the source paper is that it forms the idea of using robust statistics and building the techniques in the paper upon the median as opposed to the mean.

Paper 5:

Rebecca Killick and Kaylea Haynes. changepoint: An R package for changepoint analysis

Thesis of work: manual for the implementation of the PELT algorithm written by Rebecca Killick and Kaylea Haynes. This package is a competing change-point detection package, mainly focused around the Pruned Extraction Linear Time algorithm, although containing other worse algorithms, such as the segment neighborhoods algorithm. Essentially, it is a computational implementation of the work in Paper 2. Its application toward the source paper is that the paper at hand compares its own methodology against PELT, and often outperforms it.

Paper 6:

Rebecca Killick, Paul Fearnhead, and IA Eckley. Optimal detection of changepoints with a linear computational cost. Journal of the American Statistical Association, 107(500):1590–1598, 2012

Thesis of work: the paper proposes an algorithm (PELT) that scales linearly in running time with the size of the input time series to detect exact locations of change points. The paper aims to replace both an approximate binary partitioning algorithm, and an optimal segmentation algorithm that doesn’t involve a pruning mechanism to speed up the running time. The paper uses an MLE algorithm at the heart of its dynamic partitioning in order to locate change points. The relevance to the source paper is that through the use of the non-robust MLE procedure, this algorithm is vulnerable to poor performance due to the presence of anomalies/outliers in the data, and thus underperforms the new twitter change point detection methodology which employs robust statistics.

Paper 7:

Wassily Hoeffding. The strong law of large numbers for u-statistics. Institute of Statistics mimeo series, 302, 1961.

Thesis of work: this paper establishes a convergence of the mean of tuples of many random variables to the mean of said random variables, given enough such observations. This paper is a theoretical primer on establishing the above thesis. The mathematics involve use of measure theory and other highly advanced and theoretical manipulations. Its relevance to the source paper is in its use to establish a convergence of an estimated characteristic function.

Similar Work

In terms of financial applications, the papers covering direct applications of change points to financial time series are listed above. Particularly, David Matteson presented his ecp algorithms at R/Finance several years ago, and his work is already in use on at least one professional trading desk. Beyond this, the paper cites works on technical analysis and the classic ARCH and GARCH papers as similar work. However, as this change point algorithm is created to be a batch process, direct comparison with other trend-following (that is, breakout) methods would seem to be a case of apples and oranges, as indicators such as MACD, Donchian channels, and so on, are online methods (meaning they do not have access to the full data set like the e-divisive and the e-divisive with medians algorithms do). However, they are parameterized in terms of their lookback period, and are thus prone to error in terms of inaccurate parameterization resulting from a static lookback value.

In his book Cycle Analytics for Traders, Dr. John Ehlers details an algorithm for computing the dominant cycle of a security—that is, a way to dynamically parameterize the lookback parameter, and if this were to be successfully implemented in R, it may very well allow for improved breakout detection methods than the classic parameterized indicators popularized in the last century.

References With Implementation Hints

Reference 1: Breakout Detection In The Wild

This blog post is a reference contains the actual example included in the R package for the model, written by one of the authors of the source paper. As the data used in the source paper is proprietary twitter production data, and the model is already implemented in the package discussed in this blog post, this makes the package and the included data the go-to source for starting to work with the results presented in the source paper.

Reference 2: Twitter BreakoutDetection R package evaluation

This blog post is that of a blogger altering the default parameters in the model. His analysis of traffic to his blog contains valuable information as to greater flexibility in the use of the R package that is the implementation of the source paper.

Data

The data contained in the source paper comes from proprietary twitter cloud production data. Thus, it is not realistic to obtain a copy of that particular data set. However, one of the source paper’s co-authors, Arun Kejariwal, was so kind as to provide a tutorial, complete with code and sample data, for users to replicate at their convenience. It is this data that we will use for replication.

Building The Model

Stemming from the above, we are fortunate that the results of the source paper have already been implemented in twitter’s released R package, BreakoutDetection. This package has been written by Nicholas A. James, a PhD candidate at Cornell University studying under Dr. David S. Matteson. His page is located here.

In short, all that needs to be done on this end is to apply the model to the aforementioned data.

Validate the Results

To validate the results—that is, to obtain the same results as one of the source paper’s authors, we will execute the code on the data that he posted on his blog post (see Reference 1).

require(devtools)
install_github(repo="BreakoutDetection", username="twitter")
require(BreakoutDetection)

data(Scribe)
res = breakout(Scribe, min.size=24, method='multi', beta=.001, degree=1, plot=TRUE)
res$plot

This is the resulting image, identical from the blog post.

Validation of the Hypothesis

This validation was inspired by the following post:

The Relevance of History

The post was written by Dr. Robert J. Frey, professor of Applied Math and Statistics at Stony Brook University, the head of its Quantitative Finance program, and former managing director at Renaissance Technologies (yes, the Renaissance Technologies founded by Dr. Jim Simons). While the blog is inactive at the moment, I sincerely hope it will become more active again.

Essentially, it uses mathematica to detect changes in the slope of cumulative squared returns, and the final result is a map of spikes, mountains, and plains, the x-axis being time, and the y-axis the annualized standard deviation. Using the more formalized e-divisive and e-divisive with medians algorithms, this analysis will attempt to detect change points, and use the PerformanceAnalytics library to compute the annualized standard deviation from the data of the GSPC returns itself, and output a similarly-formatted plot.

Here’s the code:

require(quantmod)
require(PerformanceAnalytics)

getSymbols("^GSPC", from = "1984-12-25", to = "2013-05-31")
monthlyEp <- endpoints(GSPC, on = "months")
GSPCmoCl <- Cl(GSPC)[monthlyEp,]
GSPCmoRets <- Return.calculate(GSPCmoCl)
GSPCsqRets <- GSPCmoRets*GSPCmoRets
GSPCsqRets <- GSPCsqRets[-1,] #remove first NA as a result of return computation
GSPCcumSqRets <- cumsum(GSPCsqRets)
plot(GSPCcumSqRets)

This results in the following image:

So far, so good. Let’s now try to find the amount of changepoints that Dr. Frey’s graph alludes to.

t1 <- Sys.time()
ECPmonthRes <- e.divisive(X = GSPCsqRets, min.size = 2)
t2 <- Sys.time()
print(t2 - t1)

t1 <- Sys.time()
BDmonthRes <- breakout(Z = GSPCsqRets, min.size = 2, beta=0, degree=1)
t2 <- Sys.time()
print(t2 - t1)

ECPmonthRes$estimates
BDres$loc

With the following results:

> ECPmonthRes$estimates
[1]   1 285 293 342
> BDres$loc
[1] 47 87

In short, two changepoints for each. Far from the 20 or so regimes present in Dr. Frey’s analysis. So, not close to anything that was expected. My intuition tells me that the main reason for this is that these algorithms are data-hungry, and there is too little data for them to do much more than what they have done thus far. So let’s go the other way and use daily data.

dailySqRets <- Return.calculate(Cl(GSPC))*Return.calculate(Cl(GSPC))
dailySqRets <- dailySqRets["1985::"]

plot(cumsum(dailySqRets))

And here’s the new plot:

First, let’s try the e-divisive algorithm from the ecp package to find our changepoints, with a minimum size of 20 days between regimes. (Blog note: this is a process that takes an exceptionally long time. For me, it took more than 2 hours.)

t1 <- Sys.time()
ECPres <- e.divisive(X = dailySqRets, min.size=20)
t2 <- Sys.time()
print(t2 - t1)
Time difference of 2.214813 hours

With the following results:

index(dailySqRets)[ECPres$estimates]
 [1] "1985-01-02" "1987-10-14" "1987-11-11" "1998-07-21" "2002-07-01" "2003-07-28" "2008-09-15" "2008-12-09"
 [9] "2009-06-02" NA   

The first and last are merely the endpoints of the data. So essentially, it encapsulates Black Monday and the crisis, among other things. Let’s look at how the algorithm split the volatility regimes. For this, we will use the xtsExtra package for its plotting functionality (thanks to Ross Bennett for the work he did in implementing it).

require(xtsExtra)
plot(cumsum(dailySqRets))
xtsExtra::addLines(index(dailySqRets)[ECPres$estimates[-c(1, length(ECPres$estimates))]], on = 1, col = "blue", lwd = 2)

With the resulting plot:

In this case, the e-divisive algorithm from the ecp package does a pretty great job segmenting the various volatility regimes, as can be thought of roughly as the slope of the cumulative squared returns. The algorithm’s ability to accurately cluster the Black Monday events, along with the financial crisis, shows its industrial-strength applicability. How does this look on the price graph?

plot(Cl(GSPC))
xtsExtra::addLines(index(dailySqRets)[ECPres$estimates[-c(1, length(ECPres$estimates))]], on = 1, col = "blue", lwd = 2)

In this case, Black Monday is clearly visible, along with the end of the Clinton bull run through the dot-com bust, the consolidation, the run-up to the crisis, the crisis itself, the consolidation, and the new bull market.

Note that the presence of a new volatility regime may not necessarily signify a market top or bottom, but the volatility regime detection seems to have worked very well in this case.

For comparison, let’s examine the e-divisive with medians algorithm.

t1 <- Sys.time()
BDres <- breakout(Z = dailySqRets, min.size = 20, beta=0, degree=1)
t2 <- Sys.time()
print(t2-t1)

BDres$loc
index(dailySqRets)[BDres$loc]

With the following result:

Time difference of 2.900167 secs
> BDres$loc
[1] 5978
> BDres$loc
[1] 5978
> index(dailySqRets)[BDres$loc]
[1] "2008-09-12"

So while the algorithm is a lot faster, its volatility regime detection, it only sees the crisis as the one major change point. Beyond that, to my understanding, the e-divisive with medians algorithm may be “too robust” (even without any penalization) against anomalies (after all, the median is robust to changes in 50% of the data). In short, I think that while it clearly has applications, such as twitter cloud production data, it doesn’t seem to obtain a result that’s in the ballpark of two other separate procedures.

Lastly, let’s try and create a plot similar to Dr. Frey’s, with spikes, mountains, and plains.

require(PerformanceAnalytics)
GSPCrets <- Return.calculate(Cl(GSPC))
GSPCrets <- GSPCrets["1985::"]
GSPCrets$regime <- ECPres$cluster
GSPCrets$annVol <- NA

for(i in unique(ECPres$cluster)) {
  regime <- GSPCrets[GSPCrets$regime==i,]
  annVol <- StdDev.annualized(regime[,1])
  GSPCrets$annVol[GSPCrets$regime==i,] <- annVol
}

plot(GSPCrets$annVol, ylim=c(0, max(GSPCrets$annVol)), main="GSPC volatility regimes, 1985 to 2013-05")

With the corresponding image, inspired by Dr. Robert Frey:

This concludes the research replication.

********************************

Whew. Done. While I gained some understanding of what change points are useful for, I won’t profess to be an expert on them (some of the math involved uses PhD-level mathematics such as characteristic functions that I never learned). However, it was definitely interesting pulling together several different ideas and uniting them under a rigorous process.

Special thanks for this blog post:

Brian Peterson, for the process paper and putting a formal structure to the research replication process (and requesting this post).
Robert J. Frey, for the “volatility landscape” idea that I could objectively point to as an objective benchmark to validate the hypothesis of the paper.
David S. Matteson, for the ecp package.
Nicholas A. James, for the work done in the BreakoutDetection package (and clarifying some of its functionality for me).
Arun Kejariwal, for the tutorial on using the BreakoutDetection package.

Thanks for reading.

NOTE: I am a freelance consultant in quantitative analysis on topics related to this blog. If you have contract or full time roles available for proprietary research that could benefit from my skills, please contact me through my LinkedIn here.


To leave a comment for the author, please follow the link and comment on his blog: QuantStrat TradeR » R.

R-bloggers.com offers daily e-mail updates about R news and tutorials on topics such as: visualization (ggplot2, Boxplots, maps, animation), programming (RStudio, Sweave, LaTeX, SQL, Eclipse, git, hadoop, Web Scraping) statistics (regression, PCA, time series, trading) and more...

Getting a statistics education: Review of the MSc in Statistics (Sheffield)

$
0
0

(This article was first published on Shravan Vasishth's Slog (Statistics blog), and kindly contributed to R-bloggers)

[This post was written between 2012 and 2015]


Some background:

I started using statistics for my research sometime in 1999 or 2000. I was a student at Ohio State, Linguistics, and I had just gotten interested in psycholinguistics. I knew almost nothing about statistics at that time. I did one Intro to Stats course in my department with Mike Broe (4 weeks),  and that was it. In 1999 I developed repetitive strain injury, partly from using Excel and SPSS, and started googling for better statistical software. Someone pointed me to |stat, but eventually I found R. That was a transformative moment.

The next stage in my education came in 2000, when I decided to go to the Statistical Consulting department at OSU and showed them my repeated measure ANOVA analyses. The response I got was: why are you fitting ANOVAs? You need linear mixed models. The statisticians showed me what I had to do code-wise, and I went ahead and finished my dissertation work using the nlme package. The Pinheiro and Bates book had just come out then and I got myself a copy, understanding almost nothing in the book beyond the first few chapters.

After that, I published a few more papers on sentence processing using nlme and then lmer, and in 2011 I co-wrote a book with Mike Broe (the basic template of the book was based on his lecture notes at OSU, he had used Mathematica or something like that, but I used R and expanded on his excellent simulation-based approach). This book revealed the incompleteness of my understanding, as spelled out in the scathing (and well-deserved) critique by Christian Robert. Even before this review came out, I had already realized in early 2011 that I didn't really understand what I was doing. My sabbatical was coming up in winter 2011, and I enrolled for the graduate certificate in statistics at Sheffield to get a better understanding of statistical theory. Here is my review of the distance-based graduate certificate in statistics taught at Sheffield.

At the end of that graduate certificate, I felt that I still didn't really understand much that was of practical relevance to my life as a researcher. That led me to do the MSc in Statistics at Sheffield, which I have been doing over three years (2012-15). This is a review of the MSc program. I haven't actually finished the program yet, but I think I know enough to write the review. My hope is that this overview will provide others a guide-map on one possible route one can take to achieving better understanding of data analysis, and what to expect if one takes this route.

Short version of this review: The three year distance MSc program at Sheffield is outstanding. I highly recommend it to anyone wanting to acquire a good, basic understanding of statistical theory and inference. You can alternatively do the course over two years (probably impossible or very hard if you are also working full time, like me), or over one year full time (I don't know how people can do the degree in one year and still enjoy it). Be prepared to work hard and to find your own answers.

Long version:

Cost: For EU citizens, the three-year part time program costs about 2000 British pounds a year, not including the travel costs to get to Sheffield for the annual exams and presentations.  For non-EU citizens, it's about 5000 pounds a year, still cheaper than most US programs.

Summary notes of the MSc program: I made summary notes for the exams during the three years. These are still in progress and are available from:

https://github.com/vasishth/MScStatisticsNotes

The courses I found most interesting and practically useful for my own research were Linear Modelling, Inference (Bayesian Statistics and Computational Inference), Medical Statistics, and Dependent data (Multivariate Analysis).

Course structure: Over three years, one does two courses each year, plus a dissertation.  One has to commit about 15-20 hours a week in the 3-year program, although I think I did not do that much work, more like 12 hours a week on average (I had a lot of other work to do and just didn't have enough time to devote to statistics). There are four 3 hour sort-of open book exams that one has to go to Sheffield for, plus a group oral presentation, a simulated consultation, and project submissions.  Every course has regular assignments/projects, all are graded but only a subset count for the final exam (15% of the final grade). The minimum you have to get to pass is 50%.

The MSc program is taught to residential students and to distance students in parallel: the residentials are there in Sheffield, attending lectures etc. The distance students follow the course over a mailing list.  So, someone like me, who's doing the course over three years, is going to overlap with three batches of the MSc residential students. This has the effect that one has no classmates one knows, except maybe others who are doing the same three-year sequence with you.

The exams, which are the most stressful part of the program, are open book in that one can bring lecture notes and one's own but no textbooks. However, the exams are designed in such a way that if you don't already know the material inside out, there is almost no point in taking lecture notes in with you---there won't be enough time to look up the notes. I did take the official lecture notes with me for the first three exams, but I never once opened them. Instead, I only relied on my own summary sheets. Also, the exams are designed so that most people can't finish the required questions (any 5 out of 6) in the three hours. At least I never managed to finish all the questions to my satisfaction in any exam.

The first year (2012-13)

The first year courses were 6002 (Stats Lab) and 6003 (Linear Modelling). There was a project-based assessment for the first, and a 3 hour exam for the second.

6002 (Stats Lab): most of the course was about learning R, which anyone who had done the grad certificate did not need. It was only in the last weeks that things got interesting, with optimization. I didn't like the notes on optimization and MLE much, though. There wasn't enough detail, and I had to go searching in books and on the internet to find comprehensive discussions. Here I would recommend Ben Bolker's chapters 6-8, which are on his web page, complete with .Rnw files. Also, I just found a neat looking book (not read yet) which I wish I had had in 2012: Modern Optimization with R.

Overall the Stats Lab course had the feel of an intro to R, which is what it should have been called. It should have been possible to test out of such a course---I did not need to read the first 12 of 13 chapters over 9 months, I could have done it in a week or less, I'm sure that's true for those of my classmates who did the graduate certificate. However, I do see the point of the course for non-R users.  I guess this is the perennial problem of teaching; students come in with different levels, you have to cater to the lowest common denominator. Also, the introduction to R is pretty dated and needs a major overhaul. Much has happened since Hadley Wickham arrived on the scene, and it's a shame not to use his packages. Finally, the absence of literate programming tools was surprising to me. I expected it to be a standard operating procedure in statistics to use Sweave or the like.

6003 (Linear Modelling): this course was absolutely amazing.  The lecture notes were very well-written and very detailed (with some exceptions, noted below). Linear mixed models didn't get a particularly detailed treatment; I would have preferred a matrix presentation of LMM theory, and would have liked to learn how to implement these models myself.

Some problems I faced in year 1:
One issue in the course was the slow return of corrected assignments. By the time the assignment comes back graded (well, we just get general feedback and a grade), you've forgotten the details. Another strange aspect is that the grades for assignments were sometimes sent by regular air-mail. This was surprising in an online course.

One frustrating aspect of the courses was that a number of statements were made without any justification, proof, or further explanation. Example: "In R the default choice is the corner-point constraints given above, but in SPlus the default is the Helmert form, which is more convenient computationally, though more difficult to interpret." Wow, I want to know more! But this point is never discussed again. One consequence is a feeling that one must simply take certain facts as given (or work it out yourself). I think it would have been helpful to point the interested student to a reference.

The responses to questions on the mailing list are sometimes slow to come.   Answers to questions asked online sometimes didn't really address the question, and one was left in the same state of uncertainty as earlier (a familiar feeling when you talk to a statistician!).

Where the graduate certificate shone was in the excruciatingly detailed feedback; this was where I learnt the most in that course. By contrast, the feedback to some of the assignments was pretty sketchy. I never really knew what a perfect solution would have looked like.

Of course, I can see why all this happens: professors are busy, and not always able to respond quickly to questions. I myself am sometimes just as slow to respond as a teacher; I guess I need to work on that aspect of my own teaching.

My final marks in these first-year courses were 63 per cent in each course.

The second year (2013-14)

The second year courses were 6001 (Data Analysis) and 6004 (Inference: Bayesian Statistics and Computational Inference). There was a project-based assessment for the first, and a 3 hour exam for the second.

In Data Analysis we did several projects which simulated real-life consulting, or involved doing actual experiments (e.g., building aeroplanes). There was one project where one had to choose a news media article about a piece of scientific work, and then compare it with the actual scientific work. The consulting project didn't work so well for me, because we were teamed up in fives and we didn't know each other. It was very hard to coordinate a project when all your colleagues are unknown to you, and email is the only way to communicate.

For the news media article, I chose the article Gelman attacked on his blog, about women wearing red to signal sexual availability. It was interesting because the claims in the Psych Science didn't really pan out. I reanalyzed the original data, and found that the effect was driven by pink, not red; the authors had recoded red and pink as red or pink, presumably in order to make the claim that women wear reddish hues. It's hard to believe that this was not a post-hoc step after seeing the data (although I think the authors claim it was not---I suppose it's possible that it wasn't); after all, if they had originally intended to treat red and pink as one unit color type, then why did they have two columns, one for red and one for pink?

The Data Analysis course was definitely not challenging; it was rather below the level of data analysis I have to do in my own research.  However, I was thankful not to be overloaded in this course because the Bayesian analysis course took up all my energy in my second year.

The course on Bayesian statistics was a whole other animal. I read a lot of books that were not assigned as required readings (mostly, Gelman et al's BDA3, and Lunn et al, but also Lynch's excellent textbook). I did all the three exercises that were assigned (these are graded but do not count for the final grade). My scores were 20/20, 22/30, 23/30. I never really understood what exactly led to those points being lost; not much detailed explanation was provided. One doesn't know how many marks one loses for making a figure too small, for example (I was following Gelman's example of showing lots of figures, which requires making them smaller, but evidently this was frowned upon). As is typical for this degree program, the grading is pretty harsh and tight-lipped (the harsh grading is not a bad thing; but the lack of information on what to improve in the answer was frustrating).

The Bayesian lecture notes could be improved. They seem to have a disjointed feel; perhaps they were written by different people.  The Bayesian lecture notes were very different than, say, the linear modeling notes, which really drilled the student on practical details of model fitting. In the Bayesian course, there were sudden transitions to topics that fizzled out quickly and were never resurrected. An example is decision theory; one section starts out defining some basic concepts, and then quickly ends. Inference and decision theory was never discussed. There were sections that were in the notes but not needed for the exams; for an MSc level program I would have wanted to read that material (and did). I had some questions on these non-examinable sections, but never could get an answer, which was pretty frustrating.

The biggest thing that could be improved in these lecture notes is to provide more contact with code. Unfortunately, WinBUGS was introduced, and very late in the course, and then a fairly major project (which counts for the final grade) was assigned that was based entirely on modeling in WinBUGS. Apart from the fact that WinBUGS is just not a well-designed software (JAGS or Stan is much better), not much practice was given in fitting models, certainly not as much as was given for linear modelling. Model fitting should be an integral part of the course from the outset, and WinBUGS should be abandoned in favor of JAGS.

If I had not done a lot of reading on my own, and not learnt JAGS and Stan, I would have really suffered in this course.  Maybe that's what the lecture notes are intending to do: it's a graduate-level course, and maybe the expectation is that one looks up the details on one's own.

As it was, I enjoyed doing the Bayesian exercises, which were very neat problems---just hard enough to make you think, but not so hard that you can't solve them if you think hard and do your own research.

One thing that was never discussed in the Bayesian data analysis course was how to do statistical inference, for example in factorial $2times 2$ repeated measures designs. Textbooks on Bayesian methods don't discuss this either; perhaps they consider it enough that you get the posterior; you can draw your own conclusions from that.

I got scores in the mid 60s for each course. I think I had 63 in Data Analysis and 67 in Inference.

The third year

The third year courses were MAS6011 (Dependent data) and MAS6012 (Sampling, Design, Medical Statistics). There is a 3 hour exam for each course.

The dependent data course was/is truly amazing. It was here that I finally got to grips with multivariate analysis, and with some interesting data mining type of tools such as PCA.  The lecture notes could have been a lot more detailed for a graduate program; the lack of detail was due to the fact that undergrads and grad students were mixed in in the same class. 

The Medical Statistics course was fascinating because it was here that one finally saw issues being dealt with where people's lives would be at stake depending on the answer we obtain. One amazing fact I discovered is that Pocock 1983 considers power below 70% in an experiment to be unethical. Psycholinguists and psychologists routinely run low power studies and publish their null results in prestigious journals. Luckily nobody will die as a result of these studies!

The medstats lecture notes were not that well written, with not much detail, full of typos and bullet point type presentations. These lecture notes need a major overhaul in my opinion. I didn't get any detailed feedback on the first two exercises I submitted, and the feedback I did get I could not read as it was handwritten with one of those ball-point pens that don't steadily deliver ink.

There's also a thesis to be written as part of the MSc; that counts for 50% of the MSc. I would have preferred to do more coursework than do the thesis, but I can see why a thesis is required (all our programs in Potsdam require them too).

General comments/suggestions for improvement:

1. The MSc currently has three specializations: Statistics, Medical Statistics, and Financial Statistics. Each has slightly different requirements (e.g., for Financial, you need to demonstrate specific math ability).  I would add a fourth specialization, to reflect the needs of statisticians today. This could be called Computational Statistics or something like that.

In this specialization, one could require a background in R programming, just as Financial Stats requires advanced math. One could replace Stats lab and Data Analysis with a course on Statistical Computing (following some subset of the contents of textbooks like Eubank et al, Eddenbeutel, Cortez, Hadley), and Statistical Learning (aka Data Mining), following a textbook like James et al.  I am sure that such a specialization is badly needed; see, for example, the puzzled question asked by a statistician not so long ago in AMSTAT news: Aren't we data science? One can't prepare statisticians as data scientists if they don't have serious computing ability.

Some of the data mining related materials turns up in Dependent Data in year 3, and that's fine; there is much more that one needs exposure to today. For me, the Stats Lab and Data Analysis courses did not have enough bang for the buck. I can see that such courses could be useful to newcomers to R and data analysis (but at the grad level, I find it hard to believe that the student would have never seen R; I guess it's possible).

But these courses didn't really challenge me to deal with real-life problems one might be likely to encounter as a future statistician (writing one's own packages, solving large-scale data mining problems).  If there had been a more computationally oriented stream which assumed R, I would have taken that route.

Some MS(c) programs with the kind of focus I am suggesting:
a.  St Andrews: http://www.creem.st-and.ac.uk/datamining/structure.html
b. Another one in Sweden: http://www.liu.se/utbildning/pabyggnad/F7MSM/courses?l=en
c. Stanford: https://statistics.stanford.edu/academics/ms-statistics-data-science

2. The lectures could have easily been recorded, this would have greatly enhanced the quality of the MSc. All you need is slides and a screen capture software with audio recording capability.

3. The real value added in the MSc is the exercises, and the feedback after the exercises have been submitted. This is the only way that one learns new things in this course (apart from reading the lecture notes). The written exams are of course a crucial part of the program, but the solutions and one's own attempt are never released so one has only a limited opportunity to learn from one's mistakes in the exam. For 2000 pounds a year, this is quite a bargain.  Basically this is equivalent to hiring a statistician for 33 hours at 60 pounds an hour each year, with the big difference that you leave the table knowing much more than when you arrived.

4. Some ideas that were difficult for me:
- Expectation of a function of random variables was taught in the grad cert in 2011, but I needed it for the first time in 2014, when studying the EM algorithm. It would have been helpful to see a practical application early.
- The exponential distribution is a key distribution and needs much more study, esp. in connection with modeling survival. Perhaps more time should be spent studying distributions and their interrelationships.
- The derivation of full conditional distributions could have been tightly linked to DAGs, as is done in the Lunn et al book. It was only after I read the Lunn et al book that I really understood how to work out the full conditional distribution in any (within reason) given Bayesian model.
- I learnt how to compute eigenvalues and eigenvectors in the graduate certificate, but didn't use this knowledge until 2014, when I did Multivariate Analysis. I didn't even understand the relevance of eigenvalues etc. until I saw the discussion on Principal Components Analysis. A tighter linkage between mathematical concepts and their application in statistics would be useful.
- Similarly, Lagrangian multipliers became extremely useful when we started looking at PCA and Linear Discriminant Analysis; I saw them in 2011 and forgot all about them. There must be some way to show the applications of mathematical ideas in statistics. After much searching, I found this useful book that does part of the job:

5. The entire MSc program basically provides the technical background needed to understand major topics in statistics; there is not enough time to go into much detail. Each chapter in each course could have been a full course (e.g., the EM algorithm). I think that the real learning will not begin until I start to apply these ideas to new problems (as opposed to, say, using already known routines like linear mixed models). So, what I can say is that after four years of hard work, I know enough to actually start learning statistics. I don't feel like I really know anything; I just know the lay of the land.

6. The MSc is heavily dependent on R. Not having a python component to the course limits the student greatly, especially if they are going to go out there into the world as a ''data scientist''. The Enthought on-demand courses are a fantastic supplement to the MSc coursework. It would be a good idea to have a python course of that type in the MSc coursework as well.

7. One mistake I made from the perspective of exam-taking was not to spend enough time during the year using the hand-calculator (actually, I spent no time on this). In the exam, the difference between a distinction and an upper second can be the speed with which you can compute (correctly!) on a calculator. I am terrible at this, rarely even able to do simple calculations correctly on a hand-held (I'm talking about really basic operations), simply because I don't use calculators in real life; who does? I would have much preferred exams that test analytical ability rather than ability to do calculations quickly on a calculator. In the real world one uses computers to do calculations anyway. I was also hindered by the fact that I am half-blind (a side effect of kidney failure when I wa 20) and can't even see the hand-calculator's screen properly.

8. One peculiar aspect, and this permeated the MSc program, was the fairly antiquated instructions to students for using LaTeX etc. I think that statisticians should lead the way and use tools like Sweave and Knitr.

9. The textbook recommendations are out of date should be regularly revised. The best textbooks I found for each course that had exams associated with it:

Linear modelling: An Introduction to Generalized Linear Models, Dobson et al

Dobson et al is the best textbook I have ever read on generalized linear models, bar maybe McCullagh and Nelder. Dobson et al was a recommended book in the linear modeling course, a very good choice.

Bayesian Statistics: Lynch, Lunn et al, BDA3, Box and Tiao

Lynch is the best first book to read for Bayes (if you know calculus), and Lunn et al is very useful indeed, and beautifully written. It prepares you well for doing practical data analysis.  Unfortunately, it's oriented towards WinBUGS, but one can translate the code easily to JAGS. In my opinion, WinBUGS was a great first attempt, but it should be retired now, because it is just so painful to use. People should go straight to JAGS (thanks to Martyn Plummer for doing just a fantastic job with JAGS) and then (or alternatively) Stan (thanks to Bob Carpenter, Andrew Gelman and the Stan team for making it possible to use Bayes for really complex problems). You really need both JAGS and Stan in order to read and understand books, especially if you are just starting out.

I recommend reading Box and Tiao at the very end, to get a taste of (a) outstanding writing quality, and (b) what it was like to do Bayes in the pre-historic era (i.e., the 1970s).

Computational Inference: Statistical Computing with R, Rizzo
This book covers pretty much all of computational inference in a very user-friendly way,

Multivariate Analysis: Mathematical Tools for Applied Multivariate Analysis, By Carroll et al.

This book is very heavy going and not an after-five kind of book, it needs serious and slow study. I used it mostly as a reference book.

Medical Statistics (Survival Analysis): Regression Modeling Strategies by Harrell, and Dobson et al. I found the presentation of Survival Analysis in Harrell's book particularly helpful.

Concluding remarks

This MSc program is very valuable for someone willing to work hard on their own, with rather variable amounts of guidance from the instructors. It provides a lot of good-quality structure, and it allows you to check your understanding objectively by way of exams.

Doing this MSc changed a lot of things for me professionally:

Teaching:

- I rewrote my lecture notes, abandoning the statistics textbook I had written in 2011. The Sheffield coursework played a huge role in helping me clean up my notes. I think these notes still need a lot of work, and I plan to work on them during my coming sabbatical.

-I started teaching undergrad Math as a prerequisite to my more technically oriented stats courses.

- I started teaching Bayesian statistics as a standard part of the graduate linguistics coursework. There doesn't seem to be much interest among most linguistics students in this stuff, but I do attract a very special type of student in these classes and that makes teaching more fun.

- I started teaching linear (mixed) modeling in a way aligns much more with standard presentations in the Sheffield MSc program.

- At least one of my students has taken advantage of Bayesian methods in their research, so it's starting to have an impact.

Research:

- One thing that became clear (if it wasn't obvious already) is that becoming a professional statistician or at least acquiring professional training in statistics is a necessary condition to doing analyses correctly, but it isn't a sufficient condition. Statisticians usually are unable to address concerns from people in specific areas of research because they have no domain knowledge. It seems that without domain knowledge, statistical knowledge is basically useless. One should not go to statisticians seeking "recommendations" on what to do in particular situations.  Depending on which statistician you talk to, you can get a very variable answer. Coupled with knowledge of your research area and knowledge of statistical theory (which of course you have to acquire, just as you acquired your domain knowledge), you have to work out the answer to your particular problem.

- I have essentially abandoned null hypothesis significance testing and just use Bayesian methods. The linear modeling and Bayesian statistics plus computational inference courses were instrumental in making this transition possible. I still report p-values, but only because reviewers and editors of journals insist on them.

- I run high-powered studies whenever possible (e.g., it's not possible to run high power studies with aphasic populations, at least not at Potsdam). Everything else is a waste of time and money.

- I started posting all data and code online as soon as the associated paper is published.

-I spend a lot of time visualizing the data and checking model assumptions before settling on a model.

- I use bootstrapping a lot more to check whether my results hold up compared to more conventional methods. 

- I try to replicate my results, and try to publish replications both of my own work and of others (much more difficult than I anticipated---people think replication is irrelevant and uninformative once someone has published a result with p less than 0.05.

- I can understand books like BDA3. This was not true in 2011. That was the biggest gain of putting myself through this thing; it made me literate enough to read technical introductions.


To leave a comment for the author, please follow the link and comment on his blog: Shravan Vasishth's Slog (Statistics blog).

R-bloggers.com offers daily e-mail updates about R news and tutorials on topics such as: visualization (ggplot2, Boxplots, maps, animation), programming (RStudio, Sweave, LaTeX, SQL, Eclipse, git, hadoop, Web Scraping) statistics (regression, PCA, time series, trading) and more...

Generating ANOVA-like table from GLMM using parametric bootstrap

$
0
0

(This article was first published on biologyforfun » R, and kindly contributed to R-bloggers)

This article may also be found on RPubs: http://rpubs.com/hughes/63269

In the list of worst to best way to test for effect in GLMM the list on http://glmm.wikidot.com/faq state that parametric bootstrapping is among the best options. PBmodcomp in the pbkrtest package implement such parametric bootstrapping by comparing a full model to a null one. The function simulate data (the response vector) from the null model then fit these data to the null and full model and derive a likelihood ratio test for each of the simulated data. Then we can compare the observed likelihood ratio test to the null distribution generated from the many simulation and derive a p-value. The advantage of using such a method over the classical p-values derived from a chi-square test on the likelihood ratio test is that in the parametric bootstrap we do not assume any null distribution (like chi-square) but instead derive our own null distribution from the model and the data at hand. We do not make the assumption then that the likelihood ratio test statistic is chi-square distributed. I have made a little function that wraps around the PBmodcomp function to compute bootstrapped p-values for each term in a model by sequentially adding them. This lead to anova-like table that are typically obtained when one use the command anova on a glm object.

#the libraries used
library(lme4)
library(arm)
library(pbkrtest)
#the function
anova_merMod<-function(model,rand,w=NULL,seed=round(runif(1,0,100),0),nsim=50){
  data<-model@frame
  if(!is.null(w)){
    data<-data[,-grep("(weights)",names(data))]
  }
  
  resp<-names(model.frame(model))[1]
  #generate a list of reduced model formula
  fs<-list()
  fs[[1]]<-as.formula(paste(resp,"~ 1 +",rand))
  nb_terms<-length(attr(terms(model),"term.labels"))
  if(nb_terms>1){
    for(i in 1:nb_terms){
      tmp<-c(attr(terms(model),"term.labels")[1:i],rand)
      fs[[i+1]]<-reformulate(tmp,response=resp)
    }      
  }

  #fit the reduced model to the data
  
  fam<-family(model)[1]$family
  if(fam=="gaussian"){
    m_fit<-lapply(fs,function(x) lmer(x,data,REML=FALSE))
  } else if(fam=="binomial"){
    m_fit<-lapply(fs,function(x) glmer(x,data,family=fam,weights=w))
  }  else{
    m_fit<-lapply(fs,function(x) glmer(x,data,family=fam))
  }

  #compare nested model with one another and get LRT values (ie increase in the likelihood of the models as parameters are added)
  tab_out<-NULL
  
  for(i in 1:(length(m_fit)-1)){
    comp<-PBmodcomp(m_fit[[i+1]],m_fit[[i]],seed=seed,nsim=nsim)    
    term_added<-attr(terms(m_fit[[i+1]]),"term.labels")[length(attr(terms(m_fit[[i+1]]),"term.labels"))]
    #here are reported the bootstrapped p-values, ie not assuming any parametric distribution like chi-square to the LRT values generated under the null model
    #these p-values represent the number of time the simulated LRT value (under null model) are larger than the observe one
    tmp<-data.frame(term=term_added,LRT=comp$test$stat[1],p_value=comp$test$p.value[2])
    tab_out<-rbind(tab_out,tmp)
    print(paste("Variable ",term_added," tested",sep=""))
  }  
  print(paste("Seed set to:",seed))
  return(tab_out)  
}

You pass your GLMM model to the function together with the random part as character (see example below), if you fitted a binomial GLMM you also need to provide the weights as a vector, you can then set a seed and the last argument is the number of simulation to do, it is set by default to 50 for rapid checking purpose but if you want to report these results larger values (ie 1000, 10000) should be used.

Let’s look at a simple LMM example:

data(grouseticks)
m<-lmer(TICKS~cHEIGHT+YEAR+(1|BROOD),grouseticks)
summary(m)
## Linear mixed model fit by REML ['lmerMod']
## Formula: TICKS ~ cHEIGHT + YEAR + (1 | BROOD)
##    Data: grouseticks
## 
## REML criterion at convergence: 2755
## 
## Scaled residuals: 
##    Min     1Q Median     3Q    Max 
## -3.406 -0.246 -0.036  0.146  5.807 
## 
## Random effects:
##  Groups   Name        Variance Std.Dev.
##  BROOD    (Intercept) 87.3     9.34    
##  Residual             28.1     5.30    
## Number of obs: 403, groups:  BROOD, 118
## 
## Fixed effects:
##             Estimate Std. Error t value
## (Intercept)   5.4947     1.6238    3.38
## cHEIGHT      -0.1045     0.0264   -3.95
## YEAR96        4.1910     2.2424    1.87
## YEAR97       -4.3304     2.2708   -1.91
## 
## Correlation of Fixed Effects:
##         (Intr) cHEIGH YEAR96
## cHEIGHT -0.091              
## YEAR96  -0.726  0.088       
## YEAR97  -0.714  0.052  0.518
anova_merMod(model=m,rand="(1|BROOD)")
## [1] "Variable cHEIGHT tested"
## [1] "Variable YEAR tested"
## [1] "Seed set to: 63"
##      term   LRT p_value
## 1 cHEIGHT 14.55 0.01961
## 2    YEAR 14.40 0.01961

The resulting table show for each term in the model the likelihood ratio test, which is basically the decrease in deviance when going from the null to the full model and the p value, you may look at the PBtest line in the details of ?PBmodcomp to see how it is computed.

Now let’s see how to use the function with binomial GLMM:

#simulate some binomial data
x1<-runif(100,-2,2)
x2<-runif(100,-2,2)
group<-gl(n = 20,k = 5)
rnd.eff<-rnorm(20,mean=0,sd=1.5)
p<-1+0.5*x1-2*x2+rnd.eff[group]+rnorm(100,0,0.3)
y<-rbinom(n = 100,size = 10,prob = invlogit(p))
prop<-y/10
#fit a model
m<-glmer(prop~x1+x2+(1|group),family="binomial",weights = rep(10,100))
summary(m)
## Generalized linear mixed model fit by maximum likelihood (Laplace
##   Approximation) [glmerMod]
##  Family: binomial  ( logit )
## Formula: prop ~ x1 + x2 + (1 | group)
## Weights: rep(10, 100)
## 
##      AIC      BIC   logLik deviance df.resid 
##    288.6    299.1   -140.3    280.6       96 
## 
## Scaled residuals: 
##    Min     1Q Median     3Q    Max 
## -2.334 -0.503  0.181  0.580  2.466 
## 
## Random effects:
##  Groups Name        Variance Std.Dev.
##  group  (Intercept) 1.38     1.18    
## Number of obs: 100, groups:  group, 20
## 
## Fixed effects:
##             Estimate Std. Error z value Pr(>|z|)    
## (Intercept)    0.748      0.287    2.61   0.0092 ** 
## x1             0.524      0.104    5.02  5.3e-07 ***
## x2            -2.083      0.143  -14.56  < 2e-16 ***
## ---
## Signif. codes:  0 '***' 0.001 '**' 0.01 '*' 0.05 '.' 0.1 ' ' 1
## 
## Correlation of Fixed Effects:
##    (Intr) x1    
## x1  0.090       
## x2 -0.205 -0.345
#takes some time
anova_merMod(m,rand = "(1|group)",w = rep(10,100))
## [1] "Variable x1 tested"
## [1] "Variable x2 tested"
## [1] "Seed set to: 98"
##   term      LRT p_value
## 1   x1   0.0429 0.80392
## 2   x2 502.0921 0.01961

For binomial model, the model must be fitted with proportion data and a vector of weights (ie the number of binomial trial) must be passed to the ‘w’ argument. Some warning message may pop up at the end of the function, this comes from convergence failure in PBmodcomp, this do not affect the results, you may read the article from the pbkrtest package: http://www.jstatsoft.org/v59/i09/ to understand better where this comes from.

Happy modeling and as Ben Bolker say: “When all else fails, don’t forget to keep p-values in perspective: http://www.phdcomics.com/comics/archive.php?comicid=905


Filed under: R and Stat Tagged: bootstrap, GLMM, R

To leave a comment for the author, please follow the link and comment on his blog: biologyforfun » R.

R-bloggers.com offers daily e-mail updates about R news and tutorials on topics such as: visualization (ggplot2, Boxplots, maps, animation), programming (RStudio, Sweave, LaTeX, SQL, Eclipse, git, hadoop, Web Scraping) statistics (regression, PCA, time series, trading) and more...

Using and Abusing Data Visualization: Anscombe’s Quartet and Cheating Bonferroni

$
0
0

(This article was first published on Getting Genetics Done, and kindly contributed to R-bloggers)
Anscombe’s quartet comprises four datasets that have nearly identical simple statistical properties, yet appear very different when graphed. Each dataset consists of eleven (x,y) points. They were constructed in 1973 by the statistician Francis Anscombe to demonstrate both the importance of graphing data before analyzing it and the effect of outliers on statistical properties.
Let’s load and view the data. There’s a built-in dataset, but I munged the data into a tidy format and included it in an R package that I wrote primarily for myself.
# If you don't have Tmisc installed, first install devtools, then install
# from github: install.packages('devtools')
# devtools::install_github('stephenturner/Tmisc')
library(Tmisc)
data(quartet)
str(quartet)
## 'data.frame':    44 obs. of  3 variables:
## $ set: Factor w/ 4 levels "I","II","III",..: 1 1 1 1 1 1 1 1 1 1 ...
## $ x : int 10 8 13 9 11 14 6 4 12 7 ...
## $ y : num 8.04 6.95 7.58 8.81 8.33 ...
setxy
I108.04
I86.95
I137.58
II109.14
II88.14
II138.74
III107.46
III86.77
III1312.74
IV86.58
IV85.76
IV87.71
Now, let’s compute the mean and standard deviation of both x and y, and the correlation coefficient between x and y for each dataset.
library(dplyr)
quartet %>%
group_by(set) %>%
summarize(mean(x), sd(x), mean(y), sd(y), cor(x,y))
## Source: local data frame [4 x 6]
##
## set mean(x) sd(x) mean(y) sd(y) cor(x, y)
## 1 I 9 3.32 7.5 2.03 0.816
## 2 II 9 3.32 7.5 2.03 0.816
## 3 III 9 3.32 7.5 2.03 0.816
## 4 IV 9 3.32 7.5 2.03 0.817
Looks like each dataset has the same mean, median, standard deviation, and correlation coefficient between x and y.
Now, let’s plot y versus x for each set with a linear regression trendline displayed on each plot:
library(ggplot2)
p = ggplot(quartet, aes(x, y)) + geom_point()
p = p + geom_smooth(method = lm, se = FALSE)
p = p + facet_wrap(~set)
p

This classic example really illustrates the importance of looking at your data, not just the summary statistics and model parameters you compute from it.
With that said, you can’t use data visualization to “cheat” your way into statistical significance. I recently had a collaborator who wanted some help automating a data visualization task so that she could decide which correlations to test. This is a terrible idea, and it’s going to get you in serious type I error trouble. To see what I mean, consider an experiment where you have a single outcome and lots of potential predictors to test individually. For example, some outcome and a bunch of SNPs or gene expression measurements. You can’t just visually inspect all those relationships then cherry-pick the ones you want to evaluate with a statistical hypothesis test, thinking that you’ve outsmarted your way around a painful multiple-testing correction.
Here’s a simple simulation showing why that doesn’t fly. In this example, I’m simulating 100 samples with a single outcome variable y and 64 different predictor variables, x. I might be interested in which x variable is associated with my y (e.g., which of my many gene expression measurement is associated with measured liver toxicity). But in this case, both x and y are random numbers. That is, I know for a fact the null hypothesis is true, because that’s what I’ve simulated. Now we can make a scatterplot for each predictor variable against our outcome, and look at that plot.
library(dplyr)
set.seed(42)
ndset = 64
n = 100
d = data_frame(
set = factor(rep(1:ndset, each = n)),
x = rnorm(n * ndset),
y = rep(rnorm(n), ndset))
d
## Source: local data frame [6,400 x 3]
##
## set x y
## 1 1 1.3710 1.2546
## 2 1 -0.5647 0.0936
## 3 1 0.3631 -0.0678
## 4 1 0.6329 0.2846
## 5 1 0.4043 1.0350
## 6 1 -0.1061 -2.1364
## 7 1 1.5115 -1.5967
## 8 1 -0.0947 0.7663
## 9 1 2.0184 1.8043
## 10 1 -0.0627 -0.1122
## .. ... ... ...
ggplot(d, aes(x, y)) + geom_point() + geom_smooth(method = lm) + facet_wrap(~set)

Now, if I were to go through this data and compute the p-value for the linear regression of each x on y, I’d get a uniform distribution of p-values, my type I error is where it should be, and my FDR and Bonferroni-corrected p-values would almost all be 1. This is what we expect — remember, the null hypothesis is true.
library(dplyr)
results = d %>%
group_by(set) %>%
do(mod = lm(y ~ x, data = .)) %>%
summarize(set = set, p = anova(mod)$"Pr(>F)"[1]) %>%
mutate(bon = p.adjust(p, method = "bonferroni")) %>%
mutate(fdr = p.adjust(p, method = "bonferroni"))
results
## Source: local data frame [64 x 4]
##
## set p bon fdr
## 1 1 0.2738 1.000 1.000
## 2 2 0.2125 1.000 1.000
## 3 3 0.7650 1.000 1.000
## 4 4 0.2094 1.000 1.000
## 5 5 0.8073 1.000 1.000
## 6 6 0.0132 0.844 0.844
## 7 7 0.4277 1.000 1.000
## 8 8 0.7323 1.000 1.000
## 9 9 0.9323 1.000 1.000
## 10 10 0.1600 1.000 1.000
## .. ... ... ... ...
library(qqman)
qq(results$p)

BUT, if I were to look at those plots above and cherry-pick out which hypotheses to test based on how strong the correlation looks, my type I error will skyrocket. Looking at the plot above, it looks like the x variables 6, 28, 41, and 49 have a particularly strong correlation with my outcome, y. What happens if I try to do the statistical test on only those variables?
results %>% filter(set %in% c(6, 28, 41, 49))
## Source: local data frame [4 x 4]
##
## set p bon fdr
## 1 6 0.0132 0.844 0.844
## 2 28 0.0338 1.000 1.000
## 3 41 0.0624 1.000 1.000
## 4 49 0.0898 1.000 1.000
When I do that, my p-values for those four tests are all below 0.1, with two below 0.05 (and I’ll say it again, the null hypothesis is true in this experiment, because I’ve simulated random data). In other words, my type I error is now completely out of control, with more than 50% false positives at a p<0 .05="" 64="" all="" and="" are="" bonferroni="" correcting="" fdr-corrected="" for="" level.="" ll="" not="" notice="" p-values="" p="" significant.="" still="" tests="" that="" the="" you="">0>
The moral of the story here is to always look at your data, but don’t “cheat” by basing which statistical tests you perform based solely on that visualization exercise.

To leave a comment for the author, please follow the link and comment on his blog: Getting Genetics Done.

R-bloggers.com offers daily e-mail updates about R news and tutorials on topics such as: visualization (ggplot2, Boxplots, maps, animation), programming (RStudio, Sweave, LaTeX, SQL, Eclipse, git, hadoop, Web Scraping) statistics (regression, PCA, time series, trading) and more...

At the APS Observer: a profile of JASP

$
0
0

(This article was first published on BayesFactor: Software for Bayesian inference, and kindly contributed to R-bloggers)
The APS Observer has just published a profile of JASP, a graphical user interface designed to make statistics easier. It includes Bayesian procedures by means of the R and the BayesFactor package. From the article:
 JASP distinguishes itself from SPSS by being as simple, intuitive, and approachable as possible, and by making accessible some of the latest developments in Bayesian analyses. At time of writing, JASP version 0.6 implements the following analysis tools in both their classical and Bayesian manifestations:
  • Descriptive statistics
  • t tests
  • Independent samples ANOVA
  • Repeated measures ANOVA
  • Correlation
  • Linear regression
  • Contingency tables
Read more at the APS observer.

To leave a comment for the author, please follow the link and comment on his blog: BayesFactor: Software for Bayesian inference.

R-bloggers.com offers daily e-mail updates about R news and tutorials on topics such as: visualization (ggplot2, Boxplots, maps, animation), programming (RStudio, Sweave, LaTeX, SQL, Eclipse, git, hadoop, Web Scraping) statistics (regression, PCA, time series, trading) and more...

Regression Models, It’s Not Only About Interpretation

$
0
0

(This article was first published on Freakonometrics » R-english, and kindly contributed to R-bloggers)

Yesterday, I did upload a post where I tried to show that “standard” regression models where not performing bad. At least if you include splines (multivariate splines) to take into accound joint effects, and nonlinearities. So far, I do not discuss the possible high number of features (but with boostrap procedures, it is possible to assess something related to variable importance, that people from machine learning like).

But my post was not complete: I was simply plotting the prediction obtained by some model. And it “looked like” the regression was nice, but so were the random forrest, the http://latex.codecogs.com/gif.latex?k-nearest neighbour and boosting algorithm. What if we compare those models on new data?

Here is the code to create all the models (I did include another one, some kind of benchmark, where no covariates are included), based on 1,000 simulated values

> n <- 1000
> set.seed(1)
> rtf <- function(a1, a2) { sin(a1+a2)/(a1+a2) }
> df <- data.frame(x1=(runif(n, min=1, max=6)),
+                  x2=(runif(n, min=1, max=6)))
> df$m <- rtf(df$x1, df$x2)
> df$y <- df$m+rnorm(n,sd=.1)
 
> model_cste <- lm(y~1,data=df)
> p_cste <- function(x1,x2) predict(model_cste,newdata=data.frame(x1=x1,x2=x2))
 
> model_lm <- lm(y~x1+x2,data=df)
> p_lm <- function(x1,x2) predict(model_lm,newdata=data.frame(x1=x1,x2=x2))
 
> library(mgcv)
> model_bs <- gam(y~s(x1,x2),data=df)
> p_bs <- function(x1,x2) predict(model_bs,newdata=data.frame(x1=x1,x2=x2))
 
> library(rpart)
> model_cart <- rpart(y~x1+x2,data=df,method="anova")
> p_cart <- function(x1,x2) predict(model_cart,newdata=data.frame(x1=x1,x2=x2),type="vector")
 
> library(randomForest)
> model_rf <- randomForest(y~x1+x2,data=df)
> p_rf <- function(x1,x2) as.numeric(predict(model_rf,newdata=
+   data.frame(x1=x1,x2=x2),type="response"))
 
> k <- 10
> p_knn <- function(x1,x2){
+   d <- (df$x1-x1)^2+(df$x2-x2)^2
+   return(mean(df$y[which(rank(d)<=k)]))
+ }
 
> library(dismo)
> model_gbm <- gbm.step(data=df, gbm.x = 1:2, gbm.y = 4,
+   family = "gaussian", tree.complexity = 5,
+   learning.rate = 0.01, bag.fraction = 0.5)
 
 
 GBM STEP - version 2.9 
 
Performing cross-validation optimisation of a boosted regression tree model 
for y and using a family of gaussian 
Using 1000 observations and 2 predictors 
creating 10 initial models of 50 trees 
 
 folds are unstratified 
total mean deviance =  0.0242 
tolerance is fixed at  0 
ntrees resid. dev. 
50    0.0195 
now adding trees... 
100   0.017 
150   0.0154 
200   0.0145 
250   0.0139

(etc)

1650   0.0123 
fitting final gbm model with a fixed number of  1150  trees for  y 
 
mean total deviance = 0.024 
mean residual deviance = 0.009 
 
estimated cv deviance = 0.012 ; se = 0.001 
 
training data correlation = 0.804 
cv correlation =  0.705 ; se = 0.013 
 
elapsed time -  0.11 minutes 
> p_boost <- function(x1,x2) predict(model_gbm,newdata=data.frame(x1=x1,x2=x2),n.trees=1200)

To test those models on new data (that is the goal of predictive model actually, being able to build up a generalized model, that performs well on new data), generate another sample

> n <- 500
> df_new <- data.frame(x1=(runif(n, min=1, max=6)), x2=(runif(n, min=1, max=6)))
> df_new$m <- rtf(df_new$x1, df_new$x2)
> df_new$y <- df_new$m+rnorm(n,sd=.1)

And then compare the observed values with the predicted ones. For instance on a graph

> output_model <- function(p=Vectorize(p_knn)){
+ plot(df_new$y,p(df_new$x1,df_new$x2),ylim=c(-.45,.45),xlim=c(-.45,.45),xlab="Observed",ylab="Predicted")
+ abline(a=0,b=1,lty=2,col="grey")
+ }

For the linear model, we get

> output_model(Vectorize(p_lm))

For the k-nearest neighbour, we get

> output_model(Vectorize(p_knn))

With our boosted model, we get

> output_model(Vectorize(p_boost))

And finally, with our bivariate splines, we get

> output_model(Vectorize(p_bs))

It is also possible to consider some distance, e.g. the standard http://latex.codecogs.com/gif.latex?ell_2distance,

> sum_error_2 <- function(name_model){
+   sum( (df_new$y - Vectorize(get(name_model))(df_new$x1,df_new$x2))^2 )  
+ }

Here, we enter the name of the prediction function (not the R object, we’ll see soon why) as the parameter of our function. In order to have valid conclusion, why not geneate hundreds of new samples, and compure the http://latex.codecogs.com/gif.latex?ell_2 distance on the error.

> L2 <- NULL
> for(s in 1:100){
+ n <- 500
+ df_new <- data.frame(x1=(runif(n, min=1, max=6)), x2=(runif(n, min=1, max=6)))
+ df_new$m <- rtf(df_new$x1, df_new$x2)
+ df_new$y <- df_new$m+rnorm(n,sd=.1)
+ list_models <- c("p_cste","p_lm","p_bs","p_cart","p_rf","p_knn","p_boost")
+ L2_error <- sapply(list_models,sum_error_2)
+ L2 <- rbind(L2,L2_error)
+ }

To compare our predictors, use

> colnames(L2) <- substr(colnames(L2),3,nchar(colnames(L2)))
> boxplot(L2)

Our linear regression model is not performing well (lm). Clearly. But we’ve seen that already yesterday. And our bivariate spline model is (bs). Actually, it is even performing better that all other models considered here (rf, knn and even boost).

 boxplot(L2,ylim=c(4.5,6.2))

There were a lot of discussion following my previous post, on commentaries, as well as on Twitter. What I’ve seen is that there should be some kind of trade-off: interpretability (econometric models) against precision (machine learning). It is clearly not that simple. A simple regression model with splines can perform better than any machine learning algorithm, from what we’ve seen here.

To leave a comment for the author, please follow the link and comment on his blog: Freakonometrics » R-english.

R-bloggers.com offers daily e-mail updates about R news and tutorials on topics such as: visualization (ggplot2, Boxplots, maps, animation), programming (RStudio, Sweave, LaTeX, SQL, Eclipse, git, hadoop, Web Scraping) statistics (regression, PCA, time series, trading) and more...

Geomorph and Multivariate Datasets

$
0
0

(This article was first published on geomorph, and kindly contributed to R-bloggers)
Did you know that geomorph is not just for landmark-based geometric morphometric (shape) data?

We are committed to providing statistical tools for multivariate AND multidimensional morphometric data.

As laid out in the recent series of papers on Phylogenetic Comparative Methods for high-dimensional data (Adams 2014a, Adams 2014b, Adams 2014c, Adams & Felice 2014), harnessing the R-mode – Q-mode equivalency as first shown by Gower (1966) has allowed us to overcome the issue of greater variables (p) than specimens (n).

Certainly geometric morphometrics has been doing this for many years, using the Procrustes ANOVA (Goodall 1991) which is a distance-based (Q-mode) approach. The distance-based PGLS has a substantially better type I error than previously implemented approaches (Adams & Collyer 2015).

The issue, in short is that when you have p greater than or very close to n, there will be problems; your test will lose power or worse it simply will not work. The solution is to use the functions below that are designed for multivariate datasets (e.g. sets of linear measurements*) as well as multidimensional shape data (from landmark coordinates).

Here is a list of geomorph functions that can take 
multivariate morphometric datasets for statistical analysis:

advanced.procD.lm
    Procrustes ANOVA and pairwise tests for morphometric data, using complex linear models
compare.evol.rates
    Comparing rates of morphological evolution on phylogenies
compare.modular.partitions
    Compare modular signal to alternative subsets
morphol.disparity
    Morphological disparity for one or more groups of specimens
morphol.integr
    Quantify morphological integration between two modules of morphometric data
pairwise.slope.test
    Pairwise comparisons of slopes of morphometric data
pairwiseD.test
    Pairwise group comparisons of morphometric data
phylo.pls
    Quantify phylogenetic morphological integration between two sets of variables
physignal
    Assessing phylogenetic signal in morphometric data
procD.lm
    Procrustes ANOVA/regression for morphometric data
procD.pgls
    Phylogenetic ANOVA/regression for morphometric data
trajectory.analysis
    Quantify and compare shape change trajectories
two.b.pls
    Two-block partial least squares analysis for two sets of morphometric data (or with non-morphometric data)

In all functions, the input would be a n x p matrix, that is specimens in rows and measurements in columns.

* Linear measurements may require correction for size. See Mosimann (1970; and Mosimann & James 1979).
___________________

  • Adams, D. C. 2014a. A generalized K statistic for estimating phylogenetic signal from shape and other high-dimensional multivariate data. Systematic Biology 63: 685-697.
  • ---. 2014b. Quantifying and comparing phylogenetic evolutionary rates for shape and other high-dimensional phenotypic data. Systematic Biology 63: 166-177.
  • ---. 2014c. A method for assessing phylogenetic least squares models for shape and other high-dimensional multivariate data. Evolution 68: 2675-2688.
  • Adams, D. C., and R. Felice. 2014. Assessing phylogenetic morphological integration and trait covariation in morphometric data using evolutionary covariance matrices. PloS ONE 9:e94335.
  • Adams, D.C. & Collyer, M.L., 2015. Permutation tests for phylogenetic comparative analyses of high-dimensional shape data: what you shuffle matters. Evolution, 69: 823–829.
  • Goodall, C. R. 1991. Procrustes methods in the statistical analysis of shape. J. R. Stat. Soc. B 53: 285–339.
  • Gower, J.C., 1966. Some Distance Properties of Latent Root and Vector Methods Used in Multivariate Analysis. Biometrika, 53: 325-338.
  • Mosimann, J.E., 1970. Size Allometry: Size and Shape Variables with Characterizations of the Lognormal and Generalized Gamma Distributions. Journal of the American Statistical Association, 65: 930–945.
  • Mosimann, J.E. & James, F.C., 1979. New Statistical Methods for Allometry with Application to Florida Red-Winged Blackbirds. Evolution, 33: 444–459.

To leave a comment for the author, please follow the link and comment on his blog: geomorph.

R-bloggers.com offers daily e-mail updates about R news and tutorials on topics such as: visualization (ggplot2, Boxplots, maps, animation), programming (RStudio, Sweave, LaTeX, SQL, Eclipse, git, hadoop, Web Scraping) statistics (regression, PCA, time series, trading) and more...

A function to help graphical model checks of lm and ANOVA

$
0
0

(This article was first published on biologyforfun » R, and kindly contributed to R-bloggers)

As always a more colourful version of this post is available on rpubs.

Even if LM are very simple models at the basis of many more complex ones, LM still have some assumptions that if not met would render any interpretation from the models plainly wrong. In my field of research most people were taught about checking ANOVA assumptions using tests like Levene & co. This is however not the best way to check if my model meet its assumptions as p-values depend on the sample size, with small sample size we will almost never reject the null hypothesis while with big sample even small deviation will lead to significant p-values (discussion). As ANOVA and linear models are two different ways to look at the same model (explanation) we can check ANOVA assumptions using graphical check from a linear model. In R this is easily done using plot(model), but people often ask me what amount of deviation makes me reject a model. One easy way to see if the model checking graphs are off the charts is to simulate data from the model, fit the model to these newly simulated data and compare the graphical checks from the simulated data with the real data. If you cannot differentiate between the simulated and the real data then your model is fine, if you can then try again!

Below is a little function that implement this idea:


lm.test<-function(m){
  require(plyr)
  #the model frame
  dat<-model.frame(m)
  #the model matrix
  f<-formula(m)
  modmat<-model.matrix(f,dat)
  #the standard deviation of the residuals
  sd.resid<-sd(resid(m))
  #sample size
  n<-dim(dat)[1]
  #get the right-hand side of the formula  
  #rhs<-all.vars(update(f, 0~.))
  #simulate 8 response vectors from model
  ys<-lapply(1:8,function(x) rnorm(n,modmat%*%coef(m),sd.resid))
  #refit the models
  ms<-llply(ys,function(y) lm(y~modmat[,-1]))
  #put the residuals and fitted values in a list
  df<-llply(ms,function(x) data.frame(Fitted=fitted(x),Resid=resid(x)))
  #select a random number from 2 to 8
  rnd<-sample(2:8,1)
  #put the original data into the list
  df<-c(df[1:(rnd-1)],list(data.frame(Fitted=fitted(m),Resid=resid(m))),df[rnd:8])

  #plot 
  par(mfrow=c(3,3))
  l_ply(df,function(x){
    plot(Resid~Fitted,x,xlab="Fitted",ylab="Residuals")
    abline(h=0,lwd=2,lty=2)
  })

  l_ply(df,function(x){
    qqnorm(x$Resid)
    qqline(x$Resid)
  })

  out<-list(Position=rnd)
  return(out)
}


This function print the two basic plots: one looking at the spread of the residuals around the fitted values, the other one look at the normality of the residuals. The function return the position of the real model in the 3×3 window, counting from left to right and from top to bottom (ie position 1 is upper left graph).

Let’s try the function:
 

#a simulated data frame of independent variables
dat<-data.frame(Temp=runif(100,0,20),Treatment=gl(n = 5,k = 20))
contrasts(dat$Treatment)<-"contr.sum"
#the model matrix
modmat<-model.matrix(~Temp*Treatment,data=dat)
#the coefficient
coeff<-rnorm(10,0,4)
#simulate response data
dat$Biomass<-rnorm(100,modmat%*%coeff,1)
#the model
m<-lm(Biomass~Temp*Treatment,dat)
#model check
chk<-lm.test(m)


lm.test1

lm.test2

Can you find which one is the real one? I could not, here is the answer:


chk
$Position
[1] 4

Happy and safe modelling!


Filed under: R and Stat Tagged: LM, model check, R

To leave a comment for the author, please follow the link and comment on his blog: biologyforfun » R.

R-bloggers.com offers daily e-mail updates about R news and tutorials on topics such as: visualization (ggplot2, Boxplots, maps, animation), programming (RStudio, Sweave, LaTeX, SQL, Eclipse, git, hadoop, Web Scraping) statistics (regression, PCA, time series, trading) and more...

ANOVAs and Geomorph

$
0
0

(This article was first published on geomorph, and kindly contributed to R-bloggers)
Within geomorph are several functions that perform analysis of variance (ANOVA), including
procD.lm()
procD.pgls()
advanced.procD.lm()
pairwiseD.test()
pairwise.slope.test()
trajectory,analysis()
bilat.symmetry()
plotAllometry()


Inherent in all of these functions is a common philosophy for ANOVA (although other philosophies exist).  The geomorph ANOVA philosophy is that: 
(1) resampling (randomization) procedures are used to generate empirical sampling distributions to assess significance of effects, 
(2) effect sizes are estimated as standard deviates from such sampling distributions, 
(3) sums of squares are calculated between nested models in sequential fashion, 
(4) the option to use appropriate exchangeable units under the null hypothesis is permitted and encouraged.  
This philosophy is most apparent in procD.lm, our most basic function, which is also the backbone for other functions.

The simplest way to explain the philosophy is to first describe how sums of squares (SS) are calculated (in geomorph and R or any other stats program).  The residual SS (RSS) of a linear model (also called the sum of squared error, SSE) is found as follows:

1)   Obtain residuals from a linear model, shape ~ X  (+ error), where X indicates some predictive (independent) variable (or set of variables) for the matrix of dependent variables, called shape.  This is a bit of simplification, and if one wishes to have more detail about linear models, Collyer et al. (2015, Heredity) is the main source on which this blog post is based.  The model error is a matrix of residuals.  Let’s call this matrix E, which has the same number of rows (observations) and columns (shape variables) as the matrix for shape.
2)   Find the sums of square and cross-products (SSCP) matrix as EEt, where the superscript, t, indicate matrix transposition.  This is a p × p symmetric matrix whose diagonal values are the squared distances for each observation for its predicted value.  In other words, the model shape ~ X indicates that to some extent, the variation in shape should be predicted by some variable (or set of variables), X, but this prediction is probably not perfectly precise.  The square distances are a measure – observation by observation – of the imprecision of the prediction of the linear model.  Sum these squared distances and we have RSS for the model.  By the way, if shape is a matrix of Procrustes residuals, then the squared distances are squared Procrustes distances in the space tangent to shape space.  Hence the name procD.lmProcrustes (squared) Distances from a linear model.

Thus, for any model, shape ~ X, we have a set of predicted shapes and a set of residuals. For any model, we can summarize the error of prediction by calculating RSS.  If we have two similar “nested” models – where “nested” indicates that all of the predictor variables in one model are contained in the other (along with other variables) – we can compare the RSS of the two models to determine if one model is “better”.  So, the fundamental component of ANOVA is to do a series of linear model comparisons, comparing the RSS between them to ascertain if the variables contained in one but missing in the other increase the predictive power of the linear model, thus reducing the error.  The SS of the “effect” is proportional to the reduction in RSS, for the effect describe by the change in variables.

For example, using the pupfish data in geomorph, let’s generate 4 linear model (fits) that increase in complexity, and find their RSS values:

library(geomorph)
data(pupfish)
shape <- two.d.array(pupfish$coords)

fit1 <- lm(shape ~ 1) # model contains just an intercept
fit2 <- lm(shape ~ log(pupfish$CS)) # allometric scaling of shape
fit3 <- lm(shape ~ log(pupfish$CS) + pupfish$Sex) # previous model
(fit2) + sexual dimorphism
fit4 <- lm(shape ~ log(pupfish$CS) * pupfish$Sex) # previous model (fit3) + interaction between sex and log(CS)

# A function for RSS

RSS <- function(fit) sum(diag(resid(fit)%*%t(resid(fit))))

# Apply to each model

RSS(fit1)
RSS(fit2)
RSS(fit3)
RSS(fit4)

#If done correctly, the results should be

> RSS(fit1)
[1] 0.05633287
> RSS(fit2)
[1] 0.04231359
> RSS(fit3)
[1] 0.03469854
> RSS(fit4)
[1] 0.03281081

What this illustrates is that by adding effects to the previous models, in sequence, starting with a model that contains only an intercept and ending with a model that contains log(CS), Sex, and log(CS)*Sex (in this particular sequence), the model error reduced each time.  Notice that if one were to subtract consecutive RSS values, this is the same SS found when using procD.lm.  Also notice that RSS(fit) is the “Total” SS and RSS(fit4) is the RSS for the “full” model from procD.lm.  
E.g.,

> RSS(fit1) - RSS(fit2)
[1] 0.01401928
> RSS(fit2) - RSS(fit3)
[1] 0.007615054
> RSS(fit3) - RSS(fit4)
[1] 0.001887732
> RSS(fit4)
[1] 0.03281081
> RSS(fit1)
[1] 0.05633287

> procD.lm(pupfish$coords ~ log(pupfish$CS) * pupfish$Sex)

Type I (Sequential) Sums of Squares and Cross-products

Randomization of Raw Values used

                            df       SS        MS     Rsq       F       Z P.value
log(pupfish$CS)              1 0.014019 0.0140193 0.24887 21.3638 10.4250   0.001
pupfish$Sex                  1 0.007615 0.0076151 0.13518 11.6045  5.9722   0.001
log(pupfish$CS):pupfish$Sex  1 0.001888 0.0018877 0.03351  2.8767  1.4912   0.103
Residuals                   50 0.032811 0.0006562                               
Total                       53 0.056333   

Thus, ANOVA is primarily this process of comparing model error.  There are obviously other parts.  The means square (MS) of each effect is the SS/df.  These values can be used to calculate F values as ratios of MS-effect to MS-error (or MS-random effect, if present in the model).  The R-squared values are effect SS divided by total SS.  These values are “transformations” of effect SS, and might have certain appeal.  However, in geomorph, the F values are merely descriptive where in some ANOVA programs, they are used to estimate P-values from parametric F-distributions.  Such an approach uses integration of parametric F probability density functions as a proxy for estimating the probability that the effect SS was observed by chance.  This approach involves (sometimes restrictive) assumptions and that the number of shape variables is far fewer than the number of observations.  In this age of “big data” and high performance computing, forcing parametric F-distributions onto analyses is often neither feasible nor needed nor advised.

The last two columns highlight greater flexibility in geomorph ANOVA functions.  There are two components to this flexibility: (1) how SS is estimated and (2) which units are exchangeable under null hypotheses.  Let’s address the first problem first.  “Sequential” SS, also called “type 1” SS, has already been described.  This type of SS is estimated through the process of sequentially adding model effects.  Another common type of SS in stats programs is “marginal” SS, also called type 3 SS.  This process does not start with a model with only an intercept and move “forward”; rather, it starts with a model with all desired effects and systematically removes each effect, calculating SS as the difference in RSS between the full model and all “reduced” models.  The benefit of type 3 SS is that the order of terms in the model is not important.  The drawback is that the sum of SS for effects and residuals is not the same as the total (notice in the ANOVA table above that the sum of the 4 SS values equal the 5th SS, which is the total).

These are the two main types of SS.  There are other types that pertain to more complex models (for example, type 2 SS is hybrid between type 1 and type 3 SS, and involves removing all interactions from compared models when evaluating “main” effects).  We will not get into the complexity of estimating SS through various paradigms, but geomorph can handle any type of SS estimation.  The user just needs to be aware that ANOVA is really a model comparison approach.  For example, when using the anova function in base R, there are two implementations.  One performs all model comparisons for models that could be nested within the input model; the other compares two specific models.  Consider these examples for univariate data:

fit5 <- lm(pupfish$CS ~ pupfish$Sex + pupfish$Pop) # models sexual dimorphism and population differences
fit6 <- lm(pupfish$CS ~ pupfish$Sex * pupfish$Pop) # models population variation in sexual dimorphism

#One can do ANOVA two ways:

> anova(fit6)
Analysis of Variance Table

Response: pupfish$CS
                        Df  Sum Sq Mean Sq F value    Pr(>F)   
pupfish$Sex              1 1643.81 1643.81 29.4294 1.688e-06 ***
pupfish$Pop              1 1379.72 1379.72 24.7013 8.243e-06 ***
pupfish$Sex:pupfish$Pop  1  121.11  121.11  2.1682    0.1472   
Residuals               50 2792.81   55.86                     
---
Signif. codes:  0 ‘***’ 0.001 ‘**’ 0.01 ‘*’ 0.05 ‘.’ 0.1 ‘ ’ 1

> anova(fit5, fit6)
Analysis of Variance Table

Model 1: pupfish$CS ~ pupfish$Sex + pupfish$Pop
Model 2: pupfish$CS ~ pupfish$Sex * pupfish$Pop
  Res.Df    RSS Df Sum of Sq      F Pr(>F)
1     51 2913.9                           
2     50 2792.8  1    121.11 2.1682 0.1472

The first ANOVA table performs a sequential SS calculation of all possible reduced nested models; the second ANOVA directly tests the interaction between Sex and Pop.  Notice that the SS for the interaction is the same in both ANOVAs.  Notice also that the latter approach reminds the user of the models compared, and the error produced by each one.  Either way, we ascertain that population variation in sexual dimorphism (for CS) is not significant.  Using the latter approach ANY SS type can be implemented, as long as one constructs appropriate model comparisons.  F values might not be accurate as output (which is why they are only descriptive in geomorph… more on this below).  But F values can always be recalculated easily from compiling all model comparisons desired.

The function advanced.procD.lm is our multivariate analog to the latter ANOVA approach.  The name is a bit of a misnomer, because it is more basic in that it does a single model comparison, as defined by the user.  (Other options make it more advanced though.). Here is an example for how one could perform marginal SS estimates and test them using advanced.procD.lm.

#ANOVA with RRPP

                            df      SSE        SS      F      Z     P
pupfish$Sex                 52 0.040553                             
log(pupfish$CS)+pupfish$Sex 51 0.034699 0.0058541 8.6044 6.4858 0.001

> advanced.procD.lm(fit3, ~ log(pupfish$CS))  # Sex effect

#ANOVA with RRPP

                            df      SSE        SS      F      Z     P
log(pupfish$CS)             52 0.042314                             
log(pupfish$CS)+pupfish$Sex 51 0.034699 0.0076151 11.193 8.0163 0.001

#Notice that the SS are different compared to

> procD.lm(fit3)

Type I (Sequential) Sums of Squares and Cross-products

Randomization of Raw Values used

                df       SS        MS     Rsq      F       Z P.value
log(pupfish$CS)  1 0.014019 0.0140193 0.24887 20.606 10.0845   0.001
pupfish$Sex      1 0.007615 0.0076151 0.13518 11.193  5.7721   0.001
Residuals       51 0.034699 0.0006804                              
Total           53 0.056333  

The SS for sex is the same because in both cases, it is evaluated against a model that contains only log(CS); however, the SS for log(CS) is different because in one case it is compared to a model with an intercept (sequential SS) and in the other case it is compared to a model with both log(CS) and Sex (marginal SS).  Although the choice of method is an important criterion, geomorph can accommodate any SS calculation approach.

The second component of flexibility is how one chooses exchangeable units under the null hypothesis.  For any model comparison, the null hypothesis is that RSS for both models is the same (i.e., SS effect = 0).  If one were to randomize row vectors of residuals and recalculate RSS, RSS would be the same before and after randomization.  Thus, residuals are exchangeable units (of the reduced model) under the null hypothesis, as the error remains constant.  However, if one randomizes residuals, adds them to predicted values, and re-estimates the error of the full model using these psuedorandom values from teh reduced model, the RSS of the full model will change, representing random outcomes while maintaining the null hypothesis.  The observed effect SS due to the full model – as one possible random outcome – can be compared to a distribution of many SS values.  It’s standard deviate in the distribution (Z score) is a measure of effects size (in standard deviations) and its percentile (P-value) is a probability of finding as large SS, by chance, if the null hypothesis were true.  When really low (usually 0.05 or less), we say the effect is “significant”.

This process of randomizing residuals is called the randomized residual permutation procedure (RRPP).  In most functions it is an option; in some functions (trajectory.analysis, plotallometry, advanced.procD.lm, procD.lm) is not offered as an option but is required for the analysis.  The other option is to randomize the shape data.  While we do not recommend this option, it is maintained because various other programs use this method and we hope that users find consistent results. 

Choice between RRPP and full randomization (RRPP = FALSE) is important, as the choice can have a big impact.

E.g,

> procD.lm(pupfish$coords ~ log(pupfish$CS) * pupfish$Sex, iter=999, RRPP = T)

Type I (Sequential) Sums of Squares and Cross-products

Randomized Residual Permutation Procedure used

                            df       SS        MS     Rsq       F       Z P.value
log(pupfish$CS)              1 0.014019 0.0140193 0.24887 21.3638 10.1528   0.001
pupfish$Sex                  1 0.007615 0.0076151 0.13518 11.6045  7.7452   0.001
log(pupfish$CS):pupfish$Sex  1 0.001888 0.0018877 0.03351  2.8767  2.4944   0.012
Residuals                   50 0.032811 0.0006562                               
Total                       53 0.056333       
                                   
> procD.lm(pupfish$coords ~ log(pupfish$CS) * pupfish$Sex, iter=999, RRPP = F)

Type I (Sequential) Sums of Squares and Cross-products

Randomization of Raw Values used

                            df       SS        MS     Rsq       F       Z P.value
log(pupfish$CS)              1 0.014019 0.0140193 0.24887 21.3638 10.0403   0.001
pupfish$Sex                  1 0.007615 0.0076151 0.13518 11.6045  5.8287   0.001
log(pupfish$CS):pupfish$Sex  1 0.001888 0.0018877 0.03351  2.8767  1.4898   0.113
Residuals                   50 0.032811 0.0006562                               
Total                       53 0.056333   

Notice that ignoring the alternative effects (by not using RRPP) meant failing to detect a significant interaction!

There are various other options that can be explored, including verbose output, pairwise comparisons, random iterations, etc.  Most important options account for the difference in functions, and are used after first making a determination with procD.lm for how to proceed, especially when analyses contain multiple groups.  Understanding how ANOVA works in geomorph and understanding how to interpret output will influence the other functions to use.

Mike

To leave a comment for the author, please follow the link and comment on his blog: geomorph.

R-bloggers.com offers daily e-mail updates about R news and tutorials on topics such as: visualization (ggplot2, Boxplots, maps, animation), programming (RStudio, Sweave, LaTeX, SQL, Eclipse, git, hadoop, Web Scraping) statistics (regression, PCA, time series, trading) and more...

Recruitment Chapter for IFAR

$
0
0

(This article was first published on fishR » R, and kindly contributed to R-bloggers)

I have added a very rough draft of the Recruitment chapter to the Introduction to Fisheries Analysis with R (IFAR) page.  This chapter is a complete re-working of the old Stock-Recruitment vignette and includes a section on fitting non-linear stock-recruitment functions, computing spawning potential ratio (SPR) values, and computing year-class strength indices via catch-curve residuals and two-way ANOVA models.

You should upgrade to the latest version of FSA (0.6.3) as I updated all stock-recruitment related functions (srFuns() and srStarts()).  In addition, srSims() was deleted with the main functionality put into srStarts().

I hope to submit a draft of the book to the publisher (Chapman Hall/CRC Press) by 15-Apr.  If anyone has time for a very quick review of the Recruitment chapter I would very much appreciate it (let me know though as I plan to review it myself, but will put this off a bit so as not to have mixed versions).

SPR


Filed under: Administration, Fisheries Science, R Tagged: FSA, R, Recruitment, Stock Recruitment

To leave a comment for the author, please follow the link and comment on his blog: fishR » R.

R-bloggers.com offers daily e-mail updates about R news and tutorials on topics such as: visualization (ggplot2, Boxplots, maps, animation), programming (RStudio, Sweave, LaTeX, SQL, Eclipse, git, hadoop, Web Scraping) statistics (regression, PCA, time series, trading) and more...

Tips & Tricks 8: Examining Replicate Error

$
0
0

(This article was first published on geomorph, and kindly contributed to R-bloggers)
Geomorph users,

When starting out in a geometric morphometrics study, the common questions are ones of repeatability and measurement error.

How much of the variation in the Procrustes residuals is due to human (digitizing) error? How much is due to paralax (2D photographs)? How much is due to the threshold choice (3D surface meshes)?

Today we use the Procrustes ANOVA function to learn about how to check for repeatability and in doing so learn also about nested ANOVAs.

Exercise 8 - Examining Replicate Error with procD.lm().


No one is perfect. And neither will our measurements be. But we can take a few precautions to minimise error.

In geometric morphometrics, error can come from many different stages in the data collection process. It is important to assess where in your study error could occur and how to minimise the propagation of error across different stages (e.g. photographing, digitizing, translating data to analysis software). And then to work this into your pilot study.

Here we will look at measurement error and repeatability.

For example: Let's say you are taking photographs of your specimens. They are rather rounded and so it is hard to place them flat on the table to photograph from above. Issue 1 here is whether the shape variation we observe in the photo is real or due to placing the specimen at slightly different angles. Then, when once you have the photograph you need to digitize the landmarks. Issue 2 is whether you put the landmarks in the same place every time (i.e. is your criteria for the landmark robust enough that its obvious where it should be placed on each specimen, and if you came back to the data a month or year later?)

In this instance we could take two sets of pictures, each time removing and positioning the specimen. And we could digitize each image twice, preferably in different sessions (another day or week). This would give us 4 sets of landmark data for each specimen.

If it were me, I would label the files:
              Individual_photo1_rep1.jpg 
Where I have the ID of the individual, followed by which picture (photo1 or photo2) and then the digitizing replicate (rep1 or rep2).

To test for differences between landmark sets:

1) Read the coordinate data into R (using geomorph's functions readland.tps() or readland.nts() for example). 
2) Use gpagen() to perform a Procrustes Superimposition
3) Perform a Procrustes ANOVA in the style:

procD.lm(Y.gpa$coords ~ ind:photo:rep)
Y.gpa$coords is the 3D array of Procrustes residuals (shape data)
# ind is a vector containing labels for each individual
# photo is a vector designating whether the photo is 1 or 2
# rep is a vector designating whether the replicate is 1 or 2

(Tip! Use strsplit() to make these classifier vectors from the photo names, as we did in Tips & Tricks 5)

See here we use : in the model term - this means we are performing a nested ANOVA

What we are looking for in the resulting ANOVA table is the values of the Mean Squares (MS) column. Compare the value for ind:photo and ind:photo:rep with ind. 

To calculate the repeatability of our digitizing ability, we subtract the MS of the photo term from the individual term and divide by two (because we have two replicates):
(MS(ind) - MS(ind:photo:rep))/2 
Then we calculate the ratio of this value to the total MS:
((MS(ind) - MS(ind:photo:rep))/2 ) / (MS(ind)+MS(ind:photo)+MS(ind:photo:rep)

The result is a value, which in good circumstances is somewhere above 0.95; a repeatability of 0.95 and thus 5% error.

The same can be done for the photos (ind:photo) but of course remember digitizing error is also in this term. This post is inspired by Chapter 9 of the Green Book, which I strongly recommend reading.

Remember, all this can be done by accessing the parts of the ANOVA table using regular R indexing. Dump the output of procD.lm into an object e.g. called res then res[,3] will be the MS values.

Enjoy!

Emma

To leave a comment for the author, please follow the link and comment on his blog: geomorph.

R-bloggers.com offers daily e-mail updates about R news and tutorials on topics such as: visualization (ggplot2, Boxplots, maps, animation), programming (RStudio, Sweave, LaTeX, SQL, Eclipse, git, hadoop, Web Scraping) statistics (regression, PCA, time series, trading) and more...

The perfect t-test

$
0
0

(This article was first published on Daniel Lakens, and kindly contributed to R-bloggers)
I've created an easy to use R script that will import your data, and performs and writes up a state-of-the-art dependent or independent t-test. The goal of this script is to examine whether more researcher-centered statistical tools (i.e., a one-click analysis script that checks normality assumptions, calculates effect sizes and their confidence intervals, creates good figures, calculates Bayesian and robust statistics, and writes the results section) increases the use of novel statistical procedures. Download the script here: https://github.com/Lakens/Perfect-t-test. For comments, suggestions, or errors, e-mail me at D.Lakens@tue.nl. The script will likely be updated - check back for updates or follow me @Lakens to be notified of updates.


Correctly comparing two groups is remarkably challenging. When performing a t-test researchers rarely manage to follow all recommendations that statisticians have made over the years. Where statisticians update their recommendations, statistical textbooks often do not. Even though reporting effect sizes and their confidence intervals has been recommended for decades (e.g., Cohen, 1990), statistical software (e.g., SPSS 22) often does not provide these statistics. Progress is slow, and Sharpe (2013) points to a lack of awareness, a lack of time, a lack of easily usable software, and a lack of education as some of the main reasons for the resistance to adopting statistical innovations.

Here, I propose a way to speed up the widespread adoption of the state-of-the-art statistical techniques by providing researchers with an easy to use script in free statistical software (R) that will perform and report all statistical analyses, practically with a single button press. The script (Lakens, 2015, available at https://github.com/Lakens/Perfect-t-test) follows state-of-the-art recommendations (see below), creates plots of the data, and writes the results section, including a minimally required interpretation of the statistical results.

Automated analyses might strike readers as a bad idea because it facilitates mindless statistics. Having performed statistics mindlessly for most of my professional career, I sincerely doubt access to this script would have reduced my level of understanding. If anything, reading an automatically generated results section of your own data that includes statistics you are not accustomed to calculate or report is likely to make you think more about the usefulness of these statistics, not less. However, the goal of this script is not to educate people. The main goal is to get researchers to perform and report the analyses they should, and make this as efficient as possible.

Comparing two groups


Keselman, Othman, Wilcox, and Fradette (2004) proposed the a more robust two-sample t-test that provides better Type 1 error control in situations of variance heterogeneity and nonnormality, but their recommendations have not been widely implemented. Researchers might in general be unsure whether it is necessary to change the statistical tests they use to analyze and report comparisons between groups. As Wilcox, Granger, and Clark (2013, p. 29) remark: “All indications are that generally, the safest way of knowing whether a more modern method makes a practical difference is to actually try it.” Making sure conclusions based on multiple statistical approaches converge is an excellent way to gain confidence in your statistical inferences. This R script calculates traditional Frequentist statistics, Bayesian statistics, and robust statistics, using both a hypothesis testing as an estimation approach, to invite researchers to examine their data from different perspectives.

Since Frequentist and Bayesian statistics are based on assumptions of equal variances and normally distributed data, the R script provides boxplots and histograms with kernel density plots overlaid with a normal distribution curve to check for outliers and normality. Kernel density plots are a non-parametric technique to visualize the distribution of a continuous variable. They are similar to a histogram, but less dependent on the specific choice of bins used when creating a histogram. The graphs plot both the normal distribution, as the kernel density function, making it easier to visually check whether the data is normally distributed or not. Q-Q plots are provided as an additional check for normality.

Yap and Sim (2011) show that no single test for normality will perform optimally for all possible distributions. They conclude (p. 2153): “If the distribution is symmetric with low kurtosis values (i.e. symmetric short-tailed distribution), then the D'Agostino-Pearson and Shapiro-Wilkes tests have good power. For symmetric distribution with high sample kurtosis (symmetric long-tailed), the researcher can use the JB, Shapiro-Wilkes, or Anderson-Darling test." All four normality tests are provided in the R script. Levene’s test for the equality of variances is provided, although for independent t-tests, Welch’s t-test (which does not require equal variances) is provided by default, following recommendations by Ruxton (2006). A short explanation accompanies all plots and assumption checks to help researchers to interpret the results. 

The script also creates graphs that, for example, visualize the distribution of the datapoints, and provide both within as between confidence intervals:


The script provides interpretations for effect sizes based on the classifications ‘small’, ‘medium’, and ‘large’. Default interpretations of the size of an effect based on these three categories should only be used as a last resort, and it is preferable to interpret the size of the effect in relation to other effects in the literature, or in terms of its practical significance. However, since researchers often do not interpret effect sizes (if they are reported to begin with), the default interpretation (and the suggestion to interpret effect sizes in relation to other effects in the literature) should at least function as a reminder that researchers are expected to interpret effect sizes. The common language effect size  (McGraw & Wong, 1992) is provided as an additional way to communicate the effect size.

Similarly, the Bayes Factor is classified into anecdotal, moderate, strong, very strong, and decisive evidence for the alternative or null hypothesis, following Jeffreys (1961), even though researchers are reminded that default interpretations of the strength of the evidence should not distract from the fact that strength of evidence is a continuous function of the Bayes Factor. We can expect researchers will rely less on default interpretations, the more acquainted they become with these statistics, but for novices some help in interpreting effect sizes and Bayes Factors will guide their interpretation.

Running the Markdown script


R Markdown scripts provide a way to create fully reproducible reports from data files. The script combines the commands to perform all statistical analyses with the written sections of the final output. Calculated statistics and graphs are inserted into the written report at specified locations. After installing the required packages, preparing the data, and specifying some variables in the Markdown document, the report can be generated (and thus, the analysis procedure can be performed) with a single mouse-click (scroll down for an example of the output).

The R Markdown script and the ReadMe file contain detailed instructions on how to run the script, and how to install required packages, including the PoweR package (Micheaux & Tran, 2014) to perform the normality tests, HLMdiag to create the Q-Q plots (Loy & Hofmann, 2014). ggplot2 for all plots (Wickham, 2009), car (Fox & Weisberg, 2011) to perform Levene's test, MBESS(Kelley, 2007) to calculate effect sizes and their confidence intervals, WRS for the robust statistics (Wilcox & Schönbrodt, 2015), BootsES to calculate a robust effect size for the independent t-test (Kirby & Gerlanc, 2013), BayesFactor for the bayes factor (Morey & Rouder, 2015), and BEST (Kruschke & Meredith, 2014) to calculate the Bayesian highest density interval.

The data file (which should be stored in the same folder that contains the R markdown script) needs to be tab delimited with a header at the top of the file (which can easily be created from SPSS by saving data through the 'save as' menu and selecting 'save as type: Tab delimited (*.dat)', or in Excel by saving the data as ‘Text (Tab delimited) (.txt)’. For the independent t-test the data file needs to contain at least two columns (one specifying the independent variable, and one specifying the dependent variable, and for the dependent t-test the data file needs to contain three columns, one subject identifier column, and two columns for the two dependent variables. The script for dependent t-tests allows you to select a subgroup for the analysis, as long as the data file contains an additional grouping variable (see the demo data). The data files can contain irrelevant data, which will be ignored by the script. Finally, researchers need to specify the names (or headers) of the independent and dependent variables, as well as grouping variables. Finally, there are some default settings researchers can change, such as the sidedness of the test, the alpha level, the percentage for the confidence intervals, and the scalar on the prior for the Bayes Factor.

The script can be used to create either a word document or a html document. The researchers can easily interpret all the assumption checks, look at the data for possible outliers, and (after minor adaptations) copy-paste the result sections into their article. 

The statistical results the script generates has been compared against the results provided by SPSS, JASP, ESCI, online Bayes Factor calculators, and BEST online. Minor variations in the HDI calculation between BEST online and this script are possible depending on the burn-in samples and number of samples, and for huge t-values there are minor variations between JASP and the latest version of the Bayes Factor package used in this script. This program is distributed in the hope that it will be useful, but without any warranty. If you find an error, please contact me at D.Lakens@tue.nl.

Promoting Statistical Innovations


Statistical software is built around individual statistical tests, while researchers perform a set of procedures. Although it is not possible to create standardized procedures for all statistical analyses, most, if not all, of the steps researchers have to go through when they want to report correlations, regression analyses, ANOVA’s, and meta-analyses are sufficiently structured. These tests make up a large portion of analyses reported in journal articles. Demonstrating this, David Kennyhas created R scripts that will perform and report mediation and moderator analyses. Felix Schönbrodt has created a Shiny app that performs several meta-analytic techniques. Making statistical innovations more accessible has a high potential to substantially improve the quality of the statistical tests researchers perform and report. Statisticians who take the application of generated knowledge seriously should try to experiment with the best way to get researchers to use state-of-the-art techniques. R markdown scripts are an excellent method to combine statistical analyses and a written report in free software. Shiny apps might make these analyses even more accessible, because they no longer require users to install R and R packages.

Despite the name of this script, there is probably not such a thing as a ‘perfect’ report of a statistical test. Researchers might prefer to report standard errors instead of standard deviations, perform additional checks for normality, different Bayesian or robust statistics, or change the figures. The benefit of markdown scripts with a GNU license stored on GitHub is that they can be forked(copied to a new repository) where researchers are free to remove, add, or change sections of the script to create their own ideal test. After some time, a number of such scripts may be created, allowing researchers to choose an analysis procedure that most closely matches their desires. Alternatively, researchers can post feature requests or errors that can be incorporated in future versions of this script.

It is important that researchers attempt to draw the best possible statistical inferences from their data. As a science, we need to seriously consider the most efficient way to accomplish this. Time is scarce, and scientists need to master many skills in addition to statistics. I believe that some of the problems in adopting new statistical procedures discussed by Sharpe (2013) such as lack of time, lack of awareness, lack of education, and lack of easy to use software can be overcome by scripts that combine traditional and more novel statistics, are easy to use, and provide a brief explanation of what is calculated while linking to the relevant literature. This approach might be a small step towards a better understanding of statistics for individual researchers, but a large step towards better reporting practices.


References

Baguley, T. (2012). Calculating and graphing within-subject confidence intervals for ANOVA. Behavior research methods, 44, 158-175.
Cumming, G. (2012). Understanding the new statistics: Effect sizes, confidence intervals, and meta-analysis. New York: Routledge.
Fox, J. & Weisberg, S. (2011). An R Companion to Applied Regression, Second edition. Sage, Thousand Oaks CA.
Jeffreys, H. (1961). Theory of probability (3rd ed.). Oxford: Oxford University Press, Clarendon Press.
Kelley, K. (2007). Confidence intervals for standardized effect sizes: Theory, application, and implementation. Journal of Statistical Software, 20, 1-24.
Kirby, K. N., & Gerlanc, D. (2013). BootES: An R package for bootstrap confidence intervals on effect sizes. Behavior Research Methods, 45, 905-927.
Kruschke, J. K., & Meredith, M. (2014). BEST: Bayesian Estimation Supersedes the t-test. R package version 0.2.2, URL: http://CRAN.R-project.org/package=BEST.
Lakens, D. (2015). The perfect t-test (version 0.1.0). Retrieved from https://github.com/Lakens/perfect-t-test. doi:10.5281/zenodo.17603
Loy, A., & Hofmann, H. (2014). HLMdiag: A Suite of Diagnostics for Hierarchical Linear Models. R. Journal of Statistical Software, 56, pp. 1-28. URL: http://www.jstatsoft.org/v56/i05/.
McGraw, K. O., & Wong, S. P. (1992). A common language effect size statistic. Psychological Bulletin, 111, 361-365.
Micheaux, P., & Tran, V. (2012). PoweR. URL: http://www.biostatisticien.eu/PoweR/.
Morey R and Rouder J (2015). BayesFactor: Computation of Bayes Factors for Common Designs. R package version 0.9.11-1, URL: http://CRAN.R-project.org/package=BayesFactor
Sharpe, D. (2013). Why the resistance to statistical innovations? Bridging the communication gap. Psychological Methods, 18, 572-582.
Wickham, H. (2009). ggplot2: elegant graphics for data analysis. Springer New York. ISBN 978-0-387-98140-6, URL: http://had.co.nz/ggplot2/book.
Wilcox, R. R., Granger, D. A., Clark, F. (2013). Modern robust statistical methods: Basics with illustrations using psychobiological data. Universal Journal of Psychology, 1, 21-31.
Wilcox, R. R., & Schönbrodt, F. D. (2015). The WRS package for robust statistics in R (version 0.27.5). URL: https://github.com/nicebread/WRS.

Yap, B. W., & Sim, C. H. (2011). Comparisons of various types of normality tests. Journal of Statistical Computation and Simulation, 81, 2141-2155.

To leave a comment for the author, please follow the link and comment on his blog: Daniel Lakens.

R-bloggers.com offers daily e-mail updates about R news and tutorials on topics such as: visualization (ggplot2, Boxplots, maps, animation), programming (RStudio, Sweave, LaTeX, SQL, Eclipse, git, hadoop, Web Scraping) statistics (regression, PCA, time series, trading) and more...

Simulation-based power analysis using proportional odds logistic regression

$
0
0

(This article was first published on BioStatMatt » R, and kindly contributed to R-bloggers)

Consider planning a clinicial trial where patients are randomized in permuted blocks of size four to either a 'control' or 'treatment' group. The outcome is measured on an 11-point ordinal scale (e.g., the numerical rating scale for pain). It may be reasonable to evaluate the results of this trial using a proportional odds cumulative logit model (POCL), that is, if the proportional odds assumption is valid. The POCL model uses a series of 'intercept' parameters, denoted alpha_1 leq ldots leq alpha_{r-1}, where r is the number of ordered categories, and 'slope' parameters beta_1, ldots, beta_m, where m is the number of covariates. The intercept parameters encode the 'baseline', or control group frequencies of each category, and the slope parameters represent the effects of covariates (e.g., the treatment effect).

A Monte-Carlo simulation can be implemented to study the effects of the control group frequencies, the odds ratio associated with treatment allocation (i.e., the 'treatment effect'), and sample size on the power or precision associated with a null hypothesis test or confidence interval for the treatment effect.

In order to simulate this process, it's necessary to specify each of the following:

  1. control group frequencies
  2. treatment effect
  3. sample size
  4. testing or confidence interval procedure

Ideally, the control group frequencies would be informed by preliminary data, but expert opinion can also be useful. Once specified, the control group frequencies can be converted to intercepts in the POCL model framework. There is an analytical solution for this; see the link above. But, a quick and dirty method is to simulate a large sample from the control group population, and then fit an intercept-only POCL model to those data. The code below demonstrates this, using the polr function from the MASS package.


## load MASS for polr()
library(MASS)
## specify frequencies of 11 ordered categories
prbs <- c(1,5,10,15,20,40,60,80,80,60,40)
prbs <- prbs/sum(prbs)
## sample 1000 observations with probabilities prbs
resp <- factor(replicate(1000, sample(0:10, 1, prob=prbs)),
               ordered=TRUE, levels=0:10)
## fit POCL model; extract intercepts (zeta here)
alph <- polr(resp~1)$zeta

As in most other types of power analysis, the treatment effect can represent the minimum effect that the study should be designed to detect with a specified degree of power; or in a precision analysis, the maximum confidence interval width in a specified fraction of samples. In this case, the treatment effect is encoded as a log odds ratio, i.e., a slope parameter in the POCL model.

Given the intercept and slope parameters, observations from the POCL model can be simulated with permuted block randomization in blocks of size four to one of two treatment groups as follows:


## convenience functions
logit <- function(p) log(1/(1/p-1))
expit <- function(x) 1/(1/exp(x) + 1)

## block randomization
## n - number of randomizations
## m - block size
## levs - levels of treatment
block_rand <- function(n, m, levs=LETTERS[1:m]) {
  if(m %% length(levs) != 0)
    stop("length(levs) must be a factor of 'm'")
  k <- if(n%%m > 0) n%/%m + 1 else n%/%m
  l <- m %/% length(levs)
  factor(c(replicate(k, sample(rep(levs,l),
    length(levs)*l, replace=FALSE))),levels=levs)
}

## simulate from POCL model
## n - sample size
## a - alpha
## b - beta
## levs - levels of outcome
pocl_simulate <- function(n, a, b, levs=0:length(a)) {
  dat <- data.frame(Treatment=block_rand(n,4,LETTERS[1:2])) 
  des <- model.matrix(~ 0 + Treatment, data=dat)
  nlev <- length(a) + 1
  yalp <- c(-Inf, a, Inf)
  xbet <- matrix(c(rep(0, nrow(des)),
                   rep(des %*% b , nlev-1),
                   rep(0, nrow(des))), nrow(des), nlev+1)
  prbs <- sapply(1:nlev, function(lev) {
    yunc <- rep(lev, nrow(des))
    expit(yalp[yunc+1] - xbet[cbind(1:nrow(des),yunc+1)]) - 
      expit(yalp[yunc]   - xbet[cbind(1:nrow(des),yunc)])
  })
  colnames(prbs) <- levs
  dat$y <- apply(prbs, 1, function(p) sample(levs, 1, prob=p))
  dat$y <- unname(factor(dat$y, levels=levs, ordered=TRUE))
  return(dat)
}

The testing procedure we consider here is a likelihood ratio test with 5% type-I error rate:


## Likelihood ratio test with 0.05 p-value threshold
## block randomization in blocks of size four to one
## of two treatment groups
## dat - data from pocl_simulate
pocl_test <- function(dat) {
  fit <- polr(y~Treatment, data=dat)
  anova(fit, update(fit, ~.-Treatment))$"Pr(Chi)"[2] < 0.05
}

The code below demontrates the calculation of statistical power associated with sample of size 100 and odds ratio 0.25, where the control group frequencies of each category are as specified above. When executed, which takes some time, this gives about 80% power.


## power: n=50, OR=0.25
mean(replicate(10000, pocl_test(pocl_simulate(50, a=alph, b=c(0, log(0.25))))))

The figure below illustrates the power associated with a sequence of odds ratios. The dashed line represents the nominal type-I error rate 0.05.

power curve

Simulation-based power and precision analysis is a very powerful technique, which ensures that the reported statistical power reflects the intended statistical analysis (often times in research proposals, the proposed statistical analysis is not the same as that used to evaluate statistical power). In addition to the simple analysis described above, it is also possible to evaluate an adjusted analysis, i.e., the power to detect a treatment effect after adjustement for covariate effects. Of course, this requires that the latter effects be specified, and that there is some mechanism to simulate covariates. This can be a difficule task, but makes clear that there are many assumptions involved in a realistic power analysis.

Another advantage to simulation-based power analysis is that it requires implementation of the planned statistical procedure before the study begins, which ensures its feasibility and provides an opportunity to consider details that might otherwise be overlooked. Of course, it may also accelerate the 'real' analysis, once the data are collected.

Here is the complete R script:


## load MASS for polr()
library(MASS)
## specify frequencies of 11 ordered categories
prbs <- c(1,5,10,15,20,40,60,80,80,60,40)
prbs <- prbs/sum(prbs)
## sample 1000 observations with probabilities prbs
resp <- factor(replicate(1000, sample(0:10, 1, prob=prbs)),
               ordered=TRUE, levels=0:10)
## fit POCL model; extract intercepts (zeta here)
alph <- polr(resp~1)$zeta


## convenience functions
logit <- function(p) log(1/(1/p-1))
expit <- function(x) 1/(1/exp(x) + 1)

## block randomization
## n - number of randomizations
## m - block size
## levs - levels of treatment
block_rand <- function(n, m, levs=LETTERS[1:m]) {
  if(m %% length(levs) != 0)
    stop("length(levs) must be a factor of 'm'")
  k <- if(n%%m > 0) n%/%m + 1 else n%/%m
  l <- m %/% length(levs)
  factor(c(replicate(k, sample(rep(levs,l),
                               length(levs)*l, replace=FALSE))),levels=levs)
}

## simulate from POCL model
## n - sample size
## a - alpha
## b - beta
## levs - levels of outcome
pocl_simulate <- function(n, a, b, levs=0:length(a)) {
  dat <- data.frame(Treatment=block_rand(n,4,LETTERS[1:2])) 
  des <- model.matrix(~ 0 + Treatment, data=dat)
  nlev <- length(a) + 1
  yalp <- c(-Inf, a, Inf)
  xbet <- matrix(c(rep(0, nrow(des)),
                   rep(des %*% b , nlev-1),
                   rep(0, nrow(des))), nrow(des), nlev+1)
  prbs <- sapply(1:nlev, function(lev) {
    yunc <- rep(lev, nrow(des))
    expit(yalp[yunc+1] - xbet[cbind(1:nrow(des),yunc+1)]) - 
      expit(yalp[yunc]   - xbet[cbind(1:nrow(des),yunc)])
  })
  colnames(prbs) <- levs
  dat$y <- apply(prbs, 1, function(p) sample(levs, 1, prob=p))
  dat$y <- unname(factor(dat$y, levels=levs, ordered=TRUE))
  return(dat)
}

## Likelihood ratio test with 0.05 p-value threshold
## block randomization in blocks of size four to one
## of two treatment groups
## dat - data from pocl_simulate
pocl_test <- function(dat) {
  fit <- polr(y~Treatment, data=dat)
  anova(fit, update(fit, ~.-Treatment))$"Pr(Chi)"[2] < 0.05
}

## power: n=50, OR=0.25
mean(replicate(10000, pocl_test(pocl_simulate(50, a=alph, b=c(0, log(0.25))))))

To leave a comment for the author, please follow the link and comment on his blog: BioStatMatt » R.

R-bloggers.com offers daily e-mail updates about R news and tutorials on topics such as: visualization (ggplot2, Boxplots, maps, animation), programming (RStudio, Sweave, LaTeX, SQL, Eclipse, git, hadoop, Web Scraping) statistics (regression, PCA, time series, trading) and more...

An R Enthusiast Goes Pythonic!

$
0
0

(This article was first published on Data Until I Die!, and kindly contributed to R-bloggers)

I’ve spent so many years using and broadcasting my love for R and using Python quite minimally. Having read recently about machine learning in Python, I decided to take on a fun little ML project using Python from start to finish.

What follows below takes advantage of a neat dataset from the UCI Machine Learning Repository.  The data contain Math test performance of 649 students in 2 Portuguese schools.  What’s neat about this data set is that in addition to grades on the students’ 3 Math tests, they managed to collect a whole whack of demographic variables (and some behavioural) as well.  That lead me to the question of how well can you predict final math test performance based on demographics and behaviour alone.  In other words, who is likely to do well, and who is likely to tank?

I have to admit before I continue, I initially intended on doing this analysis in Python alone, but I actually felt lost 3 quarters of the way through and just did the whole darned thing in R.  Once I had completed the analysis in R to my liking, I then went back to my Python analysis and continued until I finished to my reasonable satisfaction.  For that reason, for each step in the analysis, I will show you the code I used in Python, the results, and then the same thing in R.  Do not treat this as a comparison of Python’s machine learning capabilities versus R per se.  Please treat this as a comparison of my understanding of how to do machine learning in Python versus R!

Without further ado, let’s start with some import statements in Python and library statements in R:

#Python Code
from pandas import *
from matplotlib import *
import seaborn as sns
sns.set_style("darkgrid")
import matplotlib.pyplot as plt
%matplotlib inline # I did this in ipython notebook, this makes the graphs show up inline in the notebook.
import statsmodels.formula.api as smf
from scipy import stats
from numpy.random import uniform
from numpy import arange
from sklearn.ensemble import RandomForestRegressor
from sklearn.metrics import mean_squared_error
from math import sqrt
mat_perf = read_csv('/home/inkhorn/Student Performance/student-mat.csv', delimiter=';')

I’d like to comment on the number of import statements I found myself writing in this python script. Eleven!! Is that even normal? Note the smaller number of library statements in my R code block below:

#R Code
library(ggplot2)
library(dplyr)
library(ggthemr)
library(caret)
ggthemr('flat') # I love ggthemr!
mat_perf = read.csv('student-mat.csv', sep = ';')

Now let’s do a quick plot of our target variable, scores on the students’ final math test, named ‘G3′.

#Python Code
sns.set_palette("deep", desat=.6)
sns.set_context(context='poster', font_scale=1)
sns.set_context(rc={"figure.figsize": (8, 4)})
plt.hist(mat_perf.G3)
plt.xticks(range(0,22,2))

Distribution of Final Math Test Scores (“G3″)
Python Hist - G3

That looks pretty pleasing to my eyes. Now let’s see the code for the same thing in R (I know, the visual theme is different. So sue me!)

#R Code
ggplot(mat_perf) + geom_histogram(aes(x=G3), binwidth=2)

Hist - G3

You’ll notice that I didn’t need to tweak any palette or font size parameters for the R plot, because I used the very fun ggthemr package. You choose the visual theme you want, declare it early on, and then all subsequent plots will share the same theme! There is a command I’ve hidden, however, modifying the figure height and width. I set the figure size using rmarkdown, otherwise I just would have sized it manually using the export menu in the plot frame in RStudio.  I think both plots look pretty nice, although I’m very partial to working with ggthemr!

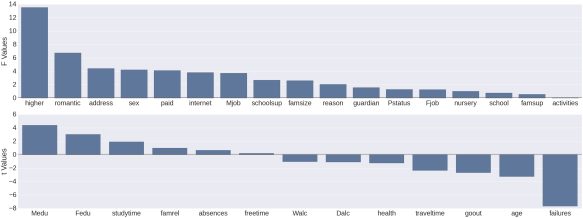
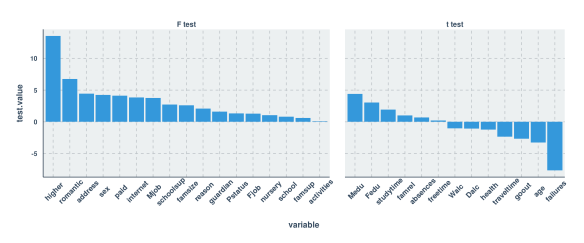
Univariate estimates of variable importance for feature selection

Below, what I’ve done in both languages is to cycle through each variable in the dataset (excepting prior test scores) insert the variable name in a dictionary/list, and get a measure of importance of how predictive that variable is, alone, of the final math test score (variable G3). Of course if the variable is qualitative then I get an F score from an ANOVA, and if it’s quantitative then I get a t score from the regression.

In the case of Python this is achieved in both cases using the ols function from scipy’s statsmodels package. In the case of R I’ve achieved this using the aov function for qualitative and the lm function for quantitative variables. The numerical outcome, as you’ll see from the graphs, is the same.

#Python Code
test_stats = {'variable': [], 'test_type' : [], 'test_value' : []}

for col in mat_perf.columns[:-3]:
    test_stats['variable'].append(col)
    if mat_perf[col].dtype == 'O':
        # Do ANOVA
        aov = smf.ols(formula='G3 ~ C(' + col + ')', data=mat_perf, missing='drop').fit()
        test_stats['test_type'].append('F Test')
        test_stats['test_value'].append(round(aov.fvalue,2))
    else:
        # Do correlation
        print col + 'n'
        model = smf.ols(formula='G3 ~ ' + col, data=mat_perf, missing='drop').fit()
        value = round(model.tvalues[1],2)
        test_stats['test_type'].append('t Test')
        test_stats['test_value'].append(value)

test_stats = DataFrame(test_stats)
test_stats.sort(columns='test_value', ascending=False, inplace=True)
#R Code
test.stats = list(test.type = c(), test.value = c(), variable = c())

for (i in 1:30) {
  test.stats$variable[i] = names(mat_perf)[i]
  if (is.factor(mat_perf[,i])) {
    anova = summary(aov(G3 ~ mat_perf[,i], data=mat_perf))
    test.stats$test.type[i] = "F test"
    test.stats$test.value[i] = unlist(anova)[7]
  }
  else {
    reg = summary(lm(G3 ~ mat_perf[,i], data=mat_perf))
    test.stats$test.type[i] = "t test"
    test.stats$test.value[i] = reg$coefficients[2,3]
  }

}

test.stats.df = arrange(data.frame(test.stats), desc(test.value))
test.stats.df$variable = reorder(test.stats.df$variable, -test.stats.df$test.value)

And now for the graphs. Again you’ll see a bit more code for the Python graph vs the R graph. Perhaps someone will be able to show me code that doesn’t involve as many lines, or maybe it’s just the way things go with graphing in Python. Feel free to educate me :)

#Python Code
f, (ax1, ax2) = plt.subplots(2,1, figsize=(48,18), sharex=False)
sns.set_context(context='poster', font_scale=1)
sns.barplot(x='variable', y='test_value', data=test_stats.query("test_type == 'F Test'"), hline=.1, ax=ax1, x_order=[x for x in test_stats.query("test_type == 'F Test'")['variable']])
ax1.set_ylabel('F Values')
ax1.set_xlabel('')

sns.barplot(x='variable', y='test_value', data=test_stats.query("test_type == 't Test'"), hline=.1, ax=ax2, x_order=[x for x in test_stats.query("test_type == 't Test'")['variable']])
ax2.set_ylabel('t Values')
ax2.set_xlabel('')

sns.despine(bottom=True)
plt.tight_layout(h_pad=3)

Python Bar Plot - Univariate Estimates of Variable Importance

#R Code
ggplot(test.stats.df, aes(x=variable, y=test.value)) +
  geom_bar(stat="identity") +
  facet_grid(.~test.type ,  scales="free", space = "free") +
  theme(axis.text.x = element_text(angle = 45, vjust=.75, size=11))

Bar plot - Univariate Estimates of Variable Importance

As you can see, the estimates that I generated in both languages were thankfully the same. My next thought was to use only those variables with a test value (F or t) of 3.0 or higher. What you’ll see below is that this led to a pretty severe decrease in predictive power compared to being liberal with feature selection.

In reality, the feature selection I use below shouldn’t be necessary at all given the size of the data set vs the number of predictors, and the statistical method that I’m using to predict grades (random forest). What’s more is that my feature selection method in fact led me to reject certain variables which I later found to be important in my expanded models! For this reason it would be nice to investigate a scalable multivariate feature selection method (I’ve been reading a bit about boruta but am skeptical about how well it scales up) to have in my tool belt. Enough blathering, and on with the model training:

Training the First Random Forest Model

#Python code
usevars =  [x for x in test_stats.query("test_value >= 3.0 | test_value <= -3.0")['variable']]
mat_perf['randu'] = np.array([uniform(0,1) for x in range(0,mat_perf.shape[0])])

mp_X = mat_perf[usevars]
mp_X_train = mp_X[mat_perf['randu'] <= .67]
mp_X_test = mp_X[mat_perf['randu'] > .67]

mp_Y_train = mat_perf.G3[mat_perf['randu'] <= .67]
mp_Y_test = mat_perf.G3[mat_perf['randu'] > .67]

# for the training set
cat_cols = [x for x in mp_X_train.columns if mp_X_train[x].dtype == "O"]
for col in cat_cols:
    new_cols = get_dummies(mp_X_train[col])
    new_cols.columns = col + '_' + new_cols.columns
    mp_X_train = concat([mp_X_train, new_cols], axis=1)

# for the testing set
cat_cols = [x for x in mp_X_test.columns if mp_X_test[x].dtype == "O"]
for col in cat_cols:
    new_cols = get_dummies(mp_X_test[col])
    new_cols.columns = col + '_' + new_cols.columns
    mp_X_test = concat([mp_X_test, new_cols], axis=1)

mp_X_train.drop(cat_cols, inplace=True, axis=1)
mp_X_test.drop(cat_cols, inplace=True, axis=1)

rf = RandomForestRegressor(bootstrap=True,
           criterion='mse', max_depth=2, max_features='auto',
           min_density=None, min_samples_leaf=1, min_samples_split=2,
           n_estimators=100, n_jobs=1, oob_score=True, random_state=None,
           verbose=0)
rf.fit(mp_X_train, mp_Y_train)

After I got past the part where I constructed the training and testing sets (with “unimportant” variables filtered out) I ran into a real annoyance. I learned that categorical variables need to be converted to dummy variables before you do the modeling (where each level of the categorical variable gets its own variable containing 1s and 0s. 1 means that the level was present in that row and 0 means that the level was not present in that row; so called “one-hot encoding”). I suppose you could argue that this puts less computational demand on the modeling procedures, but when you’re dealing with tree based ensembles I think this is a drawback. Let’s say you have a categorical variable with 5 features, “a” through “e”. It just so happens that when you compare a split on that categorical variable where “abc” is on one side and “de” is on the other side, there is a very significant difference in the dependent variable. How is one-hot encoding going to capture that? And then, your dataset which had a certain number of columns now has 5 additional columns due to the encoding. “Blah” I say!

Anyway, as you can see above, I used the get_dummies function in order to do the one-hot encoding. Also, you’ll see that I’ve assigned two thirds of the data to the training set and one third to the testing set. Now let’s see the same steps in R:

#R Code
keep.vars = match(filter(test.stats.df, abs(test.value) >= 3)$variable, names(mat_perf))
ctrl = trainControl(method="repeatedcv", number=10, selectionFunction = "oneSE")
mat_perf$randu = runif(395)
test = mat_perf[mat_perf$randu > .67,]
trf = train(mat_perf[mat_perf$randu <= .67,keep.vars], mat_perf$G3[mat_perf$randu <= .67],
            method="rf", metric="RMSE", data=mat_perf,
            trControl=ctrl, importance=TRUE)

Wait a minute. Did I really just train a Random Forest model in R, do cross validation, and prepare a testing data set with 5 commands!?!? That was a lot easier than doing these preparations and not doing cross validation in Python! I did in fact try to figure out cross validation in sklearn, but then I was having problems accessing variable importances after. I do like the caret package :) Next, let’s see how each of the models did on their testing set:

Testing the First Random Forest Model

#Python Code
y_pred = rf.predict(mp_X_test)
sns.set_context(context='poster', font_scale=1)
first_test = DataFrame({"pred.G3.keepvars" : y_pred, "G3" : mp_Y_test})
sns.lmplot("G3", "pred.G3.keepvars", first_test, size=7, aspect=1.5)
print 'r squared value of', stats.pearsonr(mp_Y_test, y_pred)[0]**2
print 'RMSE of', sqrt(mean_squared_error(mp_Y_test, y_pred))

Python Scatter Plot - First Model Pred vs Actual

R^2 value of 0.104940038879
RMSE of 4.66552400292

Here, as in all cases when making a prediction using sklearn, I use the predict method to generate the predicted values from the model using the testing set and then plot the prediction (“pred.G3.keepvars”) vs the actual values (“G3″) using the lmplot function. I like the syntax that the lmplot function from the seaborn package uses as it is simple and familiar to me from the R world (where the arguments consist of “X variable, Y Variable, dataset name, other aesthetic arguments). As you can see from the graph above and from the R^2 value, this model kind of sucks. Another thing I like here is the quality of the graph that seaborn outputs. It’s nice! It looks pretty modern, the text is very readable, and nothing looks edgy or pixelated in the plot. Okay, now let’s look at the code and output in R, using the same predictors.

#R Code
test$pred.G3.keepvars = predict(trf, test, "raw")
cor.test(test$G3, test$pred.G3.keepvars)$estimate[[1]]^2
summary(lm(test$G3 ~ test$pred.G3.keepvars))$sigma
ggplot(test, aes(x=G3, y=pred.G3.keepvars)) + geom_point() + stat_smooth(method="lm") + scale_y_continuous(breaks=seq(0,20,4), limits=c(0,20))

Scatter Plot - First Model Pred vs Actual

R^2 value of 0.198648
RMSE of 4.148194

Well, it looks like this model sucks a bit less than the Python one. Quality-wise, the plot looks super nice (thanks again, ggplot2 and ggthemr!) although by default the alpha parameter is not set to account for overplotting. The docs page for ggplot2 suggests setting alpha=.05, but for this particular data set, setting it to .5 seems to be better.

Finally for this section, let’s look at the variable importances generated for each training model:

#Python Code
importances = DataFrame({'cols':mp_X_train.columns, 'imps':rf.feature_importances_})
print importances.sort(['imps'], ascending=False)

             cols      imps
3        failures  0.641898
0            Medu  0.064586
10          sex_F  0.043548
19  Mjob_services  0.038347
11          sex_M  0.036798
16   Mjob_at_home  0.036609
2             age  0.032722
1            Fedu  0.029266
15   internet_yes  0.016545
6     romantic_no  0.013024
7    romantic_yes  0.011134
5      higher_yes  0.010598
14    internet_no  0.007603
4       higher_no  0.007431
12        paid_no  0.002508
20   Mjob_teacher  0.002476
13       paid_yes  0.002006
18     Mjob_other  0.001654
17    Mjob_health  0.000515
8       address_R  0.000403
9       address_U  0.000330
#R Code
varImp(trf)

## rf variable importance
## 
##          Overall
## failures 100.000
## romantic  49.247
## higher    27.066
## age       17.799
## Medu      14.941
## internet  12.655
## sex        8.012
## Fedu       7.536
## Mjob       5.883
## paid       1.563
## address    0.000

My first observation is that it was obviously easier for me to get the variable importances in R than it was in Python. Next, you’ll certainly see the symptom of the dummy coding I had to do for the categorical variables. That’s no fun, but we’ll survive through this example analysis, right? Now let’s look which variables made it to the top:

Whereas failures, mother’s education level, sex and mother’s job made it to the top of the list for the Python model, the top 4 were different apart from failures in the R model.

With the understanding that the variable selection method that I used was inappropriate, let’s move on to training a Random Forest model using all predictors except the prior 2 test scores. Since I’ve already commented above on my thoughts about the various steps in the process, I’ll comment only on the differences in results in the remaining sections.

Training and Testing the Second Random Forest Model

#Python Code

#aav = almost all variables
mp_X_aav = mat_perf[mat_perf.columns[0:30]]
mp_X_train_aav = mp_X_aav[mat_perf['randu'] <= .67]
mp_X_test_aav = mp_X_aav[mat_perf['randu'] > .67]

# for the training set
cat_cols = [x for x in mp_X_train_aav.columns if mp_X_train_aav[x].dtype == "O"]
for col in cat_cols:
    new_cols = get_dummies(mp_X_train_aav[col])
    new_cols.columns = col + '_' + new_cols.columns
    mp_X_train_aav = concat([mp_X_train_aav, new_cols], axis=1)
    
# for the testing set
cat_cols = [x for x in mp_X_test_aav.columns if mp_X_test_aav[x].dtype == "O"]
for col in cat_cols:
    new_cols = get_dummies(mp_X_test_aav[col])
    new_cols.columns = col + '_' + new_cols.columns
    mp_X_test_aav = concat([mp_X_test_aav, new_cols], axis=1)

mp_X_train_aav.drop(cat_cols, inplace=True, axis=1)
mp_X_test_aav.drop(cat_cols, inplace=True, axis=1)

rf_aav = RandomForestRegressor(bootstrap=True, 
           criterion='mse', max_depth=2, max_features='auto',
           min_density=None, min_samples_leaf=1, min_samples_split=2,
           n_estimators=100, n_jobs=1, oob_score=True, random_state=None,
           verbose=0)
rf_aav.fit(mp_X_train_aav, mp_Y_train)

y_pred_aav = rf_aav.predict(mp_X_test_aav)
second_test = DataFrame({"pred.G3.almostallvars" : y_pred_aav, "G3" : mp_Y_test})
sns.lmplot("G3", "pred.G3.almostallvars", second_test, size=7, aspect=1.5)
print 'r squared value of', stats.pearsonr(mp_Y_test, y_pred_aav)[0]**2
print 'RMSE of', sqrt(mean_squared_error(mp_Y_test, y_pred_aav))

Python Scatter Plot - Second Model Pred vs Actual

R^2 value of 0.226587731888
RMSE of 4.3338674965

Compared to the first Python model, the R^2 on this one is more than doubly higher (the first R^2 was .10494) and the RMSE is 7.1% lower (the first was 4.6666254). The predicted vs actual plot confirms that the predictions still don’t look fantastic compared to the actuals, which is probably the main reason why the RMSE hasn’t decreased by so much. Now to the R code using the same predictors:

#R code
trf2 = train(mat_perf[mat_perf$randu <= .67,1:30], mat_perf$G3[mat_perf$randu <= .67],
            method="rf", metric="RMSE", data=mat_perf,
            trControl=ctrl, importance=TRUE)
test$pred.g3.almostallvars = predict(trf2, test, "raw")
cor.test(test$G3, test$pred.g3.almostallvars)$estimate[[1]]^2
summary(lm(test$G3 ~ test$pred.g3.almostallvars))$sigma
ggplot(test, aes(x=G3, y=pred.g3.almostallvars)) + geom_point() + 
  stat_smooth() + scale_y_continuous(breaks=seq(0,20,4), limits=c(0,20))

Scatter Plot - Second Model Pred vs Actual

R^2 value of 0.3262093
RMSE of 3.8037318

Compared to the first R model, the R^2 on this one is approximately 1.64 times higher (the first R^2 was .19865) and the RMSE is 8.3% lower (the first was 4.148194). Although this particular model is indeed doing better at predicting values in the test set than the one built in Python using the same variables, I would still hesitate to assume that the process is inherently better for this data set. Due to the randomness inherent in Random Forests, one run of the training could be lucky enough to give results like the above, whereas other times the results might even be slightly worse than what I managed to get in Python. I confirmed this, and in fact most additional runs of this model in R seemed to result in an R^2 of around .20 and an RMSE of around 4.2.

Again, let’s look at the variable importances generated for each training model:

#Python Code
importances_aav = DataFrame({'cols':mp_X_train_aav.columns, 'imps':rf_aav.feature_importances_})
print importances_aav.sort(['imps'], ascending=False)

                 cols      imps
5            failures  0.629985
12           absences  0.057430
1                Medu  0.037081
41      schoolsup_yes  0.036830
0                 age  0.029672
23       Mjob_at_home  0.029642
16              sex_M  0.026949
15              sex_F  0.026052
40       schoolsup_no  0.019097
26      Mjob_services  0.016354
55       romantic_yes  0.014043
51         higher_yes  0.012367
2                Fedu  0.011016
39     guardian_other  0.010715
37    guardian_father  0.006785
8               goout  0.006040
11             health  0.005051
54        romantic_no  0.004113
7            freetime  0.003702
3          traveltime  0.003341
#R Code
varImp(trf2)

## rf variable importance
## 
##   only 20 most important variables shown (out of 30)
## 
##            Overall
## absences    100.00
## failures     70.49
## schoolsup    47.01
## romantic     32.20
## Pstatus      27.39
## goout        26.32
## higher       25.76
## reason       24.02
## guardian     22.32
## address      21.88
## Fedu         20.38
## school       20.07
## traveltime   20.02
## studytime    18.73
## health       18.21
## Mjob         17.29
## paid         15.67
## Dalc         14.93
## activities   13.67
## freetime     12.11

Now in both cases we’re seeing that absences and failures are considered as the top 2 most important variables for predicting final math exam grade. It makes sense to me, but frankly is a little sad that the two most important variables are so negative :( On to to the third Random Forest model, containing everything from the second with the addition of the students’ marks on their second math exam!

Training and Testing the Third Random Forest Model

#Python Code

#allv = all variables (except G1)
allvars = range(0,30)
allvars.append(31)
mp_X_allv = mat_perf[mat_perf.columns[allvars]]
mp_X_train_allv = mp_X_allv[mat_perf['randu'] <= .67]
mp_X_test_allv = mp_X_allv[mat_perf['randu'] > .67]

# for the training set
cat_cols = [x for x in mp_X_train_allv.columns if mp_X_train_allv[x].dtype == "O"]
for col in cat_cols:
    new_cols = get_dummies(mp_X_train_allv[col])
    new_cols.columns = col + '_' + new_cols.columns
    mp_X_train_allv = concat([mp_X_train_allv, new_cols], axis=1)
    
# for the testing set
cat_cols = [x for x in mp_X_test_allv.columns if mp_X_test_allv[x].dtype == "O"]
for col in cat_cols:
    new_cols = get_dummies(mp_X_test_allv[col])
    new_cols.columns = col + '_' + new_cols.columns
    mp_X_test_allv = concat([mp_X_test_allv, new_cols], axis=1)

mp_X_train_allv.drop(cat_cols, inplace=True, axis=1)
mp_X_test_allv.drop(cat_cols, inplace=True, axis=1)

rf_allv = RandomForestRegressor(bootstrap=True, 
           criterion='mse', max_depth=2, max_features='auto',
           min_density=None, min_samples_leaf=1, min_samples_split=2,
           n_estimators=100, n_jobs=1, oob_score=True, random_state=None,
           verbose=0)
rf_allv.fit(mp_X_train_allv, mp_Y_train)

y_pred_allv = rf_allv.predict(mp_X_test_allv)
third_test = DataFrame({"pred.G3.plusG2" : y_pred_allv, "G3" : mp_Y_test})
sns.lmplot("G3", "pred.G3.plusG2", third_test, size=7, aspect=1.5)
print 'r squared value of', stats.pearsonr(mp_Y_test, y_pred_allv)[0]**2
print 'RMSE of', sqrt(mean_squared_error(mp_Y_test, y_pred_allv))

Python Scatter Plot - Third Model Pred vs Actual

R^2 value of 0.836089929903
RMSE of 2.11895794845

Obviously we have added a highly predictive piece of information here by adding the grades from their second math exam (variable name was “G2″). I was reluctant to add this variable at first because when you predict test marks with previous test marks then it prevents the model from being useful much earlier on in the year when these tests have not been administered. However, I did want to see what the model would look like when I included it anyway! Now let’s see how predictive these variables were when I put them into a model in R:

#R Code
trf3 = train(mat_perf[mat_perf$randu <= .67,c(1:30,32)], mat_perf$G3[mat_perf$randu <= .67], 
             method="rf", metric="RMSE", data=mat_perf, 
             trControl=ctrl, importance=TRUE)
test$pred.g3.plusG2 = predict(trf3, test, "raw")
cor.test(test$G3, test$pred.g3.plusG2)$estimate[[1]]^2
summary(lm(test$G3 ~ test$pred.g3.plusG2))$sigma
ggplot(test, aes(x=G3, y=pred.g3.plusG2)) + geom_point() + 
  stat_smooth(method="lm") + scale_y_continuous(breaks=seq(0,20,4), limits=c(0,20))

Scatter Plot - Third Model Pred vs Actual

R^2 value of 0.9170506
RMSE of 1.3346087

Well, it appears that yet again we have a case where the R model has fared better than the Python model. I find it notable that when you look at the scatterplot for the Python model you can see what look like steps in the points as you scan your eyes from the bottom-left part of the trend line to the top-right part. It appears that the Random Forest model in R has benefitted from the tuning process and as a result the distribution of the residuals are more homoscedastic and also obviously closer to the regression line than the Python model. I still wonder how much more similar these results would be if I had carried out the Python analysis by tuning while cross validating like I did in R!

For the last time, let’s look at the variable importances generated for each training model:

#Python Code
importances_allv = DataFrame({'cols':mp_X_train_allv.columns, 'imps':rf_allv.feature_importances_})
print importances_allv.sort(['imps'], ascending=False)

                 cols      imps
13                 G2  0.924166
12           absences  0.075834
14          school_GP  0.000000
25        Mjob_health  0.000000
24       Mjob_at_home  0.000000
23          Pstatus_T  0.000000
22          Pstatus_A  0.000000
21        famsize_LE3  0.000000
20        famsize_GT3  0.000000
19          address_U  0.000000
18          address_R  0.000000
17              sex_M  0.000000
16              sex_F  0.000000
15          school_MS  0.000000
56       romantic_yes  0.000000
27      Mjob_services  0.000000
11             health  0.000000
10               Walc  0.000000
9                Dalc  0.000000
8               goout  0.000000
#R Code
varImp(trf3)

## rf variable importance
## 
##   only 20 most important variables shown (out of 31)
## 
##            Overall
## G2         100.000
## absences    33.092
## failures     9.702
## age          8.467
## paid         7.591
## schoolsup    7.385
## Pstatus      6.604
## studytime    5.963
## famrel       5.719
## reason       5.630
## guardian     5.278
## Mjob         5.163
## school       4.905
## activities   4.532
## romantic     4.336
## famsup       4.335
## traveltime   4.173
## Medu         3.540
## Walc         3.278
## higher       3.246

Now this is VERY telling, and gives me insight as to why the scatterplot from the Python model had that staircase quality to it. The R model is taking into account way more variables than the Python model. G2 obviously takes the cake in both models, but I suppose it overshadowed everything else by so much in the Python model, that for some reason it just didn’t find any use for any other variable than absences.

Conclusion

This was fun! For all the work I did in Python, I used IPython Notebook. Being an avid RStudio user, I’m not used to web-browser based interactive coding like what IPython Notebook provides. I discovered that I enjoy it and found it useful for laying out the information that I was using to write this blog post (I also laid out the R part of this analysis in RMarkdown for that same reason). What I did not like about IPython Notebook is that when you close it/shut it down/then later reinitialize it, all of the objects that form your data and analysis are gone and all you have left are the results. You must then re-run all of your code so that your objects are resident in memory again. It would be nice to have some kind of convenience function to save everything to disk so that you can reload at a later time.

I found myself stumbling a lot trying to figure out which Python packages to use for each particular purpose and I tended to get easily frustrated. I had to keep reminding myself that it’s a learning curve to a similar extent as it was for me while I was learning R. This frustration should not be a deterrent from picking it up and learning how to do machine learning in Python. Another part of my frustration was not being able to get variable importances from my Random Forest models in Python when I was building them using cross validation and grid searches. If you have a link to share with me that shows an example of this, I’d be happy to read it.

I liked seaborn and I think if I spend more time with it then perhaps it could serve as a decent alternative to graphing in ggplot2. That being said, I’ve spent so much time using ggplot2 that sometimes I wonder if there is anything out there that rivals its flexibility and elegance!

The issue I mentioned above with categorical variables is annoying and it really makes me wonder if using a Tree based R model would intrinsically be superior due to its automatic handling of categorical variables compared with Python, where you need to one-hot encode these variables.

All in all, I hope this was as useful and educational for you as it was for me. It’s important to step outside of your comfort zone every once in a while :)


To leave a comment for the author, please follow the link and comment on his blog: Data Until I Die!.

R-bloggers.com offers daily e-mail updates about R news and tutorials on topics such as: visualization (ggplot2, Boxplots, maps, animation), programming (RStudio, Sweave, LaTeX, SQL, Eclipse, git, hadoop, Web Scraping) statistics (regression, PCA, time series, trading) and more...

Paper Helicopter Experiment, part III

$
0
0

(This article was first published on Wiekvoet, and kindly contributed to R-bloggers)
As final part of my paper helicopter experiment analysis (part I, part II) I do a reanalysis for one more data set. In 2002 Erik Erhardt and Hantao Mai did an extensive experiment, see The Search for the Optimal Paper Helicopter. They did a number of steps, including variable screening, steepest ascend and confirmatory experiment. For my part, I have combined all those data in one data set, and checked what kind of model would be used.

Data

The data extracted contains 45 observations. These observations have a number of replications, for instance a central composite design has a replicated center and the optimum found has been repeatedly tested.
After creation of a factor combining all variables it is pretty easy to examine the replications. The replications are thus. Here the first eight variables are the experimental settings, allvl is the factor combining all levels, Time is response and Freq the frequency of occurrence for allvl:
   RotorLength RotorWidth BodyLength FootLength FoldLength FoldWidth
1         8.50       4.00        3.5       1.25          8       2.0
2         8.50       4.00        3.5       1.25          8       2.0
3         8.50       4.00        3.5       1.25          8       2.0
4         8.50       4.00        3.5       1.25          8       2.0
5         8.50       4.00        3.5       1.25          8       2.0
6         8.50       4.00        3.5       1.25          8       2.0
7        11.18       2.94        2.0       2.00          6       1.5
8        11.18       2.94        2.0       2.00          6       1.5
9        11.18       2.94        2.0       2.00          6       1.5
10       11.18       2.94        2.0       2.00          6       1.5
11       11.18       2.94        2.0       2.00          6       1.5
12       11.18       2.94        2.0       2.00          6       1.5
13       11.50       2.83        2.0       1.50          6       1.5
14       11.50       2.83        2.0       1.50          6       1.5
15       11.50       2.83        2.0       1.50          6       1.5
   PaperWeight DirectionOfFold                                 allvl  Time Freq
1        heavy         against  8.5.4.0.3.5.1.2. 8.2.0.heavy.against 13.88    3
2        heavy         against  8.5.4.0.3.5.1.2. 8.2.0.heavy.against 15.91    3
3        heavy         against  8.5.4.0.3.5.1.2. 8.2.0.heavy.against 16.08    3
4        light         against  8.5.4.0.3.5.1.2. 8.2.0.light.against 10.52    3
5        light         against  8.5.4.0.3.5.1.2. 8.2.0.light.against 10.81    3
6        light         against  8.5.4.0.3.5.1.2. 8.2.0.light.against 10.89    3
7        light         against 11.2.2.9.2.0.2.0. 6.1.5.light.against 17.29    6
8        light         against 11.2.2.9.2.0.2.0. 6.1.5.light.against 19.41    6
9        light         against 11.2.2.9.2.0.2.0. 6.1.5.light.against 18.55    6
10       light         against 11.2.2.9.2.0.2.0. 6.1.5.light.against 15.54    6
11       light         against 11.2.2.9.2.0.2.0. 6.1.5.light.against 16.40    6
12       light         against 11.2.2.9.2.0.2.0. 6.1.5.light.against 19.67    6
13       light         against 11.5.2.8.2.0.1.5. 6.1.5.light.against 16.35    3
14       light         against 11.5.2.8.2.0.1.5. 6.1.5.light.against 16.41    3
15       light         against 11.5.2.8.2.0.1.5. 6.1.5.light.against 17.38    3

Transformation

It is also possible to do a regression of Time against allvl and examine the residuals. Since it is not difficult to imagine that error is proportional to elapsed time this is done for both original data and log10 transformed data.
As can be seen it seems that larger values have the larger error, but it is not really corrected very much by a log transformation. To examine this a bit more, the Box-Cox transformation is used. From there it seems square root is almost optimum, but log and no transformation should also work. It was decided to use a square root transformation.
Given the square root transformation the residual error should not be lower than 0.02, since that is what the replications have. On the other hand, much higher than 0.02 is a clear sign of under fitting.
Analysis of Variance Table

Response: sqrt(Time)
          Df  Sum Sq Mean Sq F value    Pr(>F)    
allvl      3 1.84481 0.61494      26 2.707e-05 ***
Residuals 11 0.26016 0.02365                      
---
Signif. codes:  0 '***' 0.001 '**' 0.01 '*' 0.05 '.' 0.1 ' ' 1

Model selection

Given the residual variance desired, the model linear in variables is not sufficient.
Analysis of Variance Table

Response: sTime
                Df Sum Sq Mean Sq F value    Pr(>F)    
RotorLength      1 3.6578  3.6578 18.4625 0.0001257 ***
RotorWidth       1 1.0120  1.0120  5.1078 0.0299644 *  
BodyLength       1 0.1352  0.1352  0.6823 0.4142439    
FootLength       1 0.2719  0.2719  1.3725 0.2490708    
FoldLength       1 0.0060  0.0060  0.0302 0.8629331    
FoldWidth        1 0.0189  0.0189  0.0953 0.7592922    
PaperWeight      1 0.6528  0.6528  3.2951 0.0778251 .  
DirectionOfFold  1 0.4952  0.4952  2.4994 0.1226372    
Residuals       36 7.1324  0.1981                      
---
Signif. codes:  0 '***' 0.001 '**' 0.01 '*' 0.05 '.' 0.1 ' ' 1

Adding interactions and quadratic effects via stepwise regression did not improve much.
Analysis of Variance Table

Response: sTime
                       Df Sum Sq Mean Sq F value    Pr(>F)    
RotorLength             1 3.6578  3.6578 29.5262 3.971e-06 ***
RotorWidth              1 1.0120  1.0120  8.1687  0.007042 ** 
FootLength              1 0.3079  0.3079  2.4851  0.123676    
PaperWeight             1 0.6909  0.6909  5.5769  0.023730 *  
I(RotorLength^2)        1 2.2035  2.2035 17.7872  0.000159 ***
I(RotorWidth^2)         1 0.3347  0.3347  2.7018  0.108941    
FootLength:PaperWeight  1 0.4291  0.4291  3.4634  0.070922 .  
RotorWidth:FootLength   1 0.2865  0.2865  2.3126  0.137064    
Residuals              36 4.4598  0.1239                      
---
Signif. codes:  0 '***' 0.001 '**' 0.01 '*' 0.05 '.' 0.1 '
Just adding the quadratic effects did not help either. However, using both linear and quadratic as a starting point did give a more extensive model.
Analysis of Variance Table

Response: sTime
                            Df Sum Sq Mean Sq  F value    Pr(>F)    
RotorLength                  1 3.6578  3.6578 103.8434 5.350e-10 ***
RotorWidth                   1 1.0120  1.0120  28.7293 1.918e-05 ***
FootLength                   1 0.3079  0.3079   8.7401 0.0070780 ** 
FoldLength                   1 0.0145  0.0145   0.4113 0.5276737    
FoldWidth                    1 0.0099  0.0099   0.2816 0.6007138    
PaperWeight                  1 0.7122  0.7122  20.2180 0.0001633 ***
DirectionOfFold              1 0.5175  0.5175  14.6902 0.0008514 ***
I(RotorLength^2)             1 1.7405  1.7405  49.4119 3.661e-07 ***
I(RotorWidth^2)              1 0.3160  0.3160   8.9709 0.0064635 ** 
I(FootLength^2)              1 0.1216  0.1216   3.4525 0.0760048 .  
I(FoldLength^2)              1 0.0045  0.0045   0.1272 0.7245574    
RotorLength:RotorWidth       1 0.4181  0.4181  11.8693 0.0022032 ** 
RotorLength:PaperWeight      1 0.3778  0.3778  10.7247 0.0033254 ** 
RotorWidth:FootLength        1 0.6021  0.6021  17.0947 0.0004026 ***
PaperWeight:DirectionOfFold  1 0.3358  0.3358   9.5339 0.0051968 ** 
RotorWidth:FoldLength        1 1.5984  1.5984  45.3778 7.167e-07 ***
RotorWidth:FoldWidth         1 0.3937  0.3937  11.1769 0.0028207 ** 
RotorWidth:PaperWeight       1 0.2029  0.2029   5.7593 0.0248924 *  
RotorWidth:DirectionOfFold   1 0.0870  0.0870   2.4695 0.1297310    
RotorLength:FootLength       1 0.0687  0.0687   1.9517 0.1757410    
FootLength:PaperWeight       1 0.0732  0.0732   2.0781 0.1629080    
Residuals                   23 0.8102  0.0352                       
---
Signif. codes:  0 '***' 0.001 '**' 0.01 '*' 0.05 '.' 0.1 ' ' 1
This model does is quite extensive. For prediction purpose I would probably drop a few terms. For instance FootLength:PaperWeight could be removed, lessen the fit yet improve predictions, since its p-value is close to 0.15. As it is currently the model does have some issues. For instance, quite some points have high leverage.

Conclusion

The paper helicopter needs quite a complex model to fit all effects on flying time. This somewhat validates the complex models found in part 1. 

Code used

library(dplyr)
library(car)
h3 <- read.table(sep='t',header=TRUE,text='
        RotorLength RotorWidth BodyLength FootLength FoldLength FoldWidth PaperWeight DirectionOfFold Time
        5.5 3 1.5 0 5 1.5 light against 11.8
        5.5 3 1.5 2.5 11 2.5 heavy against 8.29
        5.5 3 5.5 0 11 2.5 light with 9
        5.5 3 5.5 2.5 5 1.5 heavy with 7.21
        5.5 5 1.5 0 11 1.5 heavy with 6.65
        5.5 5 1.5 2.5 5 2.5 light with 10.26
        5.5 5 5.5 0 5 2.5 heavy against 7.98
        5.5 5 5.5 2.5 11 1.5 light against 8.06
        11.5 3 1.5 0 5 2.5 heavy with 9.2
        11.5 3 1.5 2.5 11 1.5 light with 19.35
        11.5 3 5.5 0 11 1.5 heavy against 12.08
        11.5 3 5.5 2.5 5 2.5 light against 20.5
        11.5 5 1.5 0 11 2.5 light against 13.58
        11.5 5 1.5 2.5 5 1.5 heavy against 7.47
        11.5 5 5.5 0 5 1.5 light with 9.79
        11.5 5 5.5 2.5 11 2.5 heavy with 9.2
        8.5 4 3.5 1.25 8 2 light against 10.52
        8.5 4 3.5 1.25 8 2 light against 10.81
        8.5 4 3.5 1.25 8 2 light against 10.89
        8.5 4 3.5 1.25 8 2 heavy against 15.91
        8.5 4 3.5 1.25 8 2 heavy against 16.08
        8.5 4 3.5 1.25 8 2 heavy against 13.88
        8.5 4 2 2 6 2 light against 12.99
        9.5 3.61 2 2 6 2 light against 15.22
        10.5 3.22 2 2 6 2 light against 16.34
        11.5 2.83 2 2 6 1.5 light against 18.78
        12.5 2.44 2 2 6 1.5 light against 17.39
        13.5 2.05 2 2 6 1.5 light against 7.24
        10.5 2.44 2 1.5 6 1.5 light against 13.65
        12.5 2.44 2 1.5 6 1.5 light against 13.74
        10.5 3.22 2 1.5 6 1.5 light against 15.48
        12.5 3.22 2 1.5 6 1.5 light against 13.53
        11.5 2.83 2 1.5 6 1.5 light against 17.38
        11.5 2.83 2 1.5 6 1.5 light against 16.35
        11.5 2.83 2 1.5 6 1.5 light against 16.41
        10.08 2.83 2 1.5 6 1.5 light against 12.51
        12.91 2.83 2 1.5 6 1.5 light against 15.17
        11.5 2.28 2 1.5 6 1.5 light against 14.86
        11.5 3.38 2 1.5 6 1.5 light against 11.85
        11.18 2.94 2 2 6 1.5 light against 15.54
        11.18 2.94 2 2 6 1.5 light against 16.4
        11.18 2.94 2 2 6 1.5 light against 19.67
        11.18 2.94 2 2 6 1.5 light against 19.41
        11.18 2.94 2 2 6 1.5 light against 18.55
        11.18 2.94 2 2 6 1.5 light against 17.29
        ')
names(h3)

h3 <- h3 %>% 
    mutate(.,
        FRL=factor(format(RotorLength,digits=2)),
        FRW=factor(format(RotorWidth,digits=2)),
        FBL=factor(format(BodyLength,digits=2)),
        FFt=factor(format(FootLength,digits=2)),
        FFd=factor(format(FoldLength,digits=2)),
        FFW=factor(format(FoldWidth,digits=2)),
        allvl=interaction(FRL,FRW,FBL,FFt,FFd,FFW,PaperWeight,DirectionOfFold,drop=TRUE)
    )

h4 <- xtabs(~allvl,data=h3) %>% 
    as.data.frame %>%
    filter(.,Freq>1) %>%
    merge(.,h3) %>%
    select(.,RotorLength,
        RotorWidth,BodyLength,FootLength,
        FoldLength,FoldWidth,PaperWeight,
        DirectionOfFold,allvl,Time,Freq) %>%
    print
lm(Time~allvl,data=h4) %>% anova

par(mfrow=c(1,2))
aov(Time~allvl,data=h3) %>% residualPlot(.,main='Untransformed')
aov(log10(Time)~allvl,data=h3) %>% residualPlot(.,main='Log10 Transform')

lm(Time ~   RotorLength + RotorWidth + BodyLength +
            FootLength + FoldLength + FoldWidth + 
            PaperWeight + DirectionOfFold,
        data=h3) %>%
    boxCox(.)
dev.off()

lm(sqrt(Time)~allvl,data=h4) %>% anova

h3 <- mutate(h3,sTime=sqrt(Time))

lm(sTime ~  RotorLength + RotorWidth + BodyLength +
            FootLength + FoldLength + FoldWidth + 
            PaperWeight + DirectionOfFold,
        data=h3) %>%
    anova

s1 <- lm(sTime ~ 
            RotorLength + RotorWidth + BodyLength +
            FootLength + FoldLength + FoldWidth + 
            PaperWeight + DirectionOfFold ,
        data=h3) %>%
    step(.,scope=~(RotorLength + RotorWidth + BodyLength +
              FootLength + FoldLength + FoldWidth + 
              PaperWeight + DirectionOfFold)*
            (RotorLength + RotorWidth + BodyLength +
              FootLength + FoldLength + FoldWidth)+
            I(RotorLength^2) + I(RotorWidth^2) + I(BodyLength^2) +
            I(FootLength^2) + I(FoldLength^2) + I(FoldWidth^2) +
            PaperWeight*DirectionOfFold)
anova(s1)

s1 <- lm(sTime ~ 
            RotorLength + RotorWidth + BodyLength +
            FootLength + FoldLength + FoldWidth + 
            PaperWeight + DirectionOfFold ,
        data=h3) %>%
    step(.,scope=~(RotorLength + RotorWidth + BodyLength +
              FootLength + FoldLength + FoldWidth + 
              PaperWeight + DirectionOfFold)*
            (RotorLength + RotorWidth + BodyLength +
              FootLength + FoldLength + FoldWidth)+
            I(RotorLength^2) + I(RotorWidth^2) + I(BodyLength^2) +
            I(FootLength^2) + I(FoldLength^2) + I(FoldWidth^2) +
            PaperWeight*DirectionOfFold)

anova(s1)

s2 <- lm(sTime ~ 
            RotorLength + RotorWidth + BodyLength +
            FootLength + FoldLength + FoldWidth + 
            PaperWeight + DirectionOfFold +
            I(RotorLength^2) + I(RotorWidth^2) + I(BodyLength^2) +
            I(FootLength^2) + I(FoldLength^2) + I(FoldWidth^2) ,
        data=h3) %>%
    step(.,scope=~(RotorLength + RotorWidth + BodyLength +
              FootLength + FoldLength + FoldWidth + 
              PaperWeight + DirectionOfFold)*
            (RotorLength + RotorWidth + BodyLength +
              FootLength + FoldLength + FoldWidth)+
            I(RotorLength^2) + I(RotorWidth^2) + I(BodyLength^2) +
            I(FootLength^2) + I(FoldLength^2) + I(FoldWidth^2) +
            PaperWeight*DirectionOfFold)

anova(s2)
par(mfrow=c(2,2))
plot(s2)

To leave a comment for the author, please follow the link and comment on his blog: Wiekvoet.

R-bloggers.com offers daily e-mail updates about R news and tutorials on topics such as: visualization (ggplot2, Boxplots, maps, animation), programming (RStudio, Sweave, LaTeX, SQL, Eclipse, git, hadoop, Web Scraping) statistics (regression, PCA, time series, trading) and more...

advanced.procD.lm for pairwise tests and model comparisons

$
0
0

(This article was first published on geomorph, and kindly contributed to R-bloggers)
In geomorph 2.1.5, we decided to deprecate the functions, pairwiseD.test and pairwise.slope.test.   Our reason for this was two-fold.  First, recent updates by CRAN rendered these functions unstable.  These functions depended on the model.frame family of base functions, which were updated by CRAN.  We tried to find solutions but the updated pairwise functions were worse than non-functioning functions, as they sometimes provided incorrect results (owing to strange sorting of rows in design matrices).  We realized that we were in a position that required a complete overhaul of these functions, if we wanted to maintain them.  Second, because advanced.procD.lm was already capable of pairwise tests and did not suffer from the same issues, we realized we did not have to update the other functions, but could instead help users understand how to use advancd.procD.lm.  Basically, this blog post is a much better use of time than trying again and again to fix broken functions.  Before reading on, if you have not already read the blog post on ANOVA in geomorph, it would probably be worth your time to read that post first.
There are three topics covered in this post: 1) advanced.procD.lm as a model comparison test, 2) "full" randomization versus randomized residual permutation procedure (RRPP), and 3) pairwise tests.  These topics are not independent.  It is hoped that users realize that pairwise tests are nothing more than using the same resampling experiment for ANOVA for all pairwise test statistics.  Thus, understanding the first two topics makes the pairwise options of advanced.procD.lm obvious to manipulate.  (Note that the term ANOVA is used here to include univariate and multivariate ANOVA.  The ANOVA results in geomorph functions are not obtained differently for univariate and multivariate data.)

Model comparisons: As explained in the ANOVA blog post, we use comparisons of model (sum of squared) error to calculate effects (sum of squares, SS).  An "effect" is described by the variables contained in one model and lacked in another.  For example, using the plethodon data,

> library(geomorph)
> data(plethodon)
> gpa <- gpagen(plethodon$land)
> Y <- two.d.array(gpa$coords)

> species <- plethodon$species
> site <- plethodon$site
> fit1 <- lm(Y ~ 1) # effects = intercept
> fit2 <- lm(Y ~ species) # effects = intercept + species


we have created two models, fit1 and fit 2.  It is easiest to appreciate the difference between these models by looking at the model matrices.

> model.matrix(fit1)
   (Intercept)
1            1
2            1
3            1
4            1
5            1
6            1
7            1
8            1
9            1
10           1
11           1
12           1
13           1
14           1
15           1
16           1
17           1
18           1
19           1
20           1
21           1
22           1
23           1
24           1
25           1
26           1
27           1
28           1
29           1
30           1
31           1
32           1
33           1
34           1
35           1
36           1
37           1
38           1
39           1
40           1
attr(,"assign")
[1] 0
> model.matrix(fit2)
   (Intercept)                  Teyah
1            1                      0
2            1                      0
3            1                      0
4            1                      0
5            1                      0
6            1                      0
7            1                      0
8            1                      0
9            1                      0
10           1                      0
11           1                      1
12           1                      1
13           1                      1
14           1                      1
15           1                      1
16           1                      1
17           1                      1
18           1                      1
19           1                      1
20           1                      1
21           1                      0
22           1                      0
23           1                      0
24           1                      0
25           1                      0
26           1                      0
27           1                      0
28           1                      0
29           1                      0
30           1                      0
31           1                      1
32           1                      1
33           1                      1
34           1                      1
35           1                      1
36           1                      1
37           1                      1
38           1                      1
39           1                      1
40           1                      1
attr(,"assign")
[1] 0 1
attr(,"contrasts")
attr(,"contrasts")$species`
[1] "contr.treatment"


The fit2 model is more "complex" but contains the element of the fit1 model.  (It can also be seen that the species "effect" allows two means instead of one.  The first species becomes the intercept [second column = 0] and the second species changes the value of the intercept [second column = 1].  More on this here.)  If one wanted to evaluate the species effect, he could compare the error produced by the two models, since "species" is contained in one but lacked in the other.  This is what is done with advanced.procD.lm, e.g.

> advanced.procD.lm(fit1, fit2)

ANOVA with RRPP

        df     SSE       SS      F      Z     P
        39 0.19694                           
species 38 0.16768 0.029258 6.6304 4.9691 0.001


This is how this ANOVA should be interpreted: first, there are 40 salamanders in these data.  The intercept model (fit1) estimates the mean.  Therefore there are 40 - 1 = 39 degrees of freedom.  The species model (fit2) estimates two means.  Therefore there are 40 - 2 = 38 degrees of freedom.  From the "predicted" values (one multivariate mean or two multivariate means, depending on model), residuals are obtained,  their Procrustes distances to predicted values are calculated (the procD part of the function name), and the squared distances are summed to find the sum of squared error (SSE) for each model.  Error can only decrease with more model effects.  By adding the species effect, the change in SSE was 0.029258, which is the model effect.  For descriptive purposes, this can be converted to an F value by dividing the effect SS by the difference in degrees of freedom (1 df), then dividing this value by the SSE of the full model divided by its degrees of freedom (38 df).  This is a measure of effect size.  More importantly, the effect size can also be evaluated by the position of the observed SS in the distribution of random SS.  Since we did not specify the number of permutations, the default is used (999 plus the observed).  The observed SS is 4.813 standard deviations from the expected value of 0 under the null hypothesis, with a probability of being exceeded of 0.001 (the P-value).  ANOVA with RRPP indicates that in every random permutation, the residuals of the "reduced" model are randomzied.

For comparison, here are the results from procD.lm on fit2, using RRPP

> procD.lm(fit2, RRPP=TRUE)

Type I (Sequential) Sums of Squares and Cross-products

Randomized Residual Permutation Procedure used

          df       SS        MS     Rsq      F      Z P.value
species    1 0.029258 0.0292578 0.14856 6.6304 4.8448   0.001
Residuals 38 0.167682 0.0044127                             
Total     39 0.196940 


Notice that the summary statistics are the exact same (except Z and maybe P.value, as these depend on random outcomes).  This is the case if the reduced model is the most basic "null" model (contains only an intercept) and there is only one effect.  This time, let's do the same thing without RRPP.

> procD.lm(fit2, RRPP=FALSE)

Type I (Sequential) Sums of Squares and Cross-products

Randomization of Raw Values used

          df       SS        MS     Rsq      F     Z P.value
species    1 0.029258 0.0292578 0.14856 6.6304 4.772   0.002
Residuals 38 0.167682 0.0044127                            
Total     39 0.196940 


Notice that the Z and P.values were so indifferent as to suggest that nothing different was done.  In this case, this is the truth.  RRPP performed with residuals from a model with only an intercept is tantamount to a "full" randomization of the observed values.  (This is explained better here.)

Full randomization versus RRPP: To better appreciate the difference between RRPP and full randomization, let's make a different model

fit3 <- lm(Y ~ species + site)

Now we have options!  First, let's just use procD.lm and forget about mode comparisons... sort of.  We will do this with both full randomization and RRPP


> procD.lm(fit3, RRPP=FALSE)

Type I (Sequential) Sums of Squares and Cross-products

Randomization of Raw Values used

          df       SS       MS     Rsq      F       Z P.value
species    1 0.029258 0.029258 0.14856 10.479  4.7407   0.001
site       1 0.064375 0.064375 0.32688 23.056 10.1732   0.001
Residuals 37 0.103307 0.002792                              
Total     39 0.196940     

                                  
> procD.lm(fit3, RRPP=TRUE)

Type I (Sequential) Sums of Squares and Cross-products

Randomized Residual Permutation Procedure used

          df       SS       MS     Rsq      F       Z P.value
species    1 0.029258 0.029258 0.14856 10.479  4.7368   0.002
site       1 0.064375 0.064375 0.32688 23.056 11.9331   0.001
Residuals 37 0.103307 0.002792                              
Total     39 0.196940  


Notice that the test stats are the same for both but the effect sizes (Z scores) are different.  The species Z scores are similar, and similar to what was observed before.  The site Z scores are slightly different though.  There are cases where one method might produce significant results and the other does not.  The reason for this is that prcoD.lm performs a series of model comparisons.  The first model has an intercept.  The second model add species.  The third model adds site to the second model.  There are two model comparisons: first to second and second to third.  Where these methods differ is that with RRPP, the residuals from the "reduced" model is used in each comparison; with full randomization, the residuals from the intercept model (only and always) are used.

This gets even more complex with more effects added to the model; e.g., an interaction:

> fit4 <- lm(Y ~ species * site)
> procD.lm(fit4, RRPP=FALSE)

Type I (Sequential) Sums of Squares and Cross-products

Randomization of Raw Values used

             df       SS       MS     Rsq      F      Z P.value
species       1 0.029258 0.029258 0.14856 14.544 4.7214   0.001
site          1 0.064375 0.064375 0.32688 32.000 9.9451   0.001
species:site  1 0.030885 0.030885 0.15682 15.352 4.9743   0.001
Residuals    36 0.072422 0.002012                             
Total        39 0.196940    

                                  
> procD.lm(fit4, RRPP=TRUE)

Type I (Sequential) Sums of Squares and Cross-products

Randomized Residual Permutation Procedure used

             df       SS       MS     Rsq      F       Z P.value
species       1 0.029258 0.029258 0.14856 14.544  4.7512   0.001
site          1 0.064375 0.064375 0.32688 32.000 11.5108   0.001
species:site  1 0.030885 0.030885 0.15682 15.352  9.8574   0.001
Residuals    36 0.072422 0.002012                              
Total        39 0.196940  


It should be appreciated that because full randomization ignores the effects already added to the model (e.g., species and site, before the interaction is added), spurious results can occur.  This could be significant effects rendered non-significant, or non-significant effects rendered significant.  The reason advanced.procD.lm is useful is that it allows creativity rather than the simple on/off switch for RRPP in procD.lm.

Model comparisons redux: Here is a simple exercise.  Let's do all logical model comparisons of the model fits we have thus far, using advanced.procD.lm.

> advanced.procD.lm(fit1, fit2)

ANOVA with RRPP

        df     SSE       SS      F      Z     P
        39 0.19694                            
species 38 0.16768 0.029258 6.6304 4.8135 0.001


> advanced.procD.lm(fit2, fit3)

ANOVA with RRPP

             df     SSE       SS      F      Z     P
species      38 0.16768                            
species+site 37 0.10331 0.064375 23.056 11.459 0.001


> advanced.procD.lm(fit3, fit4)

ANOVA with RRPP

                          df      SSE       SS      F      Z     P
species+site              37 0.103307                            
species+site+species:site 36 0.072422 0.030885 15.352 9.4351 0.001


The Z values in each test are approximately the same as procD.lm with RRPP.  The SS values are exactly the same!  (The F values are not, as the error SS changes in each case.)  So, it might not be clear why advanced.procD.lm is useful.  Here is something that cannot be done with procD.lm.

> advanced.procD.lm(fit2, fit4)

ANOVA with RRPP

                          df      SSE      SS      F      Z     P
species                   38 0.167682                          
species+site+species:site 36 0.072422 0.09526 23.676 9.6226 0.001


The usefulness is that advanced.procD.lm can be used with any comparison of nested models.  The models do not have to differ by one effect.  Also, a "full" model evaluation can be done as

> advanced.procD.lm(fit1, fit4)

ANOVA with RRPP

                          df      SSE      SS      F      Z     P
                          39 0.196940                           
species+site+species:site 36 0.072422 0.12452 20.632 7.3273 0.001


Understanding that any two nested models can be compared, and that advanced.procD.lm uses RRPP exclusively, one can use the resampling experiment to perform pairwise comparisons for model effects that describe groups.

Pairwise tests: When one or more model effects are factors (categorical), pairwise statistics can be calculated and statistically evaluated with advanced.prcoD.lm.  This is accomplished with the groups operator within the function.  E.g.,

> advanced.procD.lm(fit1, fit4, groups = ~species*site)
$anova.table

ANOVA with RRPP

                          df      SSE      SS      F      Z     P
                          39 0.196940                           
species+site+species:site 36 0.072422 0.12452 20.632 7.4109 0.001

$Means.dist
            Jord:Allo  Jord:Symp Teyah:Allo Teyah:Symp
Jord:Allo  0.00000000 0.09566672 0.02432519  0.1013670
Jord:Symp  0.09566672 0.00000000 0.09193082  0.1069432
Teyah:Allo 0.02432519 0.09193082 0.00000000  0.0994980
Teyah:Symp 0.10136696 0.10694324 0.09949800  0.0000000

$Prob.Means.dist
           Jord:Allo Jord:Symp Teyah:Allo Teyah:Symp
Jord:Allo      1.000     0.001      0.708      0.001
Jord:Symp      0.001     1.000      0.001      0.001
Teyah:Allo     0.708     0.001      1.000      0.001
Teyah:Symp     0.001     0.001      0.001      1.000


In addition to the ANOVA, the pairwise Procrustes distances between all possible means (as defined) were calculated.  The P-values below these indicate the probability of finding a greater distance, by chance, from the resampling experiment.  Because fit1 contains only an intercept, the resampling experiment was a full randomization of shape values.  To account for species and site main effects, this analysis could be repeated with the model that contains the main effects, but no interaction.  E.g.,

> advanced.procD.lm(fit3, fit4, groups = ~species*site)
$anova.table

ANOVA with RRPP

                          df      SSE       SS      F      Z     P
species+site              37 0.103307                            
species+site+species:site 36 0.072422 0.030885 15.352 9.9593 0.001

$Means.dist
            Jord:Allo  Jord:Symp Teyah:Allo Teyah:Symp
Jord:Allo  0.00000000 0.09566672 0.02432519  0.1013670
Jord:Symp  0.09566672 0.00000000 0.09193082  0.1069432
Teyah:Allo 0.02432519 0.09193082 0.00000000  0.0994980
Teyah:Symp 0.10136696 0.10694324 0.09949800  0.0000000

$Prob.Means.dist
           Jord:Allo Jord:Symp Teyah:Allo Teyah:Symp
Jord:Allo      1.000     0.014      0.999      0.589
Jord:Symp      0.014     1.000      0.597      0.001
Teyah:Allo     0.999     0.597      1.000      0.001
Teyah:Symp     0.589     0.001      0.001      1.000


This has a profound effect.  Many of the previous significant pairwise differences in means are now not significant, after accounting for general species and site effects.  One should always be careful when interpreting results to understand the null hypothesis.  The former test assumes a null hypothesis of no differences among means; the latter test assumes a null hypothesis of no difference among means, given species and site effects.  These are two different things!

When using advanced.procD.lm, one can add covariates or other factors that might be extraneous sources of variation.  For example, if we wanted to repeat the last test but also account for body size, the following could be done.  (Also notice via this example, that making model fits beforehand is not necessary.)

> advanced.procD.lm(Y ~ log(CS) + species + site, ~ log(CS) + species*site, groups = ~species*site)
$anova.table

ANOVA with RRPP

                                  df      SSE       SS      F      Z     P
log(CS)+species+site              36 0.098490                            
log(CS)+species+site+species:site 35 0.068671 0.029819 15.198 9.6757 0.001

$Means.dist
            Jord:Allo  Jord:Symp Teyah:Allo Teyah:Symp
Jord:Allo  0.00000000 0.09566672 0.02432519  0.1013670
Jord:Symp  0.09566672 0.00000000 0.09193082  0.1069432
Teyah:Allo 0.02432519 0.09193082 0.00000000  0.0994980
Teyah:Symp 0.10136696 0.10694324 0.09949800  0.0000000

$Prob.Means.dist
           Jord:Allo Jord:Symp Teyah:Allo Teyah:Symp
Jord:Allo      1.000     0.013      1.000      0.591
Jord:Symp      0.013     1.000      0.584      0.001
Teyah:Allo     1.000     0.584      1.000      0.001
Teyah:Symp     0.591     0.001      0.001      1.000


The ANOVA and pairwise stats change a bit (but means do not), as log(CS) accounts for variation in shape in both models.  Also note that "~" is needed in all operator parts that are formulaic.  This is essential for proper functioning.  (Technical note:  this test is not quite appropriate, as the means are not appropriate.  This will be explained below, after further discussion about slopes.)

One can also compare slopes for a covariate among groups (or account for slopes.  This involves comparing a model with a common slope to one allowing different slopes (factor-slope interactions).  E.g.,

> advanced.procD.lm(Y ~ log(CS) + species*site, ~ log(CS)*species*site, groups = ~species*site, slope = ~log(CS))
$anova.table

ANOVA with RRPP

                                                                                    df      SSE        SS      F      Z     P
log(CS)+species+site+species:site                                                   35 0.068671                             
log(CS)+species+site+log(CS):species+log(CS):site+species:site+log(CS):species:site 32 0.061718 0.0069531 1.2017 1.2817 0.099

$LS.Means.dist
            Jord:Allo  Jord:Symp Teyah:Allo Teyah:Symp
Jord:Allo  0.00000000 0.09396152 0.02473040 0.10148562
Jord:Symp  0.09396152 0.00000000 0.08999162 0.10547891
Teyah:Allo 0.02473040 0.08999162 0.00000000 0.09949284
Teyah:Symp 0.10148562 0.10547891 0.09949284 0.00000000

$Prob.Means.dist
           Jord:Allo Jord:Symp Teyah:Allo Teyah:Symp
Jord:Allo      1.000     0.605      0.871      0.639
Jord:Symp      0.605     1.000      0.629      0.629
Teyah:Allo     0.871     0.629      1.000      0.638
Teyah:Symp     0.639     0.629      0.638      1.000

$Slopes.dist
           Jord:Allo Jord:Symp Teyah:Allo Teyah:Symp
Jord:Allo  0.0000000 0.2188238  0.1780151  0.1231082
Jord:Symp  0.2188238 0.0000000  0.2718850  0.2354029
Teyah:Allo 0.1780151 0.2718850  0.0000000  0.1390140
Teyah:Symp 0.1231082 0.2354029  0.1390140  0.0000000

$Prob.Slopes.dist
           Jord:Allo Jord:Symp Teyah:Allo Teyah:Symp
Jord:Allo      1.000     0.374      0.091      0.165
Jord:Symp      0.374     1.000      0.134      0.174
Teyah:Allo     0.091     0.134      1.000      0.259
Teyah:Symp     0.165     0.174      0.259      1.000

$Slopes.correlation
              Jord:Allo   Jord:Symp   Teyah:Allo Teyah:Symp
Jord:Allo   1.000000000  0.01344439 -0.006345334  0.1577696
Jord:Symp   0.013444387  1.00000000 -0.288490065 -0.3441474
Teyah:Allo -0.006345334 -0.28849007  1.000000000  0.3397718
Teyah:Symp  0.157769562 -0.34414737  0.339771753  1.0000000

$Prob.Slopes.cor
           Jord:Allo Jord:Symp Teyah:Allo Teyah:Symp
Jord:Allo      1.000     0.257      0.108      0.090
Jord:Symp      0.257     1.000      0.058      0.007
Teyah:Allo     0.108     0.058      1.000      0.424
Teyah:Symp     0.090     0.007      0.424      1.000


A couple of things.  First, instead of means there is a comparison of least-squares (LS) means.  These are predicted values at the average value of the covariate (slope variable).  These can be different than means, as groups can be comprised of different ranges of covariates.  The slope distance is the difference in amount of shape change (as a Procrustes distance) per unit of covariate change.  The slope correlation is the vector correlation of slope vectors.  This indicates if vectors point in different directions in the tangent space (or other data space).  Note that these pairwise stats should not be considered in this case, as the ANOVA reveals a non significant difference between models.

Returning to the incorrect pairwise test between LS means, the correct method is as follows.

> advanced.procD.lm(Y ~ log(CS) + species + site, ~ log(CS)+ species*site, groups = ~species*site, slope = ~log(CS))
$anova.table

ANOVA with RRPP

                                  df      SSE       SS      F      Z     P
log(CS)+species+site              36 0.098490                            
log(CS)+species+site+species:site 35 0.068671 0.029819 15.198 9.6675 0.001

$LS.Means.dist
            Jord:Allo  Jord:Symp Teyah:Allo Teyah:Symp
Jord:Allo  0.00000000 0.09396152 0.02473040 0.10148562
Jord:Symp  0.09396152 0.00000000 0.08999162 0.10547891
Teyah:Allo 0.02473040 0.08999162 0.00000000 0.09949284
Teyah:Symp 0.10148562 0.10547891 0.09949284 0.00000000

$Prob.Means.dist
           Jord:Allo Jord:Symp Teyah:Allo Teyah:Symp
Jord:Allo       1.00     0.020      1.000      0.580
Jord:Symp       0.02     1.000      0.578      0.001
Teyah:Allo      1.00     0.578      1.000      0.002
Teyah:Symp      0.58     0.001      0.002      1.000

$Slopes.dist
           Jord:Allo Jord:Symp Teyah:Allo Teyah:Symp
Jord:Allo  0.0000000 0.2188238  0.1780151  0.1231082
Jord:Symp  0.2188238 0.0000000  0.2718850  0.2354029
Teyah:Allo 0.1780151 0.2718850  0.0000000  0.1390140
Teyah:Symp 0.1231082 0.2354029  0.1390140  0.0000000

$Prob.Slopes.dist
           Jord:Allo Jord:Symp Teyah:Allo Teyah:Symp
Jord:Allo      1.000     0.675      0.340      0.425
Jord:Symp      0.675     1.000      0.418      0.486
Teyah:Allo     0.340     0.418      1.000      0.511
Teyah:Symp     0.425     0.486      0.511      1.000

$Slopes.correlation
              Jord:Allo   Jord:Symp   Teyah:Allo Teyah:Symp
Jord:Allo   1.000000000  0.01344439 -0.006345334  0.1577696
Jord:Symp   0.013444387  1.00000000 -0.288490065 -0.3441474
Teyah:Allo -0.006345334 -0.28849007  1.000000000  0.3397718
Teyah:Symp  0.157769562 -0.34414737  0.339771753  1.0000000

$Prob.Slopes.cor
           Jord:Allo Jord:Symp Teyah:Allo Teyah:Symp
Jord:Allo      1.000     0.317      0.204      0.193
Jord:Symp      0.317     1.000      0.116      0.045
Teyah:Allo     0.204     0.116      1.000      0.447
Teyah:Symp     0.193     0.045      0.447      1.000


In this case, the LS means comparison is meaningful and the rest can be ignored.  (Sorry, it is too daunting to make a program that anticipates every intention of the user.  Sometimes excessive output is required and it is reliant upon the user to know what he is doing and which output to interpret.)   Likewise, if a significant slope-interaction was observed (i.e., heterogeneity of slopes), then it would be silly to compare LS. means.  It is imperative that the user understand the models that are used and which output to interpret.  Here is a little guide.

1. If there is a covariate involved, compare two models: covariate + groups and covariate*groups.  If the ANOVA returns a significant result, re-perform and assign groups = ~groups and slope = ~covariate.  Focus on the slope distance and slope correlations (or angles, if one of the angle options is chosen).  If ANOVA does not return a significant result, go to 2.

2. If there is a covariate involved, compare two models: covariate  and covariate + groups.  If the ANOVA returns a significant result, re-perform and assign groups = ~groups and slope = ~covariate.  Focus on the LS means  If ANOVA does not return a significant result, groups are not different.

3. If groups represent a factorial interaction (e.g., species*site), one should also consider main effects in the reduced model.  If not, then an intercept can comprise the reduced model.

Ultimately, the advanced.procD.lm function has the capacity to compare a multitude of different reduced and full models and perform specialized pairwise tests.  For example, one could do this:

advanced.procD.lm(Y ~ log(CS) + site, ~ log(CS)*site*species, groups = ~ species, slope = log(CS), angle.type = "rad")

Doing this would require a lucid reason to think the residuals of the reduced model are the appropriate exchangeable units under a null hypothesis and that comparing species only, despite an interaction with site, is an appropriate thing to do.  Although advanced.procD.lm can handle it, it is the user's responsibility to validate the output as legitimate.

We hope that this tutorial and the Q & A that will result will be more edifying than the previous pairwiseD.test and pairwise.slope.test, which although more straightforward at first, were less flexible.  With a little patience and practice, this function will become clear.

More analytical details found here.

To leave a comment for the author, please follow the link and comment on his blog: geomorph.

R-bloggers.com offers daily e-mail updates about R news and tutorials on topics such as: visualization (ggplot2, Boxplots, maps, animation), programming (RStudio, Sweave, LaTeX, SQL, Eclipse, git, hadoop, Web Scraping) statistics (regression, PCA, time series, trading) and more...
Viewing all 174 articles
Browse latest View live